The GuitArchitect’s Guide To Modes – Part 13 Not-peggios

Hello everyone!

It’s been a while since I’ve posted anything mode related. So I thought I’d make up for some lost time by posting this lesson.

Not-peggios?

Those of you who have been following the licks in this blog for a while have probably figured out that one of my favorite melodic approaches is to work in the area between scales and arpeggios.

For those of you who remember all the way back to part 11 of this series – this idea works on the same approach but with triads.

Step 1: Extracting the Not-peggio

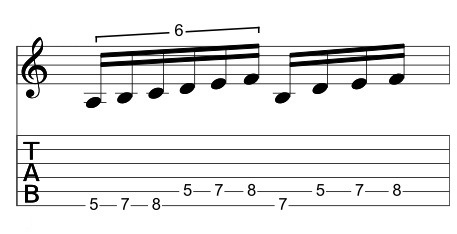
This idea uses the same 3-note-per-string / two string idea that’s behind all the visualization process here.  But to review:  Let’s start with a B Locrian scale pattern on the E and A strings:


C Ionian
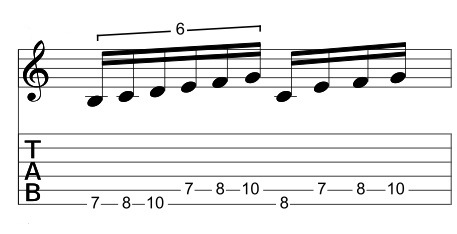
From there:  I’m going to remove the 1st and 3rd notes of the pattern:


Not Peggio Extraction

Leaving a C major major triad with an added 4th which is something that intervallically lies somewhere between an arpeggio and a scale.  Technically it’s a close voiced arpeggio but the “not-peggio” tag has worked better for me when I explain to people so I’ll use it here as well.

Call it scrapple, grapple or anything else that will help you remember it – the naming convention is much less important than getting it under your fingers and in your ears so you can play it.

The good news is that applying this approach to a Major scale only produces four unique qualities of these melodic devices which I’ll talk about below.

One brief technical note:  I recommend either one of following picking patterns for any of the 4-note shapes presented here:

Picking Examples

If you’re used to alternate picking, that will work as well but I find that the semi-swept approach of the first example gives me a more uniform sound for legato playing.  It’s counter-intuitive but check the A minor straight ascending mp3 below to see what I mean.

Major add 4

Major Add 4 shapes

This shape doesn’t really work that well over major chords because the 4th (aka 11) is an avoid tone over a major chord.

However they do work well over minor chords. Try playing the C Ionian shape over an A Minor but for the most part, I find the major add # 4 shape to be one I use much more often.
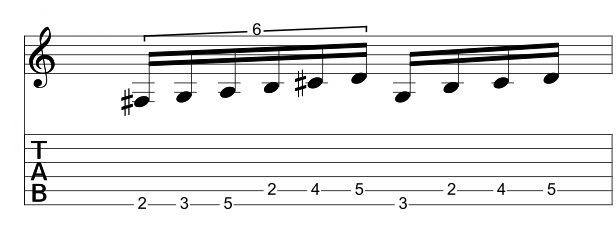
Major add #4

Major add # 4 shapes

.

I’ve talked about this before – but a kind of cool applied theory trick is that Lydian and Dorian are relative major/minor substitutions.  By that I mean that while C major is the relative major key of A natural minor related chords scales C Lydian and A Dorian both come from the same parent major scale (in this case G Major).  So licks generated from this source will do double duty over both major and minor chords.  A two-fer if you will (or won’t – I understand either way).

Let’s apply this idea to G Dorian.

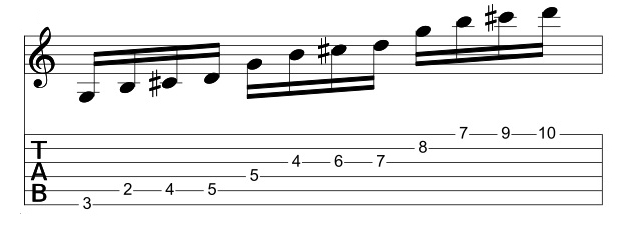
Here’s the 4-note shape taken from F# Phrygian:

G add # 4 extraction

And here it is an a 3 octave form:

G add # 4 3 octave pattern

.

Here’s a more sequences lick type of approach:

G Lydian 3 Octave run

Here’s the audio – with a short descend of the patten ending on the G on the 8th fret of b string.

You can try this approach over E minor for an E Dorian type sound as well.

 Minor add 4

Minor add 4 shapes

Okay a couple of quick tips here.  Since you don’t get the natural 6 of Dorian or the b2 of Phrygian in these shapes – they’re not really going to give you much of the flavor of those modes.

In this case, I’ll use the A Aeolian shape over A minor and F Major chords.

A Minor:


A Aeolian part 1

In this audio example I play the 3 octave form and then play the multi-octvave sequenced idea.

A Aeolian over F lick

Used over F Major:

Now I’ll take the same sequenced idea and apply it over an F major lick.  Here’s an audio example.  I slid up to the G on the 15th fret of the high E string and then descended with some tremolo bar scoops along the way.

Normally, applying an A Aeolian idea over F major would give it a Lydian sound – but the lack of the B (#4) in the pattern makes it a little more open sounding to me.

Finally – here’s the Diminished form.

Diminished add 4

Diminished add 4 shapes

Looking at the notes here (B, D, F, E) – I see the upper notes of a G7 (add 13) chord: G [Root] – B [3rd] – D [5th] – F [b7] – E [13].  So this pattern is one I use in Dominant 7th situations.

Here’s the basic pattern:

B Locrian Multi Octave

And here’s the application over a G7 chord.  It uses the same pattern sequencing idea as the other examples ascending but bends into a couple of notes including the 3rd on the B string for the final note.

Next time?  Some Melodic and Harmonic Minor shapes to get under your fingers.

As always, I hope this helps!

-SC

PS – if you like the ideas in this approach – the following books will help you expand on this idea exponentially!

The GuitArchitect’s Guide To Chord Scales

The GuitArchitect’s Guide To Modes: Melodic Patterns

The GuitArchitect’s Guide To Modes: Harmonic Combinatorics

GuitArchitect’s Guide To Modes Part 11 – Geting Into Modal Arpeggios – 7th chords

Hello everyone!!

In the previous modal arpeggio lesson, I covered how to visualize triads from 3-note per string patterns.  In this post, I’m going to apply the same concept to 7th chords.  If you haven’t checked out part 10 of the series, you may want to review the approach before moving on.

.

Major Scale Harmonization

.

Any major scale is made up of the following triads and 7th chords based on scale degree.

.

.

Related to the key of C major, this breaks down into:

.

  • Triads: C major, D minor, E minor, F major, G major, A minor and B diminished.
  • 7th chords: C major 7, D minor 7, E minor 7, F major 7, G7, A minor 7 and B minor 7b5

.

This means that there are 4 unique qualities of 7th chords for a major scale:

  • major 7 (C major 7 and F major 7 in the key of C)
  • minor 7 (D minor 7, E minor 7 and A minor 7 in the key of C)
  • dominant 7 (or 7) (G7  in the key of C)
  • minor 7 b5 (B min7b5  in the key of C)

.

Played as 2-string fingerings there are 4 possible inversions of each arpeggio.

.

.

.

.

.

To see how these shapes relate to the modes, let’s look at an ascending C major scale on the B and E strings:

.

.

Previously, we extracted every other note to reveal the triads related to each 6-note shape.

.

.

This time, we’ll remove the 3rd and the 5th note from each shape.  This will create a 7th chord arpeggio in the 3rd inversion (i.e. starting from the 7th).

.

.

Here it is written as 16th notes:

.

Chord sequence Dm7-Em7-Fmaj7-G7-Am7-Bm7b5-Cmaj7

.

While the approach I’ll demonstrate will work with any inversion, all the examples here will utilize the 3rd inversion.

.

The first important visualization with each form is that the 2nd note of each arpeggio in this lesson is acting as the root.

.

Step one: Using the patterns diagonally

.

As I mentioned in the previous arpeggio post, a distinct advantage of 2-string patterns is that you can move them in octaves and maintain the same fingering.  Here’s a C major 7 arpeggio moved in octaves on the middle and top set of strings.

.

.

Michael Angelo Batio was the first rock guy I saw playing this type of pattern in a shred context but now the sound of it is pretty common rock/metal vocabulary.  This idea will get covered more in part 12 of this series, but to make it sound a little cooler, instead of playing it over a C major chord  – try playing the above arpeggio over an A minor chord:

.

  • when C major 7 (C, E, G, B) is played over A the notes act as (b3rd, 5th, b7th and 9th) or A minor 9 (no root)

.

Step 2: Putting it together positionally

 .

At the top of the page, I showed how I extracted arpeggios by eliminating the 3rd and 5th note from an ascending 3-note per string pattern.  This same process can also be applied positionally.  For example, here’s a 3-note per string C major scale played  in 8th position.

.

.

Now I’ll apply each of these arpeggio shapes to the C major scale starting with the root position. Notice that the 6-string shape links together a D minor 7, C Major 7, and a B minor 7b5 into one big arpeggio. 

.

.

To visualize the arpeggios across 6 strings just remember: 

 as the pitches ascend, the related arpeggios descend (and vice versa)!

.

Also remember that the 2nd note of the arpreggio acts as the root, so if you want the C major 7 arpeggio on the low E string

.

.

you’ll extract it from B Locrian.

.

.

The pattern creates a different flavor of modal arpeggio than the triadic version in part 10 of the guide.  Where the triadic version moves in diatonic thirds, this pattern keeps a diatonic 2nd between each 7th chord arpeggio. Here are all of the positional arpeggios of  the C major scale derived this way:

.


Big Picture Alert!!

 .

Since all of the notes of the C major scale are presented in the linked arpeggios, you could technically play this over any diatonic 7th chord in C major if you resolved it properly.  As a recap of the modal microscope lesson, I tend to view things from a parent scale perspective so:

.

  • If you play any of these patterns over a C major 7 chord – you’ll imply a C Ionian sound
  • If you play any of these patterns over a D minor 7 chord – you’ll imply a D Dorian sound
  • If you play any of these patterns over an E minor 7 chord – you’ll imply an E Phrygian sound
  • If you play any of these patterns over a F major 7 chord – you’ll imply a F  Lydian  sound
  • If you play any of these patterns over a G7 chord – you’ll imply a G  Mixolydian  sound
  • If you play any of these patterns over an A minor 7 chord – you’ll imply an A Aeolian sound and
  • If you play any of these patterns over a B minor 7b5  chord – you’ll imply a B Locrian sound

.

Now I’ll apply each of these arpeggio shapes to the C major scale.  Feel free to try these over any of the chords listed above (although you may want to read the note about “The Problem with Ionian” below if you’re playing any of them over C major 7).  I’m partial to playing them over D minor 7 or D minor 9 depending on which note I’m starting or ending on.

.

.

.

.

.

.

.

.

The “trouble” with Ionian

.

The “problem” with the Ionian mode in general is that the natural 4th is an avoid tone over major 7th chords with the same root.  (i.e. C Ionian played over C maj7).  For this reason, I generally avoid Ionian as a mode and instead focus on the major scale for visualization purposes.   If I were to use this approach over a C major 7 chord,  I would probably be more likely to go with a Parent Major scale of G major for a C Lydian sound (i.e. change the “F” in each pattern to “F#”). 

.

.

Step 3 – Adaptation

.

While I dig these arpeggios as is – I tend to use them as visualization tools.

.

You may notice that these arpeggios are all 2-note per string.

Just like a “box” position pentatonic scale….

“Hey”, you might be thinking, “what if you adapted all of those pentatonic variations and sequences that you worked out to these arpeggios?”

Good Idea!!!

.

 As a starting point, I’m partial to playing this form over D minor as it already has some of the step-wise shapes I associate with pentatonics:
.
.
so I’ll use it for the examples below.  In the first one, I’m applying a descending group of threes to a pattern. (This also works ascending as well).
.

A big thing I work on with pentatonics is string skipping.  Here, I’ve adapted an idea to the linked arpeggios.

.

.

Here’s a cool variation on this lick – replace the 8th fret “G” on the B string with an “A” to match the major 3rd interval on the G string.  Once you can visualize a lick making variations like this is relatively easy (and it sounds cool!!)

.

From there it’s easy to mix and match things,  Now that you see the pattern it comes from, the lick below just removes the F to create a different arpeggio shape.  It starts off as C major 9 but links into a D minor shape to create a D minor 13 sound followed by some string skipping.  Grab your guitar and give it a whirl!

.

.

The key with any approach like this is to keep it simple.  Mind you, some of these ideas might not sound simple, but the approach really comes from mastering the 2-string visualization idea, and then usurping it in cool ways!  Try coming up with your own variations!  

.

Extra Credit!!

.

Like I said before, while I’m sure that they’re out there, I don’t know any other guitarist who approaches fingering modal apreggios with the interlocking 7th chords,  but if these shapes are already familiar to you or if you’re looking to expand outside of this tonality, I have a few small tweaks that have BIG implications.

.

  • Lowering the E –> Eb in any of the C major patterns above will give you all of the Melodic Minor 7th chord linked arpeggios.
  • Lowering the E–> Eb and lowering the A –> Ab in any of the C major patterns above will give you all of the Harmonic Minor 7th chord linked arpeggios.

.

In other words, “Thar’s gold in them thar’ hills!!”  If you put some time into working with these ideas methodically, I’m sure you’ll get some unique approaches under your belt that’ll pay dividends (even if they don’t get you a tab at the general store).

.

Part 12 gets into superimposition.  It’ll be short, sweet and really cool!

.

I hope this helps!

.

-SC

.

 .

GuitArchitect’s Guide to Modes Part 10 – Getting into Modal Arpeggios – Triads

Hello everyone!!

I’ll be delving into individual modes in more depth in the coming weeks and months ahead but as a preliminary step, I wanted to get into modal arpeggios a bit as they’ll be important components in future lessons.

.

Scales = Chords

.

Since chords and scales are made up of the building blocks (notes), they are essentially 2 sides of the same coin.

For example, let’s look at an ascending C major scale on the B and E strings:

.

If we remove every other note of the first for notes we can see arpeggiated versions of the triads associated with those modes.

While 2-string arpeggios are often neglected by guitarists, they are certainly worth investigating for helping with visualization.

.

2-String Triadic Visualization

.

The major scale is made up of three types of triads:  major, minor and diminished. Played as unique notes, any triad has three typical voicings:

  • Root position with the root as the bass note: (i.e. Root, 3rd, 5th)
  • 1st inversion with the 3rd as the bass note: (i.e. 3rd, 5th, Root)
  • 2nd inversion with the 5th as the bass note: (i.e. 5th, Root, 3rd)

.

Here are some sample fingerings of each of the chord types played as 2-string arpeggios in each inversion:

.

.

.

.

.

.

.

2-string Major Scale Triads

.

Now I’ll apply each of these arpeggio shapes to the C major scale starting with the root position.

As a reminder here are the triads of the C major scale.

.

 .

Since the fingerings are on 2-strings, they’ll be the same on the E/A, D/G and B/e strings.

.

.

Here are the arpeggios in 1st inversion.  Again, since the fingerings are on 2-strings, they’ll be the same on the E/A and B/e strings as well.

.

C major scale triads in 1st inversion ascending by scale degree

.

And finally, here are the arpeggios in 2nd inversion.

.

.

Putting it together positionally

 .

At the top of the page, I showed how I extracted arpeggios from ascending 2 string patterns.  This same process can be applied positionally.  For example, here’s a 3-note per string C major scale played  in 8th position.

.

.

Now I’ll apply each of these arpeggio shapes to the C major scale starting with the root position. To create a modal arpeggio, simply remove every other note.  Doing so with this scale creates a C Ionian modal arpeggio.

.

.

Modal arpeggios are sonically cool because they convey the full sound of the mode but break it out of a scalar pattern.

Modal arpeggios are cool in this method, because if you can visualize a scale then making the arpeggio is relatively easy.

.

The trouble with Ionian

..

The “problem” with the Ionian mode in general is that the natural 4th is an avoid tone over major 7th chords with the same root.  (i.e. C Ionian played over C maj7).  For this reason, I generally avoid Ionian as a mode and instead focus on the major scale for visualization purposes.  

.

With that in mind, here ‘s another approach for using this arpeggio.

.

I really dig playing this particular arpeggio over D minor – to create a D Dorian type of sound. In the example below, I’ve used the C and the E pitches on the low E string to encircle the D (one note above and one below) to help emphasize the D minor 13 sound of the arpeggio and end it on the 9th.

.

.

The final visualization trick

.

If we look at the positional arpeggio again:

.

.

Take a close look at the positional modal arpeggio!  If you look at it as a group of 3-note shapes you’ll see that it’s actually made of of 3 triadic arpeggios: C Major, B diminished and A minor.  

.

C Ionian = C maj + B dim + A min

.

Going back to the 2-string scalar observation in part 3 of this post, as the pitches ascend, the related arpeggios descend.  This is true of any of the modal arpeggios – so it might be a cool way for you to visualize it! Try it with your own arpeggio forms!

 .

In the next post, I’ll go through 7th chord arpeggios.  In the meantime, try practicing the 2-string arpeggios over all of the chords of the C major scale:

  • C maj 7
  • D min 7
  • E min 7
  • F maj 7
  • G7
  • A min 7
  • B min7 b5

.

and then over whatever other tonal centers inspire youI hope this helps!  As always, thanks for reading!

.

-SC

.

PS  – if you like this post, you may also like:

.

Books:

.

Lessons

The Modal Microscope And A Sequenced Arpeggio Approach

Hello everyone!

.

I’ve been cleaning up a lot of the text for the GuitArchitecture book releases and wanted to post a lesson that uses some ideas and approaches from my Melodic Patterns book (available here).  But first, I need to talk about…

.

The Modal Microscope

.

When I explain using modes to students – I typically use the analogy of a microscope to discuss viewing modes conceptually on multiple levels.

.

Let’s say I want to solo over a D min7 chord.  So I’ll put that “under the microscope”.

.

On the 2x setting, I see that a number of minor modes will work over D min7.  In this case,  I’ll choose Dorian.

.

Going to the 4x setting on the microscope, I see that Dorian is made up of a series of interlocking 2-string patterns.

.

Note: 

If you’re unfamiliar with the 2-string approach I’m discussing I definitely recommend that you check out part 2, part 3a or part 3b of my guide to modes posts.

.

If I go to the 8x setting, I can break the 2-string patterns down into 1 string shapes and going to a higher resolution (16x) I can see those shapes as individual notes.  At the 16x setting – maybe I’m looking at the individual notes of D min7 (D, F, A and C) and thinking about accenting those notes in my playing.

.

If I now go out to the 1x setting – I see that D Dorian is just a subset of C major.  The thing is if you go playing a bunch of C major scales over D dorian and don’t resolve anything (or focus on the chord tones) – you’re missing a big piece of the puzzle.

.

It’s good to understand modes on multiple levels but if you see how all of the related modes interlock with each other, then (using the microscope analogy), you can deal with using modes with chords on the 1x or 2x level but use information from the higher levels in your playing.

.

Putting this to use:

.

I’ve posted a number of technical things here and decided to use a much lower gain approach than normal and slow things down a bit.  The same practice points as before (Tone, Tension and Timing) apply – but this exercise is all about how to find variations in small things.  (If you like the technical things don’t worry I’ve included some deceptively tricky variations as well!)

.

Let’s take a 2-string G Major shape.

.

.

.

The nice things about 2-string patterns like this is that the fingering repeats at each octave.  (So you only need to remember one fingering for a multi octave run).

.

.

.

One process I explore in my Melodic Patterns book is systematically breaking down patterns to get new sounds out of them.  In this case, I’m going to remove the 2nd and 4th note from the pattern which leaves me with this shape:

.

.

.

Looking closely at the notes reveals that I have a G, B, C and E which is a C maj7 arpeggio. By limiting it to a  2-string shape,  I can move it in octaves and the fingering stays the same.

.

Note:

The drums are the same pattern I’ve used on my other posts, so you can play against it for any other the things I post here (more info below).

.

.

.(I’ve added a C maj7 chord in front of this to give a sense of tonality.)

.

.

Going to a higher resolution

.

I know that G parent major also contains A Dorian – which works well over A minor chords.  So playing this shape over A minor the notes – now become: b7 (G), 9 (B), b3 (C) and 5th (E).  Which has a cool sound associated with it.  (I’ve subbed out A min7 for C maj 7 here for the opening chord).

.

.

.

Sequencing the ideas:

.

However cool any scale or arpeggio is, playing it in a linear up and down manner will only get you so far.  By playing groups of notes in short sequences, the arpeggio gains a little melodic drive.

.

In this first variation I’ll play groups of 3 (So I’m playing 3 ascending notes from each note of the arpeggio).  One way to immediately make this more interesting is to break the 3 note grouping out of the triplet rhythm.  Playing the same pattern in 16ths – displaces the first note of each pattern across different beats.

.

.

.

Here’s the same idea descending: (This is another case where the microscope idea comes into play.  The A note ending the phrase isn’t part of the 4 note arpeggio – but gives the descending line a sense of resolution.  Since I’m seeing and hearing the phrase as an A minor tonality – I’m resolving it to the tonic (A),  third (C) or 5th (E).

.

.

.

For a little variety –  I’ve taken the same idea but played it as sextuplets instead.  I’ve notated the first bar of it (as the notes are the same as the patterns above) – but I play it ascending and descending on the mp3 below.

.

.

.

5 alive

.

To get a little more mileage out of this arpeggio, I’m going to play the notes in groups of 5.  Here it is in a 1/16 note rhythm (I’ve left off the last 2 notes to keep it on one line).

.

.

.

Technical note:

Watch the position skip on the A/D and the B/ G strings!!

Here it is as septuplets (5 notes to the beat).

.

.

.

Changing the note order

.

You may have noticed that all of these arpeggios use a linear note order in the sequence.  So if G is the first note of the 1st pattern and B is the 2nd note – every pattern moves in straight ascending or descending order.

.

3 Note Pattern: G, B, C/B, C, E/C, E, G

in note order = 1,2, 3/2, 3, 4/ 3, 4, 1 etc.

.

But what if we varied up the note order?  In this example, I’m going to take play groups of 3 descending notes on each ascending note of the arpeggio. (So instead of playing note numbers 1,2 3  – I’m playing 3-2-1).

.

.

.

Here it is descending:

.

.

.

Displacing the rhythm by a 1/16 makes it cooler.

.

.

.

And again, descending:

.

.

Obligatory Plug

.

I’m only scratching the surface of what’s possible here.  The big takeway here is – if you really go deep on even something small – you can probably find interesting things that will work in your playing.

.

I would also be remiss in not mentioning that my melodic patterns book shows every possible unique combination of notes (and rests) in 1 – 6 note shapes and then shows how to combine them into longer sequences (up to 9 note patterns).  It is a deep resource that can open all manner of melodic and compositional doors (and makes a great gift as well!) ; )

.

Tones

.

I went with another tonal variation here and tried some of the lower gain settings on the Scuffham amp AU.  It’s a cool product and I should have a review up soon.  In the meantime – he’s a screenshot of the laptop set up I used to track this:

Click to see full size

.

I‘ve mentioned this in the laptop guitar posts – but the varispeed is a useful plug-in!  When I get bored with a metronome sound – I’ll throw a drum loop into the AU fileplayer and then use the varispeed to control the speed of the loop.

.

As always, I hope this helps!

.

-SC

.

If you like this post, you may also like:

.

Books:

LESSONS

.

Slash and Burn – Creating More Complex Sounds With Slash Chords

The GuitArchitect’s Guide to Modes Part 8 – Major Positional Modal Interchange and Complimenting Modes with Chords

THE GUITARCHITECT’S GUIDE TO MODES PART 7 – MINOR POSITIONAL MODAL INTERCHANGE AND COMPLIMENTING MODES WITH CHORDS

.

THE GUITARCHITECT’S GUIDE TO MODES PART 6 – THE CIRCLE OF 5THS AND MODAL INTERCHANGE

THE GUITARCHITECT’S GUIDE TO MODES PART 5 – MAKING THE MOST OF ONE PATTERN

The GuitArchitect’s Guide To Modes Part 4 – Modes and Chords

.

THE GUITARCHITECT’S GUIDE TO MODES PART 3B – SEEING THE SIX-STRING MAJOR SCALE

THE GUITARCHITECT’S GUIDE TO MODES PART 3A – SEEING THE SIX-STRING MAJOR SCALE

THE GUITARCHITECT’S GUIDE TO MODES PART 2 – SEEING THE TWO STRING MAJOR SCALE

.

The GuitArchitecture Guide To Modes Part 1 – Seeing The Single String Major Scale

Making Music Out Of Scales

.

Chords/Triads/Superimposition/Arpeggios:

GETTING HIPNESS FROM A MAJOR TRIAD OR MORE CHORD RECYCLING PART 3

Getting Hipness From A Major Triad Or More Chord Recycling Part 2

GETTING HIPNESS FROM A MAJOR TRIAD OR MORE CHORD RECYCLING PART 1

.

Getting Through The Gig – Negotiating A Chord Chart Part 3

Getting Through The Gig – Negotiating A Chord Chart Part 2

GETTING THROUGH THE GIG – NEGOTIATING A CHORD CHART PART 1

.

RECYCLING CHORDS PART II: TRIAD TRANSFORMATION

RECYCLING CHORDS PART I OR WHERE’S THE ROOT?

.

FAVORED CURRY OR SPICING UP CHORD SCALES AND TRIADS PART 2

FAVORED CURRY OR SPICING UP CHORD SCALES AND TRIADS PART 1

.

RECYCLING SHAPES OR MODULAR ARPEGGIOS FOR FUN AND PROFIT

GLASS NOODLES – ADAPTING A PHILIP GLASS ARPEGGIO APPROACH TO GUITAR

.

Practicing:

MELVILLE, MADNESS AND PRACTICING – OR FINDING THE DEEPER LESSON PART 2

Some Useful Online Practice Tools

POSSESSION IS 9/10S OF THE LAW BUT PERCEPTION IS EVERYTHING OR PRACTICING PART VII

TESTING YOUR VOCABULARY OR PRACTICING PART VI

PRACTICE WHAT YOU PLAY OR PRACTICING PART V

.

DEFINITIONS AND DOCUMENTS OR PRACTICING PART IV

TENSION AND THE SODA CAN OR PRACTICING PART III

PROPER POSTURE IS REQUIRED FOR PROPER PERFORMANCE – PRACTICING PART II

PRACTICE MAKES BETTER AKA PRACTICING PART I

.

Slash and Burn – Creating More Complex Sounds With Slash Chords

Hello all,

.

I wanted to take a break from the excerpts from the modes book I’ve been posting and post a lesson that’s based on material from my new Harmonic Combinatorics Book.  In that book, I have an entire section about using triads and 7th chords to create more complex sounds.

.

Here’s the two sentence synopsis:

  • Playing a minor chord (or arpeggio) a 1/2 step below a major triad implies a Lydian sound by giving you upper chord tensions (7, 9, #11) of that major chord. (i.e. B minor/C).
  • Playing a minor chord (or arpeggio) a step above a minor triad implies a Dorian sound by giving you the upper chord tensions (9, 11, 13) of the minor chord. (i.e. playing B minor over A minor).

.

Seeing (and making sense of ) the bigger picture:

.

When beginning players see a 3rd position C major chord they see something like this:

.

.

But an experienced player sees something more like this:

.


.

One of the secrets to seeing more of the fretboard is to see chord tones relationally.  I’ll show you how to do that by applying some of the approaches from a previous Triad Transformation lesson:

.

Taking a C major chord:

.

C Major Triad

.

(here’s a reference chord):

.

.

Lowering the root a 1/2 step gives you a major 7 chord:

.

C Major 7

.

C Major 7:

.

.

Lowering the 3rd a 1/2 step gives you a 9th.  Since there’s no other 3rd in the chord – this becomes a slash chord of G Major over C (written G/C).  It has a lot of the sound of a major 9th chord – but because it’s missing the 3rd it really only implies the tonality.

.

G / C

.

G/C:

.

.

If you want this to sound like a Major 9th, we’ll need to add a 3rd in as well.

.

C Major 9

.

C Maj 9

.

.

Lowering the 5th a 1/2 step gives us the #4 (aka the # 11).  Here I’ve kept the 3rd to make it a Major 9 (#11) chord.

.

C Major 9 (#11)

.

C Maj 9 (#11)

.

.

Notice that if we lower the root  a 1/2 step – we have a B minor triad:

.

B Minor

.

So, as a short cut,  playing a B minor over C we imply the sound of a C major  9 (#11) chord without having to memorize a separate voicing.

.

Melodic Application

This extends into lead playing as well.  Rather than just playing a C major arpeggio over a C chord, here I’ve replaced the bottom note of a B minor arpeggio with a C and resolved it to C:

.

B min / C  or C Lydian Lick

.

C Lydian lick (louder than the chord mp3s- FYI):

.

.

Here’s another chord voicing of B minor/C:

.

B minor / C

.

When I see voicings that use the middle notes of the 7th fret,  I generally try to think of ways to incorporate harmonics into it.  In this example, I’ve added harmonics in to fill out a B minor arpeggio with some encircling to resolve it to C. I forgot the fermata on the first chord – but you’ll figure it out when you hear the mp3.

.

B min / C aka C Lydian Lick 2

.

C Lydian Lick 2:

.

.

Now we’ll take this in a different direction:  playing B minor over A minor implies a cool A minor 13 sound.  I’ve added an A to lick #1, and a semi-chromatic run that skips the 3rd and makes it a more open sound.

.

B min / A min – A Dorian Lick

.

B min/A Dorian Lick:

.

.

I’ve resolved the lines to the root notes of the chords I’m playing over – but you may want to stay on a tension depending on the context.

.

With any approach like this – always use your ears as a guide for what sounds good and what doesn’t.

.

The Quiz:

Did you notice anything about the C major voicings?  Using a B minor triad doesn’t take it to the 13th.

.

In any chord tone voicing, raising the 5th a step gives you the 6th (if no 7th is in the chord) or  (in this case) the 13th  So using our initial voicings, the easiest way to bring in the 13th is to raise the G on the high E string to A.

.

B min 7 / C Implying C maj 13 (#11)

.

.

Looking at at a little deeper,

if we fully spell out this chord:

  • C (root)
  • E (3rd)
  • G (5th)
  • B (7th)
  • D (9th)
  • F# (#11) and
  • A (13)

.

the top 3 notes form a D major chord.  As a modified rule for playing over a major chord:

.

  • Playing a minor chord (or arpeggio) a 1/2 step below a major triad implies a Lydian sound by giving you upper chord tensions (7, 9 and #11) of that major chord. (i.e. B minor/C).
  • Playing a major chord (or arpeggio) a step above a major triad also implies a Lydian sound by giving you the upper chord tensions (9, #11 and 13) of the minor chord. (i.e. playing D/C).

.

As with any material here, pay attention to the 3 T’s (Timing, (hand) Tension and Tone) and just go through the lesson at your own pace and return to it as you need to.

.

I hope this helps and as always, thanks for reading!

.

-SC

.

P.S. If you like this post – you may also like:

.

MAKING MUSIC OUT OF SCALES

SOME USEFUL ONLINE PRACTICE TOOLS

.

GETTING HIPNESS FROM A MAJOR TRIAD OR MORE CHORD RECYCLING PART 3

GETTING HIPNESS FROM A MAJOR TRIAD OR MORE CHORD RECYCLING PART 2

GETTING HIPNESS FROM A MAJOR TRIAD OR MORE CHORD RECYCLING PART 1

.

GETTING THROUGH THE GIG – NEGOTIATING A CHORD CHART PART 3

GETTING THROUGH THE GIG – NEGOTIATING A CHORD CHART PART 2

GETTING THROUGH THE GIG – NEGOTIATING A CHORD CHART PART 1

.

RECYCLING CHORDS PART II: TRIAD TRANSFORMATION

RECYCLING CHORDS PART I OR WHERE’S THE ROOT?

.

FAVORED CURRY OR SPICING UP CHORD SCALES AND TRIADS PART 2

FAVORED CURRY OR SPICING UP CHORD SCALES AND TRIADS PART 1

A BRIEF THOUGHT ABOUT MUSIC THEORY

.

The GuitArchitect’s Guide to Modes Part 8 – Major Positional Modal Interchange and Complimenting Modes with Chords

Welcome to the part eight of the GuitArcitecture Mode Visualization lesson series.

If you see anything unfamiliar here, you may want to check out:

.

.

In the last lesson, I took a look at adapting minor chords to modes and modal interchange.  In this lesson – I’m going to apply the same process to major chords.

.

Note:

I’ve outlined this process thoroughly in part 7, so if you have questions – just check the instructions there.

.

One Chord Modal Interchange Exercise – Major

.

 Of the parent major scale modes I’ve been covering – there are 3 that can be used over an A major chord:

.

  • A Lydian (E major):

.

A Lydian – Click to enlarge

.

  • A Ionian (A Major):

.

A Ionian – Click to enlarge

.

  • A Mixolydian (D major):

.

A Mixolydian – Click to enlarge

.

Here’s the major-based chord progression:

.

Repeat each bar 2-4 times ** Click to enlarge**

.

Here are the steps (repeated from Part 7):

  • Record or loop the pattern in time 
  • Playing over the loop practice switching modes each bar.  I’ve outlined the fingerings above (see earlier posts in the series if you want to see how I derived them) with a sample rhythm.  As an initial step – just practice ascending and descending the patterns in a scalar fashion.
  • As the level of familiarity with the modal interchanges increases, try removing the repeats and increasing the tempo (thus increasing the difficulty level).

.

Note:

Make sure you don’t start every bar with the low A root!

The goal of this is to be able to switch between modes “mid-stream”.   As a first step, when playing these ascending and descending make sure that wherever you are in the pattern ascending or descending that you transition into the next mode smoothly.  The initial goal here isn’t speed – it’s fluidity and being in control of switching between modes.

(See the melodic note below for some other tips once you get comfortable with the transition).

.

Now let’s examine each chord (and mode) individually:

.

  • First measure: A Major

..

A Major – Play A Lydian, A Ionian or A Mixolydian – Click to enlarge

.

The modes could be played over this chord are:

.

A Lydian (recommended), A Ionian (be careful of the 4th) and A Mixolydian

.

  • Measure 2: A Major 7

.

Lowering the root to G# creates an A major 7 chord – which works with either A Lydian or A Ionian.

.

A Major 7 – Play A Lydian or A Ionian – Click to enlarge

.

  • Measure 3:  Lowering the G# to G produces an A7 – stick with A Mixolydian for this one.

.

A7 – Play A Mixolydian – Click to enlarge

.

  • Measure 4:  I’m going to start the process of chromatically ascending certain pitches rather than descending.  So I’ll go back to A Major here.

.

  • Measure 5:  Raising the 3rd (C#) a 1/2 step to D produces an Asus4 chord.  The #4 in Lydian will clash with the natural 4th – so go with Ionian or Mixolydian for this one.

.

A sus4 – Play A Ionian or A Mixolydian – Click to enlarge

.

  • Measure 6: Raising the 4th another 1/2 step results in an A major (add #11) – a chord firmly in the domain of A Lydian.

.

A Major (add #11) – Play A Lydian – Click to enlarge

.

The chord progression then goes back to A major where any of the 3 modes could be used.

.

Notes:

.

  • Harmonic – If you’re playing with another musician try taking this one chord vamp idea and using your ear to change the chord when the soloist changes modes.  You can make other chordal alterations as well creating melodic movement in the voicing –  is a great approach to use both in comping on a single chord as well as creating melodic movement between 2 chords (more on that in another lesson).

.

  • Melodic – As the soloist in this approach – try to change modes then the rhythm player changes chords.  As soon as you get comfortable with the shapes – try making melodies and taking them through each modal change.  (See part 5  for an example of that process with one modal shape).

.

The nice thing about playing with human beings (rather than sequences) is that people can introduce random factors into playing.  A person can make all kinds of melodic or harmonic decisions that require the other person to change and adapt.  It develops a dialog and allows people to become more attune to playing with other people (and ultimately more musical).

.

The next lesson will cover a go a little deeper into modal chord progressions and offer some new challenges.  As before, just go through the lesson at your own pace and return to it as you need to.  Also please feel free to post any questions you might have (or pm me at guitar.blueprint@gmail.com).

.

I hope this helps and as always, thanks for reading!

.

-SC

.

P.S. If you like this post – you may also like:

.

THE GUITARCHITECT’S GUIDE TO MODES PART 7 – MINOR POSITIONAL MODAL INTERCHANGE AND COMPLIMENTING MODES WITH CHORDS

THE GUITARCHITECT’S GUIDE TO MODES PART 6 – THE CIRCLE OF 5THS AND MODAL INTERCHANGE

THE GUITARCHITECT’S GUIDE TO MODES PART 5 – MAKING THE MOST OF ONE PATTERN

THE GUITARCHITECT’S GUIDE TO MODES PART 4 – MODES AND CHORDS

.

Making Music Out Of Scales

A BRIEF THOUGHT ABOUT MUSIC THEORY

.

PRACTICE MAKES BETTER AKA PRACTICING PART I

PROPER POSTURE IS REQUIRED FOR PROPER PERFORMANCE – PRACTICING PART II

TENSION AND THE SODA CAN OR PRACTICING PART III

DEFINITIONS AND DOCUMENTS OR PRACTICING PART IV

PRACTICE WHAT YOU PLAY OR PRACTICING PART V

TESTING YOUR VOCABULARY OR PRACTICING PART VI

POSSESSION IS 9/10S OF THE LAW BUT PERCEPTION IS EVERYTHING OR PRACTICING PART VII

SOME USEFUL ONLINE PRACTICE TOOLS

.

GETTING HIPNESS FROM A MAJOR TRIAD OR MORE CHORD RECYCLING PART 3

Getting Hipness From A Major Triad Or More Chord Recycling Part 2

GETTING HIPNESS FROM A MAJOR TRIAD OR MORE CHORD RECYCLING PART 1

.

Getting Through The Gig – Negotiating A Chord Chart Part 3

Getting Through The Gig – Negotiating A Chord Chart Part 2

GETTING THROUGH THE GIG – NEGOTIATING A CHORD CHART PART 1

.

WARMING UP: FINGER EXERCISES, THE 3 T’S AND THE NECESSITY OF MISTAKES

.

The GuitArchitect’s Guide to Modes Part 7 – Minor Positional Modal Interchange and Complimenting Modes with Chords

Welcome to the seventh installment of the GuitArcitecture Mode Visualization lesson series.

If you see anything unfamiliar here, you may want to check out:

.

.

In the last lesson, I took a look at the modes and the circle of 5ths.  In this lesson, I’m going to:

.

  • show how to modify a minor chord to cover minor modal interchanges and
  • show how to switch modal patterns in position

.

Complimenting Modes with Chords

.

A lot of print has been used to describe how modes fit with chords but substantially less has been written about modifying chords to fit various modes. I’ve developed this approach as an introductory way to work on modal interchange it does three things:

  • Limits harmonic content to simplify the modal interchange process
  • show a way to modify chords to work with modes and
  • develops the skill set for changing modes in position.

.

(All useful skills to have – btw).  Since I’ve been dealing with C major – I’m going to look at A minor (the relative minor chord) first.

.

One Chord Modal Interchange Exercise – Minor

.

Before we get into the exercise, let’s make sure we’re clear about the modes we’ll be using.  Of the parent major scale modes I’ve covered – there are 3 that can be used over an A minor chord:

.

  • A Dorian (G major):

.

Click to enlarge

.

  • A Aeolian (C major):

.

Click to enlarge

.

  • A Phrygian (F major):

.

Click to enlarge

.

Here’s the accompaniment pattern:

..

Repeat each bar 2-4 times ** Click to enlarge**

.

Here are the steps:

  • Record or loop the pattern in time 
  • Playing over the loop practice switching modes each bar.  I’ve outlined the fingerings above (see earlier posts in the series if you want to see how I derived them) with a sample rhythm.  As an initial step – just practice ascending and descending the patterns in a scalar fashion.
  • As the level of familiarity with the modal interchanges increases, try removing the repeats and increasing the tempo (thus increasing the difficulty level).

.

Note:

Make sure you don’t start every bar with the low A root!

The goal of this is to be able to switch between modes “mid-stream”.   As a first step, when playing these ascending and descending make sure that wherever you are in the pattern ascending or descending that you transition into the next mode smoothly.  The initial goal here isn’t speed – it’s fluidity and being in control of switching between modes.

(See the melodic note below for some other tips once you get comfortable with the transition).

.

Now let’s examine each chord (and mode) individually:

.

  • First measure: arpeggiate a minor chord in 4/4 time (in this case A minor).

.

A minor – Play A Dorian, A Aeolian or A Phrygian – Click to enlarge

.

In order of increasing darkness, the modes could be played over that chord are:

.

A Dorian, A Aeolian and A Phrygian

.

  • Measure 2: adapt the chord to a specific mode using the mode’s characteristic note.

.

The first mode explored in this example will be A Phrygian.  Since Phrygian’s characteristic note is the b2, I’ll change the 2nd root (A) with the b2 (Bb) creating an A minor (add b9).

.

A minor add b9 – Play A Phrygian – Click to enlarge

.

  • Measure 3:  I’ll continue the chromatic motion on the G string changing the Bb to B natural. This produces an A minor (add 9).

.

A minor add 9 – Play A Dorian or A Aeolian – Click to enlarge

.

  • Measure 4:  Now the 5th of the chord (E) will move chromatically to F, emphasizing the b6 of the Aeolian mode creating an A minor (add 9, b6) chord.

.

A minor add 9 add b6 – Play A Aeolian – click to enlarge

.

  • Measure 5:  The 6th of the chord will now move chromatically to F#  emphasizing the natural 6 of the Dorian mode and creating an A minor (add 6, 9) chord.

.

A minor add 6, 9 – Play A Dorian – Click to enlarge

.

The chord progression then goes back to A minor where any of the 3 modes could be used.

.

Notes:

  • Harmonic – If you’re playing with another musician try taking this one chord vamp idea and using your ear to change the chord when the soloist changes modes.  You can make other chordal alterations as well creating melodic movement in the voicing –  is a great approach to use both in comping on a single chord as well as creating melodic movement between 2 chords (more on that in another lesson).

.

  • Melodic – As the soloist in this approach – try to change modes then the rhythm player changes chords.  As soon as you get comfortable with the shapes – try making melodies and taking them through each modal change.  (See part 5  for an example of that process with one modal shape).

.

The nice thing about playing with human beings (rather than sequences) is that people can introduce random factors into playing.  A person can make all kinds of melodic or harmonic decisions that require the other person to change and adapt.  It develops a dialog and allows people to become more attune to playing with other people (and ultimately more musical).

.

The next lesson will cover Major chord variations in this same style.  But if you want to get a head start the process is the same as what I just covered, the characteristic notes for the major modes are:

.

Lydian: #4

Major: Natural 7

Mixolydian: b7

.

As before, just go through the lesson at your own pace and return to it as you need to.  Also please feel free to post any questions you might have (or pm me at guitar.blueprint@gmail.com).

.

I hope this helps and as always, thanks for reading!

.

-SC

.

P.S. If you like this post – you may also like:

.

THE GUITARCHITECT’S GUIDE TO MODES PART 6 – THE CIRCLE OF 5THS AND MODAL INTERCHANGE

THE GUITARCHITECT’S GUIDE TO MODES PART 5 – MAKING THE MOST OF ONE PATTERN

THE GUITARCHITECT’S GUIDE TO MODES PART 4 – MODES AND CHORDS

.

THE GUITARCHITECT’S GUIDE TO MODES PART 3B – SEEING THE SIX-STRING MAJOR SCALE

THE GUITARCHITECT’S GUIDE TO MODES PART 3A – SEEING THE SIX-STRING MAJOR SCALE

THE GUITARCHITECT’S GUIDE TO MODES PART 2 – SEEING THE TWO STRING MAJOR SCALE

THE GUITARCHITECTURE GUIDE TO MODES PART 1 – SEEING THE SINGLE STRING MAJOR SCALE

.

Making Music Out Of Scales

A BRIEF THOUGHT ABOUT MUSIC THEORY

.

PRACTICE MAKES BETTER AKA PRACTICING PART I

PROPER POSTURE IS REQUIRED FOR PROPER PERFORMANCE – PRACTICING PART II

TENSION AND THE SODA CAN OR PRACTICING PART III

DEFINITIONS AND DOCUMENTS OR PRACTICING PART IV

PRACTICE WHAT YOU PLAY OR PRACTICING PART V

TESTING YOUR VOCABULARY OR PRACTICING PART VI

POSSESSION IS 9/10S OF THE LAW BUT PERCEPTION IS EVERYTHING OR PRACTICING PART VII

SOME USEFUL ONLINE PRACTICE TOOLS

.

GETTING HIPNESS FROM A MAJOR TRIAD OR MORE CHORD RECYCLING PART 3

Getting Hipness From A Major Triad Or More Chord Recycling Part 2

GETTING HIPNESS FROM A MAJOR TRIAD OR MORE CHORD RECYCLING PART 1

.

Getting Through The Gig – Negotiating A Chord Chart Part 3

Getting Through The Gig – Negotiating A Chord Chart Part 2

GETTING THROUGH THE GIG – NEGOTIATING A CHORD CHART PART 1

.

WARMING UP: FINGER EXERCISES, THE 3 T’S AND THE NECESSITY OF MISTAKES

.

The GuitArchitect’s Guide To Modes Part 6 – The Circle of 5ths and Modal Interchange

Welcome to the sixth installment of the GuitArcitecture Mode Visualization lesson series.

If you see anything unfamiliar here, you may want to check out:

.

.

In the last lesson, I took a look at using one fingering pattern to play all of the modes.  I wanted to get the sounds under your fingers a little bit and then start to explain a context for them a little more.

In this lesson, I’m going to go into modal interchange more in-depth.  To get deeper into modes, we need to talk about Relative Modes versus Parallel Modes, examine tonal centers and keys and talk about Modal Interchange.

..

Organizing the sounds of the different modes:

.

  • While the different modes of a parent major scale all contain the same notes, each mode has a unique sound.
  • For the purposes of this lesson, modes of the major scale will fall into one of two (overly general) categories (Major or Minor) based on their third scale degree.
  • The sounds of the modes are based on their scale formulaTheir scale formula is based on their relationship to their parallel major mode. 

.

For Example:

To determine the scale  formula of, say,  C Mixolydian, the notes of C Mixolydian would be compared to the notes of a C major scale.

  • Since C Mixolydian is spelled C, D, E, F, G, A, Bb, and
  • C Major is spelled C, D, E, F, G, A, B,
  • the scale formula of C Mixolydian is b7.

.

Relative versus Parallel Major 

C major is the relative major scale to A natural minor (A Aeolian) because both are part of the same parent major scale

.

C major is the parallel major scale of C natural minor (C Aeolian).

In this case they share a common root, but C natural minor has a different parent major scale than C major.

.

Here’s a table that shows the  parallel modes of C Major and their scale formula.

.

..

.

The Tonal Cycle of 5ths

.

Listing the modes in order of scale degree (Ionian, Dorian, etc.) is one way to work through the modes but a  more logical way to see the relationship of the modes is to place them in a tonal circle of 5ths.  So first let’s talk about the circle of 5ths versus the tonal circle.

.

The circle of 5ths:

The circle of fifths is a way to see all of the major and minor keys and key signatures in a logical order.  The Wikipedia page on it offers an excellent detailed explanation –  but seeing the actual circle will help clear things up.

.

Circle of 5ths taken from Wikipedia.com

.

From the pitch C :

  • moving in clockwise motion, the number of sharps in a key signature increase sequentially with each tonal center a 5th away. (C, G, D, A etc.)
  • moving in counterclockwise motion the number of flats in a key signature increase sequentially with each tonal center a 4th away. (C, F, Bb, Eb etc.)

..

This is a very handy and compact way to see tonal centers and relative major/minor scales – but adapting it to a tonal circle of 5ths will help clarify modes in a very unique way.

.

The Tonal Cycle of 5ths:

.

In a tonal circle of 5ths, the circle moves in diatonic 5ths (and thus stays in a particular key).  In the key of C it looks like this:

.

The next note in a circle of 5ths after B would be F#, but keeping it in a tonal cycle of 5ths the key of C major, the next note would be F natural.

Now that we have a tonal cycle of 5ths in C Major, let’s fill in the modes associated with each note of C Major.

.

.

Now let’s insert the scale formula of each mode:

.

.
Note:

the scale formula is listed as a series of cumulative alterations rather than sequential.

In general, the more flats in the modal scale formula, the darker the sound.

.

..

Modal Interchange

.

The key to using these to create modal sounds is what is called Modal Interchange.

.

As a simplified definition –  a mode associated with a specific chord will work over the same chord in any other key.  In other words, D Dorian could be played over any D minor 7 chord in any other key that has a D minor 7 chord in it.

.

Rather than thinking of modal ideas when I play,  an easier way (for me) to think about modal sounds is to think of parent scales since all the modes are derived from a parent scale (and it’s less to keep track of).

.

If I’m playing a song in the key of F major:

  • soloing over a Dm7 chord
  • and playing the notes from the C parent major scale over that chord
  • I’m playing in D Dorian.

If I use notes from the F major scale, I’m playing in D Aeolian.

If I use notes from the Bb major scale, I’m playing in D Phrygian.

.

Since I’ve been dealing with C major – I’ll give a C parallel mode example:

.

If you want a C Lydian sound – you’re really talking about playing a G parent major scale over a C Major / C Major 7th) chord or a C major chord progression.  Here’s a shortcut:

.

.

Note (repeated from part 5):

This is a tricky area.  While I use a parent scale approach to visualize how I solo over chords, I am aware of the chord tones (and tensions) and tend to focus on those melodically.

Just running up and down a scale isn’t going to help you really nail changes in the long run, it’s just going to fill space that often doesn’t need filling sonically.

That being said, the first step in any playing process is knowing where to put your fingers – so working through scales is as good a place to start as any….

For beginning or intermediate players new to this – like I said before,  just worry about associating the modes, fingerings and sounds for now.

..

Next Steps

.

In the next part of this series I’m going to give some major and minor positional approaches and talk about a cool way to use modes to modify chords.  In the meantime you may want to familiarize yourself with the shapes in part 3b of the lesson series.

As before, just go through the lesson at your own pace and return to it as you need to and please feel free to post any questions you might have (or pm me at guitar.blueprint@gmail.com).

.

I hope this helps and as always, thanks for reading!

.

-SC

.

P.S. If you like this post – you may also like:

.

THE GUITARCHITECT’S GUIDE TO MODES PART 5 – MAKING THE MOST OF ONE PATTERN

The GuitArchitect’s Guide To Modes Part 4 – Modes and Chords

THE GUITARCHITECT’S POSITIONAL EXPLORATION PRE-RELEASE NOW AVAILABLE

THE GUITARCHITECT’S GUIDE TO MODES PART 3B – SEEING THE SIX-STRING MAJOR SCALE

THE GUITARCHITECT’S GUIDE TO MODES PART 3A – SEEING THE SIX-STRING MAJOR SCALE

THE GUITARCHITECT’S GUIDE TO MODES PART 2 – SEEING THE TWO STRING MAJOR SCALE

The GuitArchitecture Guide To Modes Part 1 – Seeing The Single String Major Scale

.

Making Music Out Of Scales

A BRIEF THOUGHT ABOUT MUSIC THEORY

.

PRACTICE MAKES BETTER AKA PRACTICING PART I

PROPER POSTURE IS REQUIRED FOR PROPER PERFORMANCE – PRACTICING PART II

TENSION AND THE SODA CAN OR PRACTICING PART III

DEFINITIONS AND DOCUMENTS OR PRACTICING PART IV

PRACTICE WHAT YOU PLAY OR PRACTICING PART V

TESTING YOUR VOCABULARY OR PRACTICING PART VI

POSSESSION IS 9/10S OF THE LAW BUT PERCEPTION IS EVERYTHING OR PRACTICING PART VII

SOME USEFUL ONLINE PRACTICE TOOLS

.

GETTING HIPNESS FROM A MAJOR TRIAD OR MORE CHORD RECYCLING PART 3

Getting Hipness From A Major Triad Or More Chord Recycling Part 2

GETTING HIPNESS FROM A MAJOR TRIAD OR MORE CHORD RECYCLING PART 1

.

Getting Through The Gig – Negotiating A Chord Chart Part 3

Getting Through The Gig – Negotiating A Chord Chart Part 2

GETTING THROUGH THE GIG – NEGOTIATING A CHORD CHART PART 1

.

WARMING UP: FINGER EXERCISES, THE 3 T’S AND THE NECESSITY OF MISTAKES

The GuitArchitect’s Guide To Modes Part 5 – Making The Most Of One Pattern

Welcome to the fifth installment of the GuitArcitecture Mode Visualization lesson series.

If you see anything unfamiliar here, you may want to check out:

.

.

About The Modal Exchange Example

Since describing how interchanging modes work doesn’t really get you any closer to hearing how they work – I’m going to present a simple exercise first and then explain the process of what’s going on theoretically in the post following this one.

.

Using one pattern to get all the sounds of the major scale modes:

.

As I’ve discussed before the modes of the C major scale are all related.  Each individual mode has a different root but all belong to the same parent scale.

.

.

That being said, if I use any C major pattern (like this one with C played with the first finger on the 8th fret of the low E string):

.

C Ionian

.

and move the note C to different scale degrees – I’ll have all of the parallel modes  (or modes have the same root notes  – but belong to different parent scales) based on the pitch C.

.

So if, for example,  I take the same pattern and move C to the 2nd scale degree (with C played with the second finger on the 8th fret of the low E string) I’ll have C Dorian.

.

C Dorian

.

Moving it to the 3rd scale degree (with C played with the 4th finger on the 8th fret of the low E string) produces C Phrygian.

.

c-phrygian.

On the 4th scale degree (with C played with the first finger on the 3rd fret of the A string) – I’ll have C Lydian.

.

C Lydian

.

The 5th scale degree (with C played with the second finger on the 3rd fret of the A string) – produces C Mixolydian.

.

C Mixolydian

.

On the 6th scale degree (with C played with the fourth finger on the 15th fret of the A string) – I’ll have C Aeolian.

.

C Aeolian

.

And finally, if I move it to the 7th scale degree (with C played with the first finger on the 10th fret of the D string) – I’ll have C Locrian.

.

C Locrian

.

Taking stock of the exchange:

.

Now I’ll show a musical example that uses this one shape to play all of the parent major scale/natural minor scale modes.

.

Note:

This is not the most efficient way to get around the fingerboard but it can help with 3 things.

  1. Hearing the difference in how modes sound
  2. Seeing the modes as they relate to parent scale and
  3. Gaining fluidity in getting around the fretboard.

.

What you’ll need

.

  • You’ll need a time keeping device (like a metronome, or a drum loop) and
  • A drone of the note C (You can create this by looping the pitch C in your DAW or just recording a note C)

.

The drone is very important because the drone and the combination of notes will be what helps you hear the change in modes (and tonality).

.

Playing the Example

.

I’ve created a simple one bar phrase for each mode.

All you have to do is play them over the C drone, in the order I’ve listed below and in time.

.

That being said, here are some additional things to keep in mind:

.

  • The primary goal of this is not physical technique  – but developing your ear.  Playing through it at slower tempos will probably be more beneficial to you in really being able to hear the transitions.

.

Note:

If you really want to get something more out of it – try singing along with the pitches as you’re playing them.  This sounds goofy to most people but singing really is the way to get the sounds into your ear.

.

Take this as a piece of advice learned by many people who take four terms of ear training at the collegiate level. If you look at those 4 terms as 3 units each  that’s 12 units or a full term load (at most for-profit colleges at $18-19,000 a term).

.

In other words, people spend a lot of money to sing things to train their ear, doing it for free on your own is a good idea.

.

  • Focus on the 3 T’s in performance (Tone, Timing and hand Tension).  From a technical standpoint, the goal is to play though the whole cycle without stopping.
  • Get the patterns and the timing under your fingers first – and then worry about making music out of it.  The important thing here is connecting the sound with the pattern visualization.  (I’ve tabbed all the examples as well – but try to be aware of the change in key signatures in each bar).

.

First, here are the individual measures.

..

C Lydian

.

C Ionian

.

C Mixolydian

.

C Dorian

.

C Aeolian

.

C Phrygian

.

C Locrian Option 1

.

If you want to keep a low register pattern – you can try starting the Db Major pattern from the 7th putting 4 notes on the low E string).

.

C Locrian Option 2

.

and here’s the whole thing:

(Just click to see full size)

.

.

Going Further

.

  • Once you can get through the example at various tempos cleanly and really hear the transitions, take a short phrase and try moving it through the different modes.  It will be easier initially if you think about scale degrees.  Here – I’m thinking 5-4-5-6-7-2-1.
  • Also: try playing it swung in double time (ala Jazz 001)

.

C Lydian Lick

.

.

Note:  The scale degrees stay the same when I move to C Ionian but the F# becomes F natural.

.

C Ionian Lick

.

The same phrase changes the B to Bb when moved to C Mixolydian:

.

C Mixolydian

.

The lack of an Eb in the phrase means that the notes are the same between Mixolydian and Dorian in this case – just played in different position.

.

.

Moving it to Aeolian, the A natural becomes Ab.

.

C Aeolian Lick

.

The D becomes Db in C Phrygian.

.

C Phrygian Lick

.

And finally, changes the G to Gb for C Locrian:

.

C Locrian Lick

.

From the light to the Dark.:

I’ll be talking about how I derived the order I’m using for the mode progression in the next lesson post on the circle of 5ths, the tonal circle of 5ths and talk about how these relate to modal interchange.  For now here’s a shortcut to consider until next time.

.

In general the more flats a mode has in its scale formula – the darker its sound.

.

.

Note:

This is a tricky area for intermediate students.  While I use a parent scale approach to visualize how I solo over chords, I am aware of the chord tones (and tensions) and tend to focus on those melodically.

When soloing, Just running up and down a scale isn’t going to help you really nail changes – it’s just going to fill space that often doesn’t need filling sonically.

.

For beginning or intermediate players new to this – like I said before, for now just worry about associating the modes, fingerings and sounds.

.

I’ll be talking about each of the modes in-depth in future posts, but for now understand that each mode of Major, Melodic Minor or Harmonic Minor has its own unique characteristics that are worth exploring.

.

As before, just go through the lesson at your own pace and return to it as you need to and please feel free to post any questions you might have (or pm me at guitar.blueprint@gmail.com).

.

I hope this helps and as always, thanks for reading!

.

-SC

.

P.S. If you like this post – you may also like:

.

The GuitArchitect’s Guide To Modes Part 4 – Modes and Chords

THE GUITARCHITECT’S GUIDE TO MODES PART 3B – SEEING THE SIX-STRING MAJOR SCALE

THE GUITARCHITECT’S GUIDE TO MODES PART 3A – SEEING THE SIX-STRING MAJOR SCALE

THE GUITARCHITECT’S GUIDE TO MODES PART 2 – SEEING THE TWO STRING MAJOR SCALE

The GuitArchitecture Guide To Modes Part 1 – Seeing The Single String Major Scale

.

Making Music Out Of Scales

A BRIEF THOUGHT ABOUT MUSIC THEORY

.

PRACTICE MAKES BETTER AKA PRACTICING PART I

PROPER POSTURE IS REQUIRED FOR PROPER PERFORMANCE – PRACTICING PART II

TENSION AND THE SODA CAN OR PRACTICING PART III

DEFINITIONS AND DOCUMENTS OR PRACTICING PART IV

PRACTICE WHAT YOU PLAY OR PRACTICING PART V

TESTING YOUR VOCABULARY OR PRACTICING PART VI

POSSESSION IS 9/10S OF THE LAW BUT PERCEPTION IS EVERYTHING OR PRACTICING PART VII

SOME USEFUL ONLINE PRACTICE TOOLS

.

GETTING HIPNESS FROM A MAJOR TRIAD OR MORE CHORD RECYCLING PART 3

Getting Hipness From A Major Triad Or More Chord Recycling Part 2

GETTING HIPNESS FROM A MAJOR TRIAD OR MORE CHORD RECYCLING PART 1

.

Getting Through The Gig – Negotiating A Chord Chart Part 3

Getting Through The Gig – Negotiating A Chord Chart Part 2

GETTING THROUGH THE GIG – NEGOTIATING A CHORD CHART PART 1

.

WARMING UP: FINGER EXERCISES, THE 3 T’S AND THE NECESSITY OF MISTAKES.

The GuitArchitect’s Guide To Modes Part 4 – Modes and Chords

Welcome to the fourth installment of the GuitArcitecture Mode Visualization lesson series.

If you see anything unfamiliar here, you may want to check out part one, part two, part 3a or part 3b, of the series, but in the meantime, here’s a quick recap:

.

To Review:

Any major scale can be broken down into seven 2-string modal shapes that are derived from their scale degree (i.e. position in the scale). These Related Modes are:

  1. Ionian
  2. Dorian
  3. Phrygian
  4. Lydian
  5. Mixolydian
  6. Aeolian
  7. Locrian

.

The sequential order of the modes is always the same.

In the 2-string modal shapes, the fact that the 7th note of each mode is missing from the initial fingering pattern is irrelevant because it will be played in the pattern that follows it.

Modes do not exist in a vacuum.  They have as much to do with chords as they do with scales and are always associated with either a chord or a chord progression.

.

Deriving the chords from the scale

.

Let’s take a look at the initial two-string C Major pattern that we used in the previous lesson.

.

.

If we remove every other note of the scale pattern, we can see arpeggiated versions of the triads associated with those modes.

.

.

Here are the triads in ascending order with a root on the A String:

(Note: these are only sample voicings – please feel free to use your own)

.


.

Since major scales all use the same intervallic formula, all major scales follow the same formula for standard harmonization. 

.

From this we can develop a generic formula for major scale triads.

.

.

So, for example,  the triad built on the first scale degree (i.e. the I chord) of any major scale will always be Major.

.

Note:

If we’re discussing the relative minor key (A minor) – the sequence is the same – it just starts from the vi chord:

.


.

.

7th Chords

If we take a look at the initial 2 string pattern again:

.

This time I’m going to eliminate the 3rd and 5th note of each pattern.  So in the first pattern:

C, D, E, F, G, A becomes

C, D, F, A aka

D, F, A, C or  (D minor 7 starting from the 7th)

.

Here’s the rest of the sequence:

.

.

And a generic breakdown in another chart.

.

.

Here are the 7th chords in ascending order with a root on the A String:

(Again, these are only sample voicings so please feel free to use your own)

.

.

.

Beyond 7th Chords:

You could extend this idea out beyond 7th chords into harmonizations using the diatonic 9th, 11th or 13ths.  But all of these chords just come from stacking diatonic 3rds on top of each other.    I’ve followed this process through all the diatonic chord tones below with each scale degree of C Major:

.

.

I’ll be explaining a lot more about this in a future post (including multiple approaches for voicing these) but for now here’s a chart that shows the harmonizations in the key of C Major.

.

.

But Here’s The Catch

(and there’s always a catch)

The C Major modes are all just subsets of  the same parent scale.  If you’re playing them over a C major chord (or a chord progression in C Major) scale-wise it really doesn’t make a difference which of the above modes you’re thinking of as it’s all going to sound like C Major.

.

To get deeper into modes, we need to get into some other tonal centers and talk about Relative Modes versus Parallel Modes and Modal Interchange and that is the topic of the next post in this series.

.

Here are some important things to focus on for now:

.

1. Theoretical:

  • The major scale can be broken down into a series of triads and 7th chords based on scale degrees that are associated with the modes on those scale degrees (Ex. Key of C Major – D Dorian and D minor 7 on the 2nd scale degree.)
  • The sound of the mode is based as much on the notes of the mode as it’s related chord.  So for right now – this is just a whole lot of ways to see C Major on a fingerboard – you should adapt the process to other keys as well.

.

2.  Technical:

  • While it’s natural to want to progress quickly, trying to play too quickly too soon results in excess hand tension which will increase the difficulty of what you’re trying to play.  Fluidity comes from focused, relaxed repetition.  
  • Fretting hand: Always use the minimum amount of tension needed for the notes to sound cleanly.  The idea is to be able to hear every individual note in the chord as well.  Additionally, try to keep the fingers motion on the strings to a minimum and removing them from the string only when necessary.
  • Picking Hand:  Try using the above picking pattern on the top two strings or alternate picking.
  • Practice switching between chord voicings cleanly and playing the 3-note-per-string forms over each one individually.  As a comping exploration, you could try moving from one chord to the next in the series but only moving one voice at a time.  This type of internal motion is something I initially copped from guys like Torn and Miroslav Tadic.
  • Isolate problem areas and develop them.  You’re not going to be able to pull  any of these ideas off live if any of the individual components aren’t happening.  This isn’t a bad thing.  Things you develop over time are more likely to stay with you (and thus be accessible when you’re improvising).

.

3.  Musical:

  • One thing to work on right now is to come up with multiple ways to play the chords above.  If you’re not familiar with voicings in general – try to write out the individual notes of each chord and move them around on the fingerboard.   It might not yield the most practical voicings (depending on key and position) – but it will definitely help expand your awareness of the fingerboard!

.

Finally, one other thing I need to mention is that this is just my approach but it certainly isn’t the only one.    You should explore multiple approaches and take things that resonate with you from each of them as each of them will give you more depth of understanding.

.

As before, just go through the lesson at your own pace and return to it as you need to and please feel free to post any questions you might have (or pm me at guitar.blueprint@gmail.com).

.

I hope this helps and as always, thanks for reading!

.

-SC

.

P.S. If you like this post – you may also like:

.

THE GUITARCHITECT’S GUIDE TO MODES PART 3B – SEEING THE SIX-STRING MAJOR SCALE

THE GUITARCHITECT’S GUIDE TO MODES PART 3A – SEEING THE SIX-STRING MAJOR SCALE

THE GUITARCHITECT’S GUIDE TO MODES PART 2 – SEEING THE TWO STRING MAJOR SCALE

The GuitArchitecture Guide To Modes Part 1 – Seeing The Single String Major Scale

.

Making Music Out Of Scales

.

A BRIEF THOUGHT ABOUT MUSIC THEORY

.

PRACTICE MAKES BETTER AKA PRACTICING PART I

PROPER POSTURE IS REQUIRED FOR PROPER PERFORMANCE – PRACTICING PART II

TENSION AND THE SODA CAN OR PRACTICING PART III

DEFINITIONS AND DOCUMENTS OR PRACTICING PART IV

PRACTICE WHAT YOU PLAY OR PRACTICING PART V

TESTING YOUR VOCABULARY OR PRACTICING PART VI

POSSESSION IS 9/10S OF THE LAW BUT PERCEPTION IS EVERYTHING OR PRACTICING PART VII

SOME USEFUL ONLINE PRACTICE TOOLS

.

GETTING HIPNESS FROM A MAJOR TRIAD OR MORE CHORD RECYCLING PART 3

Getting Hipness From A Major Triad Or More Chord Recycling Part 2

GETTING HIPNESS FROM A MAJOR TRIAD OR MORE CHORD RECYCLING PART 1

.

Getting Through The Gig – Negotiating A Chord Chart Part 3

Getting Through The Gig – Negotiating A Chord Chart Part 2

GETTING THROUGH THE GIG – NEGOTIATING A CHORD CHART PART 1

.

WARMING UP: FINGER EXERCISES, THE 3 T’S AND THE NECESSITY OF MISTAKES

.