Making A Longer Phase From A Few Notes

Just like Ratt – I’m back for more (hopefully you are also).

(Please feel free to insert another random hair metal reference if that suits you better).

I’m in the midst of a bunch of recording and gig preparation, and I thought one of the things I pulled out in a piece might help you.

I have an instrumental track that’s based on a pentatonic I’ve heard in Hindustani music before but don’t know the name of.  Other players have gravitated to this sound as well and in print I’ve only seen it listed as “Indian Pentatonic” (which, if we’re going to call it that, we might as well call it “Vindaloo” because vindaloo is at least tasty.)

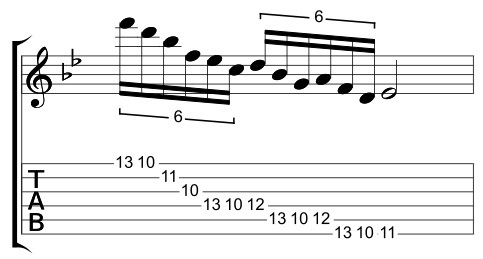
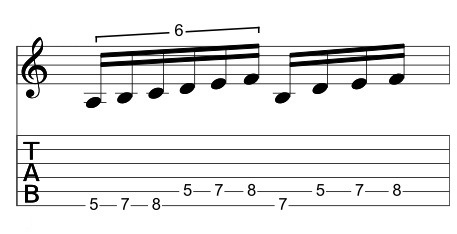
Here’s the scale in A descending and then ascending.  Don’t let the time signature throw you off.  It’s just there to get all 5 notes in a bar.

A Pentatonic Asc Desc
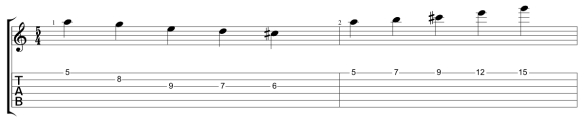
In A  – I see R, 3, 4, 5 b7 (aka an A Mixolydian extraction) so this would work over chord taken from the parent scale D major.  In this case I’m using over a G – A vamp.

Start Small

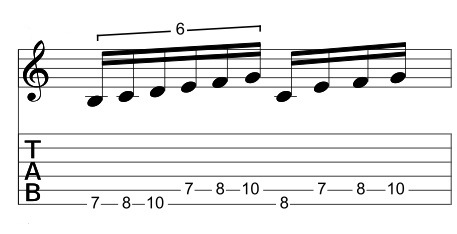
Notice in the descending version I used one note on the B string and then 3 on the G string.  I do this because keeping only one note of the scale on the middle string of a 3 string group (in this case E, B, G) allows me to set up a sweepable version of the scale.

Why do I do that?

Here’s a little secret about guitar.  Certain techniques will take you a VERY long time to get under your fingers so if you’re going to spend the time to work on them make sure you find ways to use them to get the sounds you’re looking for.

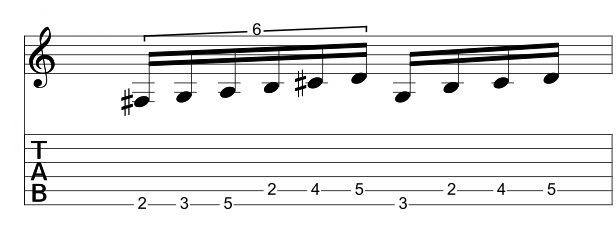
Here I’ve taken the ascending scale and added 2 descending notes.  I’ve included 2 picking variations in the first two examples.  In my own playing I find that I end up going to the first Down Up Up pattern more often than not – but it’s worth the time to be able to do both of them.

For the example below – choose ONE picking variation and use it for all the groups of notes.  Pay attention to the 3 T’s (Timing, Tone and Hand Tension) and try playing it over a chord to associate the scale with a harmony.

A Pent 3 Note Sweeps

You might notice in the example that the E string always uses the index finger of the fretting hand and the G string always uses the pinky.  That leaves either the 2nd or 3rd finger for the B string note.  The fingering consistency also makes it easier to memorize the patterns.

Then build up

A Pent 5 Note

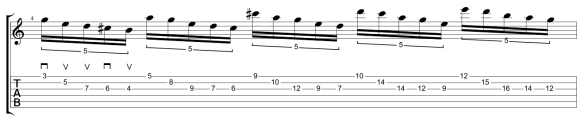
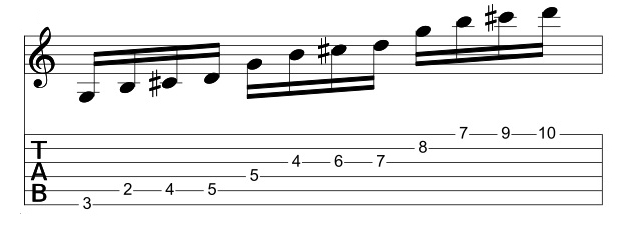
Now I’ve added a few notes on the G string.  One nice thing about Pentatonics is that they have some built in intervals larger than a major or minor 2nd that make them sound less “scale-ish” to my ears.  I’ve only included one picking idea above.  The 2-note sweep in the middle with the alternating picking would allow you to repeat the picking pattern, but you could also use pull-offs on the notes on the G string.

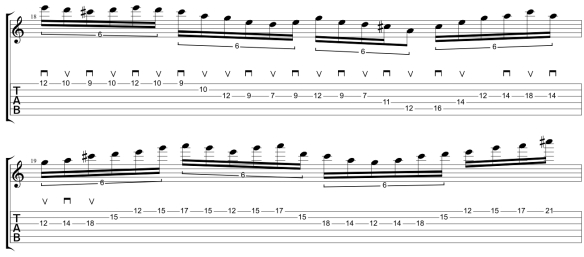
If the scale can descend on the G string – it can also ascend on the E string.  Here’s a two bar lick based on the idea above and adding in some notes on the E string as well.

A Pent Descending Line

Let’s Break This Down

A Pent Breakdown
I’ve broken this down in overlapping phrases to show how I expanded the initial idea into something larger.

Bar 9 Above:  This is a simple descending / ascending of the scale on the E string

Bar 10: There’s the sweep

Bar 11: This is a similar 7-note descending / ascending idea as bar 9

Bar 12-13: I broke this out to show the position shift to add the C# again with a similar idea as bar 9 and 11

Bar 14: There’s the sweep again

Bar 15: this is an the same idea as before but one octave lower.

Notice how there are two simple pieces of “connective tissue” the sweep and the short one string scale passage that ties the lick together.

Let’s look at another (and more challenging) idea:
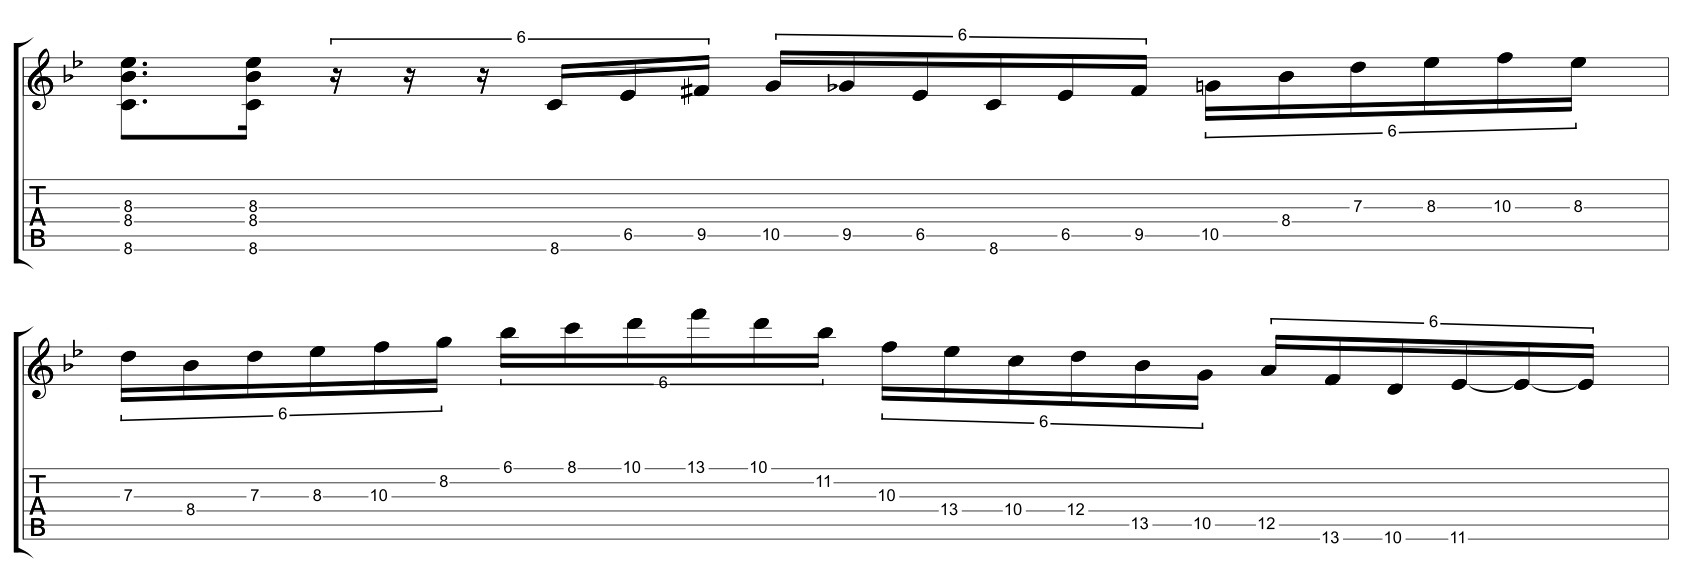
Lick #2

A Pent Lick 2

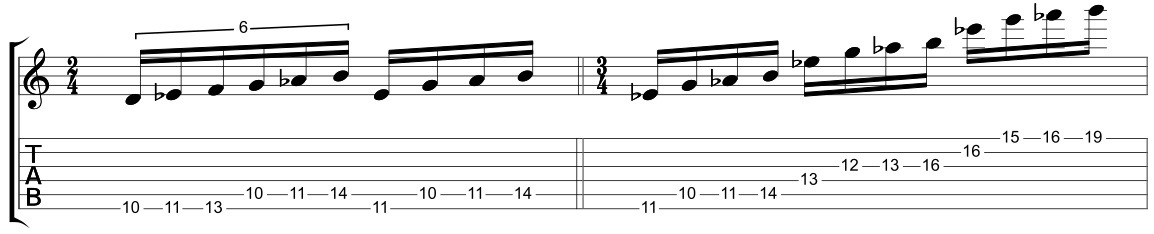
Here I expanded on the initial idea.  I’m using sextuplets now so it’s faster.  In the first measure – there’s a slight pause on the last A in beat 3 to accommodate a position shift for the following beat.  As a phrase, I’d likely sit on that A for a beat or two before continuing but I shortened the time to fit it in a smaller graphic.

The position shift allows me to set up a sequence to ascend the scale again and build a little excitement.  Technically this uses all the ideas that have already been used.

Again – these techniques take time to get them under your fingers so they sound good.  Don’t take shortcuts.  Really focus on the 3 T’s and then find ways to incorporate them in ideas you already are using.

And one for the road

So far in this lesson we’ve been exploring string ascending / descending scales.  Adding in things like string skipping will give you some wider intervals to incorporate and get you further away from the scale sound.  Here’s one variation below.

Idea 3

My suggestions (should you choose to take them)

  • Find fingerings that work for you
  • incorporate some of the scale sequence ideas into the phrases you create
  • mix and match see how far you can go in one direction or the next before you run out of notes
  • incorporate different scale sequence ideas.  (For more information on this my Melodic Patterns book can open some doors here).


I hope this helps and as always, thanks for reading!

-SC

Practice The Way You Want To Play

Recently I had a Skype lesson with someone who wanted to learn more about practicing and while we talked about a lot of different elements of things to work on I forgot to mention one critical thing (that may be a good reminder for you):

When you’re practicing you should practice material the way you ultimately want to play it.

(Be forewarned – this simple sentence requires some context.)

When I was living in small apartments I was really mindful of other people and not disturbing them and made sure that when I practiced that I was really quiet.

Guess what happened when I went to play live?  You couldn’t hear me or make out a single thing I was playing.

You can’t practice something in a passive or lethargic way and expect to play it aggressively /dynamically / with conviction / in a way that creates a moment in a live context.

This is one reason I recommend that people work on specific licks or approaches for short periods of time as a big part of practice is examining nuance and attention to detail.

Here’s (one way) how I approach something new I need to learn in a practice session.

1.  Figure out what I’m playing (and why I’m working on it)

Even before I go to a metronome, I make sure I understand what I’m playing.  If I’m going to add it to my musical vocabulary – I need to understand how it fits in a context.  Examples of this would be:

“Ah..it’s a pentatonic based lick”
“It’s an arpeggio pattern based on harmonic minor chords”
“It’s a scale I’m not familiar with” (Then I need to learn that as well).

The why is generally, “it sounds cool.” but usually it’s tied to a specific song, solo or approach for something I’m going to play in front of people or record.

2.  Figure out where to put all my fingers

Again, still no sign of a metronome yet!  Here I’m looking at the fretboard shapes involved and make sure that I understand what I need to do physically to perform it.  Recently, I was working on a descending scalar pattern for an original tune and realized that the fingering I was using was really difficult and didn’t sound that great.  Even playing it at the slowest possible tempo, it was difficult to get the articulation I wanted.  After about 5 minutes of running options, I discovered a string skipping shape that made it much easier t play and (more importantly) sounded better.

Included in this step is also  addressing what the fingers of the picking or tapping hand need to do.

3.  Understand the phrasing

Usually I’ll try to sing along with the line to help internalize it.  I’m not a vocalist.  You’ll never hear me on American idol.  I don’t do it because it sounds good, I do it so I can really internalize the rhythms and the phrasing.  Tapping my foot helps a lot with that as well…..

I heard a guitarist of some renown play recently and I was shocked at just how bad the phrasing on his tunes was.  Every note was played in the right order but it just didn’t sound musical at all.

4. 
Set a metronome marking

There are a couple of ways I’ll do this but in general I’ll find the fastest tempo I can perform the idea following the 3 T’s (Tone, Timing and hand tension and by “perform” I mean playing it totally in the pocket and every note jumping out at the listener.) and then move it up a few metronome markings until it starts to fall apart.

One place where I think some people get hung up on this is (on the physical side of practicing) equating playing with conviction = playing aggressively = playing with excessive tension.  As the saying goes,

“Tension is trying to be where I think I should be”
“Relaxed is being where I am”

Take your time getting to this step if you need to!  I might be practicing the idea for a couple of sessions before I even get to the point where I can play it in time.  I work on playing the phrase with conviction and intent and then worry about tempo.  Playing all the notes on the guitar quickly doesn’t mean much if you can’t move listeners when doing so.

Eventually, you’ll get to the point where your overall level comes up and you can start playing things closer to the tempo you hear it.

5.  Do.  Observe. Correct (if necessary).

That’s the crux of it right there.  Not getting emotional about what you’re doing or getting hung up on where you should be – just performing it.  Observing what worked.  Correct if necessary.  If I can play something 3-5 times without a mistake – I’ll generally bump up the metronome a few markings and try it again.

(Make sure to check out The Practicing Mind: Developing Focus and Discipline in Your Life by Thomas M. Sterner for more on this.  I had another descriptive but I liked his description of “Do Observe Correct” so much that I use it in my own teaching now)

6.  Keep track of what I’m doing and work on it daily

This is an old topic for me but daily focused work makes the difference.  Writing it down let’s you see what kind of progress you’re making.

As a shortcut think of it this way (I stole this from a book that is definitely worth reading – The Champion’s Mind: How Great Athletes Think, Train, and Thrive by Jim Afremo)

You want to practice like you’re the number 2 player in the world and have something to prove.  Practice with grit and drive and instead of being totally focused on the end goal – try to be engaged in the process of what you’re doing.

Having said that, when you play or perform – you want to do so like the #1 players in the world.  Those players play with no tension.  Their hands are lose and relaxed and they’re focused but not over-focused.

If you practice in an engaged manner you’re more likely to perform in an engaged manner and that’s a good thing.

There’s a lot more to practice than what I’ve outlined here (If you check the blueprints page you’ll see a lot of material specifically related to guitar practicing) – but I really think that the steps I outlined offer a reasonable starting point and (perhaps more importantly) can be applied to any skill set you want to achieve.

That’s it for now!  I hope this helps and as always thanks for reading!

-SC

The GuitArchitect’s Guide To Modes Part 17 – Makin’ Mu-sick With Not-Peggios

Hello everyone.

Here’s another short lesson that may keep you busy.

One thing to consider in any of the material I’ve ben presenting is that all of the modes, scales and other materials that I’ve presenting are all just tools to get to making music.

So here’s an example where I’m “breaking” few of the rules I’ve previously posted to get the sounds I’m looking for.

The lick.

Here’s a lick I threw out over a C minor 7 vamp:

Click To Enlarge

Click on image to enlarge

Here’s the audio:

(If the play button doesn’t work – just click on the title and it’ll load in a new window).

.

Some “Broad Stoke” notes.

  • Contrasts play a critical role in having a good solo.  In the case of soloing over a vamp like this, I would either start spare and build into something rhythmically active or hit the gas out of the gate and then wind down (or further up) into something.  Since I’m playing something rhythmically active in the example above,  I’d probably phrase a series of short sparse lines after this and then build it back up again.
  • Speaking of rhythm, I usually try to start long passages off the beat.  It just allows the phrases to breathe a little more and starting fast passages on the beat makes me think of ’80’s metal.  Not a bad thing – but not what I’m always going for. ; )  Also the patterns are based around 4-note patterns so I’ll typically play them as sextuplets to make the phrasing less well… ’80’s metal.
  • The Paul Gilbert-ish pattern (ascending phrases that descend on a note and then ascend again) is one I use a lot.  Part of that use here is pedagogical.  By using the same rhythmic idea, it allows people to focus more on the notes being employed.  (Part of this is hoping that if I keep putting Paul Gilbert tags in my columns that he may find this blog eventually!)
  • The best thing I could do in this context might be to play nothing – but that makes for a boring lesson. Typically in soloing I want to be pretty deep in the song after a lot has already been said before I start putting my $.02 in.  When I see people starting to solo before they even know what the melody is, I kind of know what to expect.

Some Specifics.

  • The first chord is a C minor 7, so one of my first thoughts is to superimpose a G minor idea over it, and my initial thought was G Harmonic Minor.  To extract the “not-peggio” I start with a three-note per string harmonic minor scale from Bb….
G Harmonic Minor from C

See my previous lessons if the interlocking 2-string patterns are unfamiliar to you!

and then remove the first and third note on the low E, D and B strings.

I’ve notated this below as both 1/16th notes and sextuplets.

Notpeggio Extract
  • As I mentioned in part 16, with this approach, I tend to keep the arpeggio shape in position which means moving the shape on the highest two strings down.  So instead of starting on the pitch G on the B string I start on the F#.
high E string pattern

previous 6-note pattern – revised 6-note pattern

Conceptually it’s a small shift but it changes the six-string extraction to the following:

Modified patternwhich fits under my fingers much better.  While the interlocking two-string patterns may be confusing, the resulting “not-peggio” lays out nicely between the 6th and 10th frets.

  • Chromatic alterations.  If you look at the initial lick, you’ll see I alternate between the F# and the F natural.  Again, these patterns should just be viewed as a launching off point to develop your own ideas.

The Arpeggio

At the end of the phrase I slide up to an F and then descend on a Bb arpeggio.  For visualization purposes, here’s a version that starts on the beat:

Bb Major arpeggio w. encircling

Notice that on the bottom three strings I incorporate an encircling motive where instead of landing directly on the note D on the D string, I land on an Eb, go down to C and then hit the chord tone D.  This is a great way to add some zip to arpeggios and get a little extra mileage from a well worn melodic device.

This is a short lick that may take a while to get under your fingers!  I’m only playing it around 100 bpm or so as that’s the pocket I felt, but if you’re unfamiliar with sweep picking or the encircling idea with the arpeggios even getting it clean at 90 might take a while.  Just go slowly and work on the 3 T’s (Timing, Tone and Hand Tension).

That’s it for now!  I hope this helps and I hope that this lesson gives you some inspiration in developing your own melodic devices!

-SC

p.s. – The Rest of the “Not-peggio” posts can be found below:

The GuitArchitect’s Guide To Modes Part 16 – Not-Peggios Positional Lesson

The GuitArchitect’s Guide To Modes – Part 15 – Not-peggios – Harmonic Minor Version

The GuitArchitect’s Guide To Modes – Part 14 – Not-peggios – Melodic Minor Version

The GuitArchitect’s Guide To Modes – Part 13 – “Not-peggios”

p.s.s. – If you like this approach – the following books may be of interest to you!

guitarchitect-2 harmonic-combinatorics melodic-patterns positional-exploration

The GuitArchitect’s Guide To Modes Part 16 – Not-Peggios Positional Lesson

Hello everyone.

This is going to be a short lesson as the concept is really simple but making it work requires a lot of shedding.

For those of you who have been following the guide to Modes might remember that back in part 3a/3b, I outlined a method for connecting 2-string modal patterns positionally using a simple rule where:

(As the scale ascends the patterns descend and vice-versa)

so that this C Ionian fingering


Can be broken down into three distinct two-string patterns:

.

.

Or

.

.

(You can review the earlier posts if this looks unfamiliar to you)

And the not-peggios?

Guess what?  The not-peggio shapes I’ve covered work the same way.

Previously, I took the two-string shapes and moved them in octaves – but looked at positionally…

C Major Positional Notpeggio I

Note that the first note of each 4-note goes from C to B to A.  (Or uses the C Ionian – B Locrian – A Aeolian shapes).

Since the pattern contains a c and a f (and avoid note over C Major) I decided to use this form over the relative minor (a minor) In this audio example below, I’ve played an A minor (add9) chord and then played the notes as a sextuplet (then as 1/16th notes).

What’s cool:

  • The resultant sound is somewhere between a scale and an arpeggio
  • All the notes from the parent  scale are present but divided out in different octaves
  • The concept works with any of the two-string shapes I covered (major, melodic minor and harmonic minor)
  • The pattern can be adapted to work over any diatonic chord (Try this one over D minor as well)

What’s jive:

  • The pattern features a funfy positional shift between the G and B strings which is VERY difficult to get smooth when descending.

The Workaround:

The workaround is very simple, I just change up the pattern order on the b and e strings.

In the example above I replace  C Ionian – B Locrian – A Aeolian shapes with C Ionian – B Locrian – G Mixolydian.  That results in:

C Major Notpeggio II Positional

It does make the overall pattern a little more scalar, but the only main difference is that this pattern lacks the A note.

In the audio below, I just played a sextuplet pattern and ended on the B (the 9 over A minor) the first time.

Homework:

Okay!  If you like this sound – here’s what I think you should do:

  1. Go back to part 13, part 14 and part 15 and review the Major, Melodic Minor and Harmonic Minor 2-string shapes and related chords.
  2. Record a diatonic chord from a group and practice one ascending pattern positionally over the chord.
  3. Try changing chords over static patterns (and vice versa) and start to make a record of which patterns you like over which chords.

This might sound like a lot of work, but the reality is that pretty quickly you’re going to find one or two of these that you really like and the idea is to tae those and try to incorporate them into your playing as thoroughly as you can!

I hope this helps!

The GuitArchitect’s Guide To Modes – Part 15 Not-peggios – Harmonic Minor Version

Hey everyone,

As promised, here’s a follow-up lesson that takes the approach I explored in Part 13 and Part 14 and now applies it to the Harmonic Minor scale.

I’ll use C Harmonic Minor in this case – but this idea will work on any root.

Chords

Before we get too far into the lick side of this let’s look at the chords to see what we can play this over.

Here are the diatonic triads and 7th chords.

.
.
Try playing the initial C Harmonic Minor shape over any of these chords…
.
.
.

Harmonic Minor Notes:

  • C Harmonic Minor is spelled C, D, Eb, F, G, Ab, B, C – and from the root note the step and a 1/2 between the Ab and the B is a very distinctive sound of the scale.  
  • This scale has a lot of cool arpeggios and chord scale associations, but the most commonly used scales and modes are the root scale and the mode based on the 5th of the scale (R, b2, 3, 4, 5, b6, b7).  Having said that, modes starting on the b3 and 4th add some really cool sounds as well.

Now let’s talk about visualizing the scale.

.

Harmonic Minor

I’ve talked about my approach to Harmonic Minor briefly in part 9 of this series – but as a brief review:

Major Scale/Modal Visualization Review

  • The guitar fingerboard can be divided into 3 sets of two strings. Any 2-string fingering pattern that starts on the B string can be moved to the same starting pitch on the D or the low E string and keep the same fingering.
  • The major scale can be broken down into seven two-string modes that follow a specific order based on its scale degree from the parent scale (Ionian, Dorian, Phrygian, Lydian, Mixolydian, Aeolian, Locrian). The two-string patterns are modular and can be adapted to positional playing.
  • Instead of thinking of individual modes when playing,  I tend to think of larger tonal systems (i.e. I think of C Major all over the fingerboard instead of D Dorian or A Aeolian.)
  • By thinking of the fingerboard in a larger scale – it makes it easier for me to navigate Melodic and Harmonic Minor as – solely from a fingering/sonic visualization standpoint – I just see it as variations of the Major scale patterns.

To visualize Harmonic Minor patterns – simply flat the 3rd and the 6th of the Parent Major scale. (i.e. to visualize C Melodic Minor just play C major but change every E  to Eb, and change every A to Ab).

It’s important to note that all of the fingering conventions mentioned here are solely to assist with visualization as Melodic and Harmonic Minor really aren’t directly related to the Major scale sonically.

Here’s C Major

Here’s the audio.

Note:

In all the audio examples, I’ve played the example first as sextuplets – then at a slower tempo (i.e. 16ths) – then as sextuplets again.


Here’s C Harmonic Minor

(the only differences are

the E has been changed to Eb and

the A has been changed to Ab)

.

.

Harmonic Minor short cuts:

To visualize Harmonic Minor Patterns – simply flat the 3rd and the 6th of the Parent Major scale.

(i.e. to visualize C Harmonic Minor just play C major but change every E  to Eb and every A  to Ab).

.

Here are the pattern adaptations.  In a situation like this, it can get confusing to remember a formula like “Dorian b2, b5” so as an alternative you may just want to try remembering something like “Pattern 1” for Ionian b3, b6, “Pattern 2” for Dorian b2, b5, etc.

.

.
.
.
Here’s the same scale pattern – I left off the text “Pattern 6” in the example be by mistake but the sequence is Ionian b3, b6 (Pattern 1 ), Locrian b4 (Pattern 7) and Ionian b5, bRoot (Pattern 6).  You can really see this if you compare it to the initial major patterns.
.
.

Not-Peggios

Now let’s take this not-peggio idea from the last lesson and apply it to C Harmonic Minor starting from G.

In each of the following I’ll show the 2-string pattern followed by the 4-note “notpeggio” extraction from that fingering and then show the multi octave form.

Note:  The extraction always starts from the second note of the 6-note pattern – so while the first example is extracted from the F Lydian fingering – it’s viewed as a G based pattern.

From G

F Based Pattern

Note: this G-based pattern is the same as the C major and the C Melodic Minor G shape. It’s functional but a little plain sounding over a G major chord.

From Ab

G Based Pattern

Note: this R-3-#4-5 extraction works great as a lydian sound from the Root (Ab Lydian in this case) or a Dorian Sound over the vi (F minor in this case)

From B

Ab Based Pattern

Note: even though the original shape is different, this R-b3-b4th-b5 extraction is the same as the Melodic Minor pattern and is something you may want to explore over diminished chords.

From C

B Based Pattern

Note: this C pattern shape is the same as the C-Based C Melodic Minor pattern.

From D


C Based Pattern

Note: this R-b3-4-b5 extraction is right out of the D-Blues scale and can be used in the same context (just remember to resolve the Ab!)

From Eb

D Based Pattern

Note: this is a new shape from the other patterns we’ve seen. The R-3-4-b5 (i.e. major b5 (add 11) sound mixed with the min3-min2-augmented 2nd construction and the added chromatic weight from the G to Ab  makes it sound a bit harmonically unsettled over an Eb root.  I think it’s one of the more interesting sounds of the scale along with the final extraction….

From F

Eb Based Pattern

Note: this is a new shape from the other patterns we’ve seen. The R-b3-#4-5 (i.e. minor add (#11)) sound is a really nice spice to incorporate in your melodic ideas!

Here’s an audio sample of the 3/4 measures in ascending order from G

Next TIme?

In the next lesson I’ll look at using these extractions positionally.  It’s a Scott Collins original idea – and not one that I’ve heard anyone else really employ in this manner!
.

Practice Tips

As always, focus on the 3 T’s (Timing, Tone and hand Tension) when playing through these and make sure to have the timing locked in as you increase the metronome speed.  This approach is just a short cut to getting the patterns under your fingers.  By practicing them slowly and increasing the performance tempo gradually, you’re also getting the sound of them in your head – which is critical if they’re something you want to integrate in your playing!
As always, I hope this helps and thanks for reading!
– SC
PS – One plug here.  If you like this idea – I go MUCH deeper into similar concepts in my Guide to Chord Scales book – which covers every unique melodic combination from 3 notes to 12-note scales!!
Print editions of this book are available  on lulu.com or on Amazon (amazon.comamazon.co.uk, or amazon.fr).
.
.

P.S. If you like this post – you may also like:

BOOKS:


The GuitArchitect’s Guide To Modes – Part 13 Not-peggios

Hello everyone!

It’s been a while since I’ve posted anything mode related. So I thought I’d make up for some lost time by posting this lesson.

Not-peggios?

Those of you who have been following the licks in this blog for a while have probably figured out that one of my favorite melodic approaches is to work in the area between scales and arpeggios.

For those of you who remember all the way back to part 11 of this series – this idea works on the same approach but with triads.

Step 1: Extracting the Not-peggio

This idea uses the same 3-note-per-string / two string idea that’s behind all the visualization process here.  But to review:  Let’s start with a B Locrian scale pattern on the E and A strings:


C Ionian
From there:  I’m going to remove the 1st and 3rd notes of the pattern:


Not Peggio Extraction

Leaving a C major major triad with an added 4th which is something that intervallically lies somewhere between an arpeggio and a scale.  Technically it’s a close voiced arpeggio but the “not-peggio” tag has worked better for me when I explain to people so I’ll use it here as well.

Call it scrapple, grapple or anything else that will help you remember it – the naming convention is much less important than getting it under your fingers and in your ears so you can play it.

The good news is that applying this approach to a Major scale only produces four unique qualities of these melodic devices which I’ll talk about below.

One brief technical note:  I recommend either one of following picking patterns for any of the 4-note shapes presented here:

Picking Examples

If you’re used to alternate picking, that will work as well but I find that the semi-swept approach of the first example gives me a more uniform sound for legato playing.  It’s counter-intuitive but check the A minor straight ascending mp3 below to see what I mean.

Major add 4

Major Add 4 shapes

This shape doesn’t really work that well over major chords because the 4th (aka 11) is an avoid tone over a major chord.

However they do work well over minor chords. Try playing the C Ionian shape over an A Minor but for the most part, I find the major add # 4 shape to be one I use much more often.

Major add #4

Major add # 4 shapes

.

I’ve talked about this before – but a kind of cool applied theory trick is that Lydian and Dorian are relative major/minor substitutions.  By that I mean that while C major is the relative major key of A natural minor related chords scales C Lydian and A Dorian both come from the same parent major scale (in this case G Major).  So licks generated from this source will do double duty over both major and minor chords.  A two-fer if you will (or won’t – I understand either way).

Let’s apply this idea to G Dorian.

Here’s the 4-note shape taken from F# Phrygian:

G add # 4 extraction

And here it is an a 3 octave form:

G add # 4 3 octave pattern

.

Here’s a more sequences lick type of approach:

G Lydian 3 Octave run

Here’s the audio – with a short descend of the patten ending on the G on the 8th fret of b string.

You can try this approach over E minor for an E Dorian type sound as well.

 Minor add 4

Minor add 4 shapes

Okay a couple of quick tips here.  Since you don’t get the natural 6 of Dorian or the b2 of Phrygian in these shapes – they’re not really going to give you much of the flavor of those modes.

In this case, I’ll use the A Aeolian shape over A minor and F Major chords.

A Minor:


A Aeolian part 1

In this audio example I play the 3 octave form and then play the multi-octvave sequenced idea.

A Aeolian over F lick

Used over F Major:

Now I’ll take the same sequenced idea and apply it over an F major lick.  Here’s an audio example.  I slid up to the G on the 15th fret of the high E string and then descended with some tremolo bar scoops along the way.

Normally, applying an A Aeolian idea over F major would give it a Lydian sound – but the lack of the B (#4) in the pattern makes it a little more open sounding to me.

Finally – here’s the Diminished form.

Diminished add 4

Diminished add 4 shapes

Looking at the notes here (B, D, F, E) – I see the upper notes of a G7 (add 13) chord: G [Root] – B [3rd] – D [5th] – F [b7] – E [13].  So this pattern is one I use in Dominant 7th situations.

Here’s the basic pattern:

B Locrian Multi Octave

And here’s the application over a G7 chord.  It uses the same pattern sequencing idea as the other examples ascending but bends into a couple of notes including the 3rd on the B string for the final note.

Next time?  Some Melodic and Harmonic Minor shapes to get under your fingers.

As always, I hope this helps!

-SC

PS – if you like the ideas in this approach – the following books will help you expand on this idea exponentially!

The GuitArchitect’s Guide To Chord Scales

The GuitArchitect’s Guide To Modes: Melodic Patterns

The GuitArchitect’s Guide To Modes: Harmonic Combinatorics

Hot Rodding Your Minor Arpeggios – Or A Little Theory Goes A Long Ways

Hey everyone!

This post is tangentially related to the Modal Arpeggio posts that I put online so I’ve adapted the title (just like I’m going to be adapting the arpeggios in the post).

.

 “Minor minor on the wall….”

Let’s look at a 5-string A minor arpeggio:

.

.

Now there’s nothing wrong with this form.  But I find that a lot of people practice this arpeggio ascending and descending and then when it’s time to play over an A minor chord guess how they play it?

There was a time in the ’80’s where just cycling an A minor arpeggio over an A minor chord would cut it, but now it’s (yawn) boring.  So what can we do to make it more interesting?

.

Start with the Top Side

.

In a previous post, I talked about modifying triads to get more complex sounds.  In this lesson I’ll apply that to arpeggios.

The following is a map of alterations to show how chord tones can be modified to create other sounds.

.

.

So with any triad:

The root of the chord can be lowered to the 7 or raised to the 9

The third of the chord can be lowered to the 9 or raised to the 11

The fifth of the chord can be lowered to the 11 or raised to the 13

 .

In this manner, a triad can be altered into almost any other functional chord.

.
Let’s apply this to a minor arpeggio.

In the case of A minor I’m going to change the C on the high E string to B.  This creates an A minor (add 9) sound.


.

.

This is already a more interesting sound over an A minor chord to my ears.  But cycling the top notes of the arpeggio creates an interesting arpeggio sequence along the lines of something Tosin Abasi of Animals For Leaders might cycle (Try combining this lick with the one before it to see what I mean).

.

.

.

Going under the Hood

 .

This modification idea can be applied to any of the notes of the arpeggio, but for a moment let’s go in the opposite direction.  

In the previous post I talked about superimposing arpeggios.  Here I’ll take the same arpeggio form and drop the low note.  

Instead of stacking ascending thirds  like so:

A [up a 3rd]

C [up a 3rd]

E

I’m going to go a 3rd below A to F.  In this example I hammer on the 2nd note and then play the rest with sweep picking.

.

.

Over F, these notes become:

F (Root), A (Major 3rd), C (5th), E (Major 7th) and B (#11) or F Maj7 #11.

.

Using F# instead:

.

.

.

These notes then become:

F# (Root), A (Minor 3rd), C ( flat 5th), E (minor 7th) and B (11) or F Minor 7 b5 (add #11).

.

You could also make to low note G on the 10th fret for an A minor 9 sound (starting from the b7 – G) or make the low note an E which creates a A minor (add 9) arpeggio starting from the 5th.

.

For now, let’s stick with the F major 7 (add #11).  If we stack another 3rd below the F, we get D which creates a D minor 9 (add 13) sound. 

.

.


The natural 13 with the minor 9 is truly a Dorian modal arpeggio sound.  To play a simplified version –  just play the F major 7 (#11) arpeggio above over a d minor chord.

.

In the following example, I’ve added an open A string to the F major 7 (add #11) arpeggio.  Try playing this as a repeating figure which changing chords over the top of it.  It might give you a new song idea!

.

.

.

Hopefully this has given you some ideas and some new things to work on.  In the next lesson post, we get back into modes and get deeper into the individual modes.

.

Thanks for reading and I hope this helps!  

-SC

.

PS If you like this post you may also like:.

The Modal Microscope And A Sequenced Arpeggio Approach

Slash and Burn – Creating More Complex Sounds With Slash Chords

.

CREATING CHORDS AND LINES FROM ANY SCALE – A HARMONIC COMBINATORICS / SPREAD VOICINGS LESSON

AUGMENT YOUR KNOWLEDGE: SONIC SHAPES AND GETTING MORE FROM AUGMENTED CHORDS

Slash and Burn – Creating More Complex Sounds With Slash Chords

.

GETTING HIPNESS FROM A MAJOR TRIAD OR MORE CHORD RECYCLING PART 3

Getting Hipness From A Major Triad Or More Chord Recycling Part 2

GETTING HIPNESS FROM A MAJOR TRIAD OR MORE CHORD RECYCLING PART 1

.

RECYCLING CHORDS PART II: TRIAD TRANSFORMATION

RECYCLING CHORDS PART I OR WHERE’S THE ROOT?

RECYCLING SHAPES OR MODULAR ARPEGGIOS FOR FUN AND PROFIT

.

Some Useful Online Practice Tools

POSSESSION IS 9/10S OF THE LAW BUT PERCEPTION IS EVERYTHING OR PRACTICING PART VII

TESTING YOUR VOCABULARY OR PRACTICING PART VI

PRACTICE WHAT YOU PLAY OR PRACTICING PART V

.

DEFINITIONS AND DOCUMENTS OR PRACTICING PART IV

TENSION AND THE SODA CAN OR PRACTICING PART III

PROPER POSTURE IS REQUIRED FOR PROPER PERFORMANCE – PRACTICING PART II

PRACTICE MAKES BETTER AKA PRACTICING PART I

The GuitArchitect’s Guide To Modes Part 12 – Getting Into Modal Arpeggios – Superimpostion

Hello everyone!

Greetings from NYC!  While I’m still unpacking and waiting for instruments and boxes to make it here from South Pasadena I thought I’d mix and match a few ideas from my GuitArchitect’s Guide to Chord Scales book and modal arpeggios and talk about more ways to recycle things you already know!

.

2-string or not 2-string

(is that really the question?)

.

I’ve been talking a lot about 2 string arpeggios.  They’re really useful things in soloing because you can take a figure like this:

.

.

and move it in octaves while keeping the same fingering.

.

.

.

It’s a really useful visualization tool, and a relatively easy way to cover a lot of range on the instrument.

.

The real secret behind this approach is how you use the arpeggio or:

“So what about this superimposition thing?”

.

Superimposition is simply playing one thing on top of something that’s related but not in an immediately direct way.   Logic would dictate that you would play a C major 7 arpeggio over a C major chord.  That’s certainly one valid use, but it’s really not superimposing the chord because their directly related (i.e. Cmaj7 and C major).  Playing a C major 7 arpeggio over say a d minor or an e minor chord is getting more into what we’re talking about here.

In the examples below, I’ll be using a bass note to indicate tonality.  If you have a recording of a chord (or a bass note) to play over – just play the c major 7 arpeggio over one of those – otherwise you can use your fretting hand to tap each of the notes of the arpeggio (see the glass noodles post if you’re unfamiliar with the technique) and use your picking hand to tap the bass notes in the figure (and to help mute the strings)!

.

.

If the C major 7 chord is created by stacking ascending 3rds (C, E, G, B) then we should be able to go the reverse direction using descending 3rds from the root.  Going a 3rd below C gives us A which creates A, C, E, G, B or an A minor 9 arpeggio (no root):

.

.

Going a 3rd below A gives us F which implies: F (root), A (3rd), C (5th), E (7th), G (9th) and  B (#4 or #11)  or a F major 9 #11 arpeggio (no root, no 3rd):

.

.

(Note: This concept is explored in much more depth in the Harmonic Combinatorics book but you can get some information about the approach from the slash chords post or the recycling triads posts as well.)

.

You could continue on with this approach, and each time figuring out how the arpeggio functions over different chords, but there is an easier way!

.

The Chromatic Root Interval Chart

In The GuitArchitect’s Guide to Chord Scales, I devised a chart that would tell the reader how any chord scale would function over any root.  I’ve adapted that chart and utilized it for arpeggios in this lesson.  Here’s the full chart:

.

.

At first glance, this can look confusing but it’s REALLY useful for determining how scales and arpeggios (or chords) function over different tonal centers.  

.

In the steps below, I’m going to outline every step that could be taken to visualize this, but once you understand the process, you can skip a lot of the steps and understand what’s happening almost immediately.

.

Let’s go back to the C maj 7 arpeggio.  The formula for the arpeggio is Root (or R) 3rd, 5th and 7th.  Here’s what it looks like superimposed into the chart.  

.

.

I’ve taken the extra step of removing all of the information in the other columns of the chart to solely show how the Root, 3rd, and 5th of a particular chord functions over other tonal centers. It’s also important to note that this chart accommodates all possible root notes.  So while sharped roots (#R) or flat roots (bR) are really heard as b2 (b9) or 7ths respectively, they’re listed here to show the functions of specific notes over tonal centers (e.g. C maj 7 arpeggio played over a C# tonality).

Okay – now let’s move the information in the chart to the key of C:

.

.

Presented this way,  we can see how things function.  Played over D for example – the C, E, G, B functions as a b7th, 9th, 4th (or 11th) and a 6th.  As a D Dorian sound (C major over D implies D Dorian) you lose the minor 3rd but get the natural 6th flavor of the mode.

.

.

I’ll simplify the chart a little more:

.

.

Again, it’s also important to note that this chart accommodates all possible root notes.  So while sharped roots (#R) or flat roots (bR) are really heard as b2 (b9) or 7ths respectively, they’re listed here to show the functions of specific notes over tonal centers (e.g. C maj 7 arpeggio played over a C# tonality).  This also counts for b4 (which will be heard as a 3rd), and double flats (like bb7 which will be heard as a 6th or bb3 which will be heard as a 2nd).

.

From intervals to chord tones

Since this chart was initially created for chord scales, the intervals all exist within an octave.  For the purposes of chords and arpeggios it’s more beneficial to think of:

  • 2nds as 9ths
  • 4ths as 11ths and 
  • 6ths as 13ths 

.

I’ve converted these intervals to chord tones in the chart below:

.

 .

One sound I get out of this immediately is the Ab which gives a Ab maj 7 (#5, #9 no root) sound.  I’ve resolved it to Ab in the example below – but give it a shot – it takes a generic C major 7 arpeggio and gives it a shot glass of tabasco.

.

.

.

When I went to Berklee and got knee-deep into analysis, my teacher gave me this pearl of insight, 

“Actually the whole point of harmony 1-4 [classes] is to show you how any chord can follow any other chord”.

.

The reality behind all of the charts and theory is, if you understand how an arpeggio functions then you’re more likely to be able to resolve it – regardless of what chord you play it over.  

That’s a big picture concept – you may want to give it a second to let it sink in.

.

The thing to start to focus on is how things sound to you – specifically how various chord tones and intervals sound over various chords you’re using.  How do you like the sound of a #4 over a major chord?  Or a b9 on a minor chord?  As you start to find chord tones that you like over those areas, you’ll start to find that you’ll seek those sounds out.   The chart is just a shortcut for seeing how things function – but it’s reliant on what you hear.

My recommendation is take this arpeggio, play it (slowly at first) over all the tonal centers and really be aware of how the notes are functioning.  And (here’s the step most people skip) if it sounds “bad” to you – find a way to resolve it (like going to the Ab in the example above).  I call this the Van Halen approach, there are plenty of times that Eddie hits clams – but he finds cool ways to work them around so that you say, “wow what a cool idea” rather than “oh he botched that one”.

I’ll talk more about the importance of knowing how to “fix” things in a future post, but trust me – it’s worth spending some time on.

.

In the next lesson post, I’ll get into arpeggio modification slash chord stylie.  It’ll be really cool and if I have my audio converters delivered in time I can even go back to posting audio clips again!

ah the joys of moving….

.

I hope this helps and thanks for reading!

.

-SC

GuitArchitect’s Guide To Modes Part 11 – Geting Into Modal Arpeggios – 7th chords

Hello everyone!!

In the previous modal arpeggio lesson, I covered how to visualize triads from 3-note per string patterns.  In this post, I’m going to apply the same concept to 7th chords.  If you haven’t checked out part 10 of the series, you may want to review the approach before moving on.

.

Major Scale Harmonization

.

Any major scale is made up of the following triads and 7th chords based on scale degree.

.

.

Related to the key of C major, this breaks down into:

.

  • Triads: C major, D minor, E minor, F major, G major, A minor and B diminished.
  • 7th chords: C major 7, D minor 7, E minor 7, F major 7, G7, A minor 7 and B minor 7b5

.

This means that there are 4 unique qualities of 7th chords for a major scale:

  • major 7 (C major 7 and F major 7 in the key of C)
  • minor 7 (D minor 7, E minor 7 and A minor 7 in the key of C)
  • dominant 7 (or 7) (G7  in the key of C)
  • minor 7 b5 (B min7b5  in the key of C)

.

Played as 2-string fingerings there are 4 possible inversions of each arpeggio.

.

.

.

.

.

To see how these shapes relate to the modes, let’s look at an ascending C major scale on the B and E strings:

.

.

Previously, we extracted every other note to reveal the triads related to each 6-note shape.

.

.

This time, we’ll remove the 3rd and the 5th note from each shape.  This will create a 7th chord arpeggio in the 3rd inversion (i.e. starting from the 7th).

.

.

Here it is written as 16th notes:

.

Chord sequence Dm7-Em7-Fmaj7-G7-Am7-Bm7b5-Cmaj7

.

While the approach I’ll demonstrate will work with any inversion, all the examples here will utilize the 3rd inversion.

.

The first important visualization with each form is that the 2nd note of each arpeggio in this lesson is acting as the root.

.

Step one: Using the patterns diagonally

.

As I mentioned in the previous arpeggio post, a distinct advantage of 2-string patterns is that you can move them in octaves and maintain the same fingering.  Here’s a C major 7 arpeggio moved in octaves on the middle and top set of strings.

.

.

Michael Angelo Batio was the first rock guy I saw playing this type of pattern in a shred context but now the sound of it is pretty common rock/metal vocabulary.  This idea will get covered more in part 12 of this series, but to make it sound a little cooler, instead of playing it over a C major chord  – try playing the above arpeggio over an A minor chord:

.

  • when C major 7 (C, E, G, B) is played over A the notes act as (b3rd, 5th, b7th and 9th) or A minor 9 (no root)

.

Step 2: Putting it together positionally

 .

At the top of the page, I showed how I extracted arpeggios by eliminating the 3rd and 5th note from an ascending 3-note per string pattern.  This same process can also be applied positionally.  For example, here’s a 3-note per string C major scale played  in 8th position.

.

.

Now I’ll apply each of these arpeggio shapes to the C major scale starting with the root position. Notice that the 6-string shape links together a D minor 7, C Major 7, and a B minor 7b5 into one big arpeggio. 

.

.

To visualize the arpeggios across 6 strings just remember: 

 as the pitches ascend, the related arpeggios descend (and vice versa)!

.

Also remember that the 2nd note of the arpreggio acts as the root, so if you want the C major 7 arpeggio on the low E string

.

.

you’ll extract it from B Locrian.

.

.

The pattern creates a different flavor of modal arpeggio than the triadic version in part 10 of the guide.  Where the triadic version moves in diatonic thirds, this pattern keeps a diatonic 2nd between each 7th chord arpeggio. Here are all of the positional arpeggios of  the C major scale derived this way:

.


Big Picture Alert!!

 .

Since all of the notes of the C major scale are presented in the linked arpeggios, you could technically play this over any diatonic 7th chord in C major if you resolved it properly.  As a recap of the modal microscope lesson, I tend to view things from a parent scale perspective so:

.

  • If you play any of these patterns over a C major 7 chord – you’ll imply a C Ionian sound
  • If you play any of these patterns over a D minor 7 chord – you’ll imply a D Dorian sound
  • If you play any of these patterns over an E minor 7 chord – you’ll imply an E Phrygian sound
  • If you play any of these patterns over a F major 7 chord – you’ll imply a F  Lydian  sound
  • If you play any of these patterns over a G7 chord – you’ll imply a G  Mixolydian  sound
  • If you play any of these patterns over an A minor 7 chord – you’ll imply an A Aeolian sound and
  • If you play any of these patterns over a B minor 7b5  chord – you’ll imply a B Locrian sound

.

Now I’ll apply each of these arpeggio shapes to the C major scale.  Feel free to try these over any of the chords listed above (although you may want to read the note about “The Problem with Ionian” below if you’re playing any of them over C major 7).  I’m partial to playing them over D minor 7 or D minor 9 depending on which note I’m starting or ending on.

.

.

.

.

.

.

.

.

The “trouble” with Ionian

.

The “problem” with the Ionian mode in general is that the natural 4th is an avoid tone over major 7th chords with the same root.  (i.e. C Ionian played over C maj7).  For this reason, I generally avoid Ionian as a mode and instead focus on the major scale for visualization purposes.   If I were to use this approach over a C major 7 chord,  I would probably be more likely to go with a Parent Major scale of G major for a C Lydian sound (i.e. change the “F” in each pattern to “F#”). 

.

.

Step 3 – Adaptation

.

While I dig these arpeggios as is – I tend to use them as visualization tools.

.

You may notice that these arpeggios are all 2-note per string.

Just like a “box” position pentatonic scale….

“Hey”, you might be thinking, “what if you adapted all of those pentatonic variations and sequences that you worked out to these arpeggios?”

Good Idea!!!

.

 As a starting point, I’m partial to playing this form over D minor as it already has some of the step-wise shapes I associate with pentatonics:
.
.
so I’ll use it for the examples below.  In the first one, I’m applying a descending group of threes to a pattern. (This also works ascending as well).
.

A big thing I work on with pentatonics is string skipping.  Here, I’ve adapted an idea to the linked arpeggios.

.

.

Here’s a cool variation on this lick – replace the 8th fret “G” on the B string with an “A” to match the major 3rd interval on the G string.  Once you can visualize a lick making variations like this is relatively easy (and it sounds cool!!)

.

From there it’s easy to mix and match things,  Now that you see the pattern it comes from, the lick below just removes the F to create a different arpeggio shape.  It starts off as C major 9 but links into a D minor shape to create a D minor 13 sound followed by some string skipping.  Grab your guitar and give it a whirl!

.

.

The key with any approach like this is to keep it simple.  Mind you, some of these ideas might not sound simple, but the approach really comes from mastering the 2-string visualization idea, and then usurping it in cool ways!  Try coming up with your own variations!  

.

Extra Credit!!

.

Like I said before, while I’m sure that they’re out there, I don’t know any other guitarist who approaches fingering modal apreggios with the interlocking 7th chords,  but if these shapes are already familiar to you or if you’re looking to expand outside of this tonality, I have a few small tweaks that have BIG implications.

.

  • Lowering the E –> Eb in any of the C major patterns above will give you all of the Melodic Minor 7th chord linked arpeggios.
  • Lowering the E–> Eb and lowering the A –> Ab in any of the C major patterns above will give you all of the Harmonic Minor 7th chord linked arpeggios.

.

In other words, “Thar’s gold in them thar’ hills!!”  If you put some time into working with these ideas methodically, I’m sure you’ll get some unique approaches under your belt that’ll pay dividends (even if they don’t get you a tab at the general store).

.

Part 12 gets into superimposition.  It’ll be short, sweet and really cool!

.

I hope this helps!

.

-SC

.

 .

GuitArchitect’s Guide to Modes Part 10 – Getting into Modal Arpeggios – Triads

Hello everyone!!

I’ll be delving into individual modes in more depth in the coming weeks and months ahead but as a preliminary step, I wanted to get into modal arpeggios a bit as they’ll be important components in future lessons.

.

Scales = Chords

.

Since chords and scales are made up of the building blocks (notes), they are essentially 2 sides of the same coin.

For example, let’s look at an ascending C major scale on the B and E strings:

.

If we remove every other note of the first for notes we can see arpeggiated versions of the triads associated with those modes.

While 2-string arpeggios are often neglected by guitarists, they are certainly worth investigating for helping with visualization.

.

2-String Triadic Visualization

.

The major scale is made up of three types of triads:  major, minor and diminished. Played as unique notes, any triad has three typical voicings:

  • Root position with the root as the bass note: (i.e. Root, 3rd, 5th)
  • 1st inversion with the 3rd as the bass note: (i.e. 3rd, 5th, Root)
  • 2nd inversion with the 5th as the bass note: (i.e. 5th, Root, 3rd)

.

Here are some sample fingerings of each of the chord types played as 2-string arpeggios in each inversion:

.

.

.

.

.

.

.

2-string Major Scale Triads

.

Now I’ll apply each of these arpeggio shapes to the C major scale starting with the root position.

As a reminder here are the triads of the C major scale.

.

 .

Since the fingerings are on 2-strings, they’ll be the same on the E/A, D/G and B/e strings.

.

.

Here are the arpeggios in 1st inversion.  Again, since the fingerings are on 2-strings, they’ll be the same on the E/A and B/e strings as well.

.

C major scale triads in 1st inversion ascending by scale degree

.

And finally, here are the arpeggios in 2nd inversion.

.

.

Putting it together positionally

 .

At the top of the page, I showed how I extracted arpeggios from ascending 2 string patterns.  This same process can be applied positionally.  For example, here’s a 3-note per string C major scale played  in 8th position.

.

.

Now I’ll apply each of these arpeggio shapes to the C major scale starting with the root position. To create a modal arpeggio, simply remove every other note.  Doing so with this scale creates a C Ionian modal arpeggio.

.

.

Modal arpeggios are sonically cool because they convey the full sound of the mode but break it out of a scalar pattern.

Modal arpeggios are cool in this method, because if you can visualize a scale then making the arpeggio is relatively easy.

.

The trouble with Ionian

..

The “problem” with the Ionian mode in general is that the natural 4th is an avoid tone over major 7th chords with the same root.  (i.e. C Ionian played over C maj7).  For this reason, I generally avoid Ionian as a mode and instead focus on the major scale for visualization purposes.  

.

With that in mind, here ‘s another approach for using this arpeggio.

.

I really dig playing this particular arpeggio over D minor – to create a D Dorian type of sound. In the example below, I’ve used the C and the E pitches on the low E string to encircle the D (one note above and one below) to help emphasize the D minor 13 sound of the arpeggio and end it on the 9th.

.

.

The final visualization trick

.

If we look at the positional arpeggio again:

.

.

Take a close look at the positional modal arpeggio!  If you look at it as a group of 3-note shapes you’ll see that it’s actually made of of 3 triadic arpeggios: C Major, B diminished and A minor.  

.

C Ionian = C maj + B dim + A min

.

Going back to the 2-string scalar observation in part 3 of this post, as the pitches ascend, the related arpeggios descend.  This is true of any of the modal arpeggios – so it might be a cool way for you to visualize it! Try it with your own arpeggio forms!

 .

In the next post, I’ll go through 7th chord arpeggios.  In the meantime, try practicing the 2-string arpeggios over all of the chords of the C major scale:

  • C maj 7
  • D min 7
  • E min 7
  • F maj 7
  • G7
  • A min 7
  • B min7 b5

.

and then over whatever other tonal centers inspire youI hope this helps!  As always, thanks for reading!

.

-SC

.

PS  – if you like this post, you may also like:

.

Books:

.

Lessons