What Scale Do I Use?

Well…


Yep – It’s been a while.  A lot’s gone on.   These posts take quite a while to do so I need to either figure out a way to make them MUCH shorter or just post more sporadically.  I had a couple of free hours this AM so here we go!  Let’s get to something you might be able to use.

A lot of times in lessons, I get asked some variation of the question,

“What should I play over this or that chord?”


For example, here’s a question I answered on Facebook  a while back and I thought that the answer for approaching any kind of unfamiliar chord might help some of you.

“hi folks!Cmaj7b9#11 what scale can i use???????”

Here’s how I approach unfamiliar chords and it may help you:

  •  If I don’t recognize the chord – I recommend CONVERTING to the key of C.  The reason for this is the key of C has no sharps or flats so any chord formulas become easier to figure out.  In this case we’re already in C (C maj7 b9 #11).


  • Make sure you understand the chord. The chord is C maj7 b9 #11. The major 7th chord formula is Root (C), 3rd (E), 5th (G), 7th (B).  On top of that we’re adding a b9 (Db) and a #11 (F#).  Lets find a voicing that makes sense.


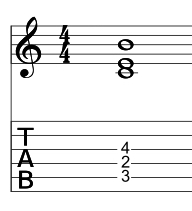
In a Major 7th chord, the 5th doesn’t really add any flavor to the chord.  It’s just filler.  If you need to condense voicings just remove the 5th (if it’s an altered 5th like. #5 or a b5 – that’s a different story!!).  Here’s a shell voicing of the C major 7th (no 5th):  R-3rd-5th.

C Maj
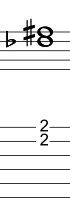
Now I see that Db – F# as just a barre on the 2nd fret.  (Side note – taken on it’s own I hear this as F#-C# or a F# power chord.  In the following examples I’ll continue to use Db but I recommend paying attention to what you hear and adjusting appropriately).

DbF#

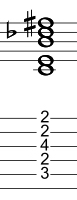
Combining the two produces this:

CMaj 7b9#11_1

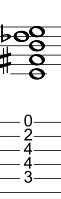
As an alternative to this voicing I also like the 3rd on the high E string – so I’ve switched the F# and E around in the voicing below.  Use one of these for the examples below (or any other voicing with the appropriate notes that works for you.)

Cmaj7b9#11_2

  • Now that we know what chord we’re playing the question of “what do we play over it?” becomes a little easier to answer.  My very first question might be counter-intuitive but typically I’d ask, “What chord are you playing after it?”  It’s important to understand how a chord works in the context of the chords around it because ultimately you want to be able to make a musical statement that has continuity through a chord progression.


  • For the sake of simplicity, let’s assume it’s the ending chord of a tune.  Start with just the notes of the chord: C, E, G, B, Db, F# 

    in order that becomes C, Db, E, F#, G, B.  Using the notes that are actually in the chord for melodic exploration are the best place to start!  You can always add other notes after!

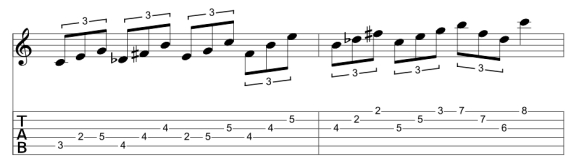
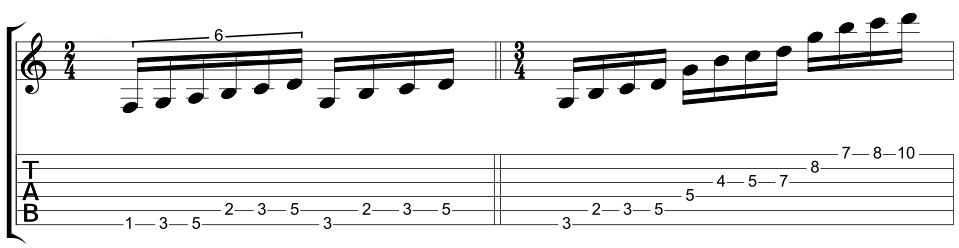
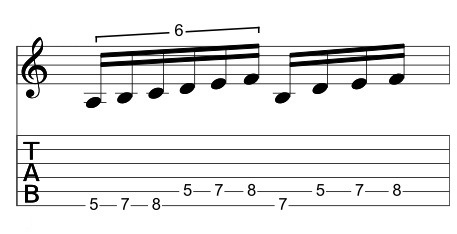
Here’s a lick that uses the notes of the scale in position.

Scale 1

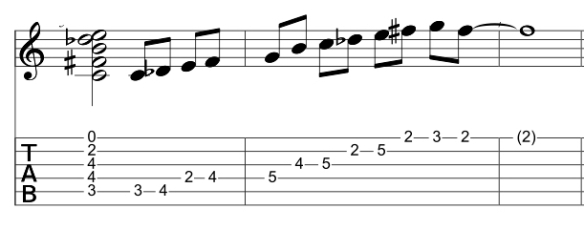
When I play licks like this I always play the chord first to get the sound of the chord in my head and THEN work on a lick.  You could loop the chord with a looper, record it and play it as a backing track, etc.  the point is to get the harmonic context (i.e. the sound) in your head first and go from there.

Note:  the resolution to C doesn’t really feel complete.  The F# and Db in the chord creates instability.  It’s almost as if the chord is implying (to my ears) a resolution to Em.  When you have chords like any kind of dominant chord – they typically want to resolve somewhere.  Pay attention to where your ear tells you the chord is going and use that in crafting lines and ideas.

So start here!  Just familiarize yourself with the sound of the chord and how the individual chord tones work over it.

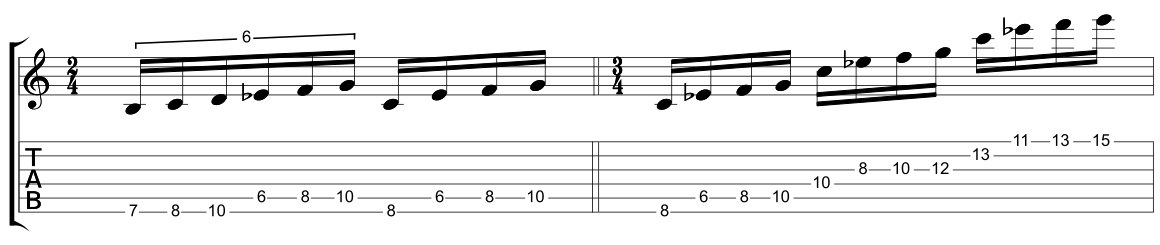
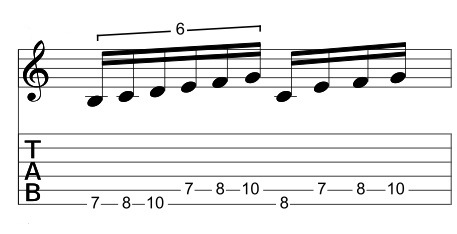
  • You could remove any note for a pentatonic (C, E, F#, B, G / C, Db, E, F#, B for example).  Here’s are a few fingerings to explore those ideas.  Apply melodic devices (rests, rhythmic variation, sequencing) to get generate unique ideas.

Cmaj7b9#11_2

Pentatonic Lick 1_1A

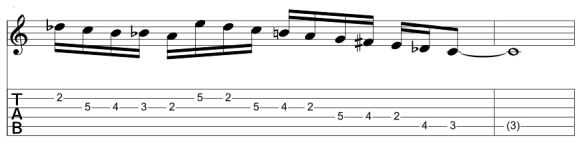
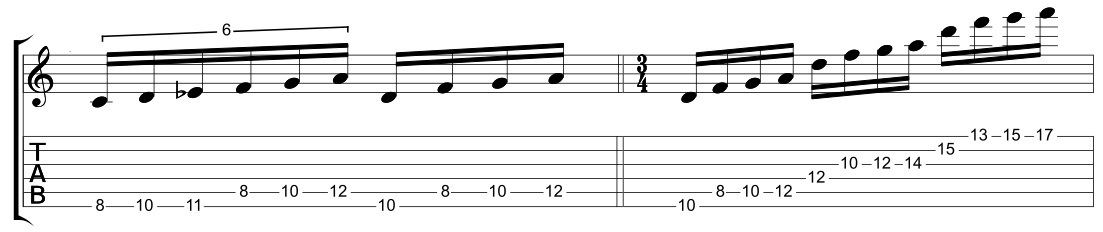
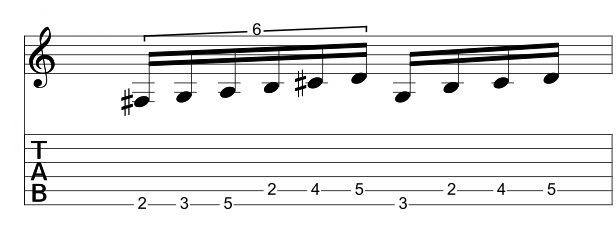
  • You’re only missing some type of A for a 7-note scale (Ab, A, A#)  Let’s say A for now:  C, Db, E, F#, G, A, B

Here are a couple of ideas floating around that.  The first one uses the sequencing idea we saw before – the second is just a straight melody.

7 note with A

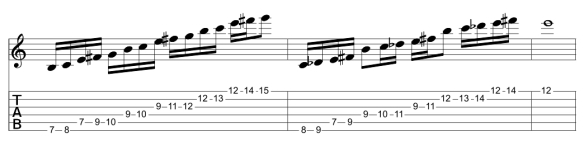
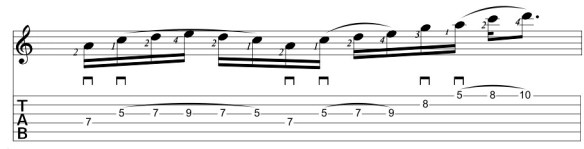
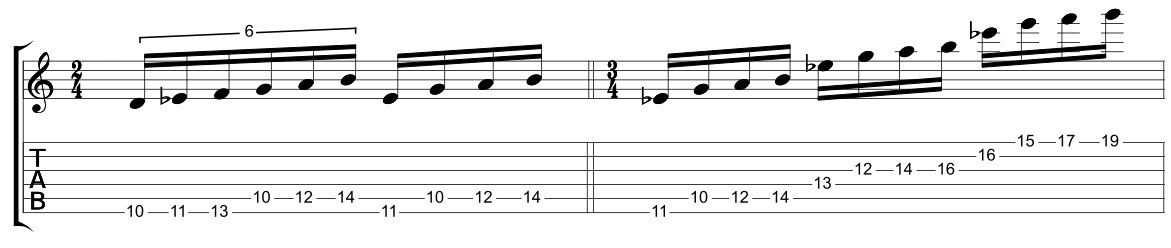
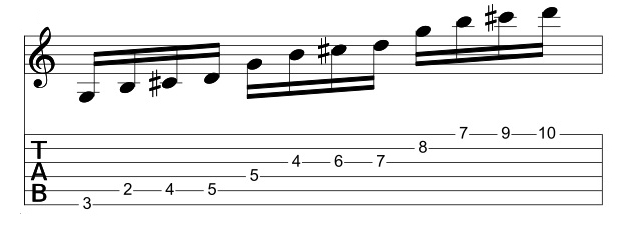
  • Repeating licks are something worth exploring as well (particularly if you’re playing the last chord as a cadenza).  Here’s a little McLaughlin inspired run.

Repeating Lick

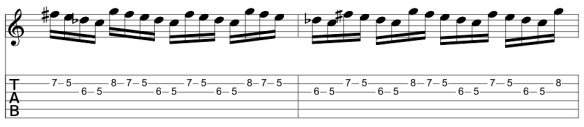
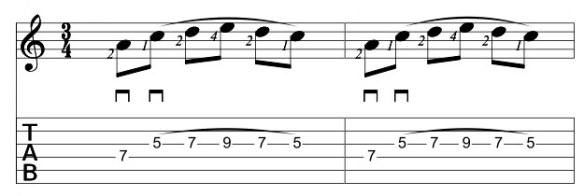
  • Try extracting some triads, 7th chords or intervallic ideas from the scale.  In the example below, I took a G5 add 2 (aka Gsus2 aka replacing the B in a G major triad with an A) and moved it in scale wise motion on the A, G and B strings.  I added a C in the bass for harmonic context (sometimes played with the thumb but you can experiment with fingerings) to help get the sound of the triad in my head. (Watch that stretch in bar 3!!  If it hurts your hand just tap the C with your picking hand.)

Intervals 1

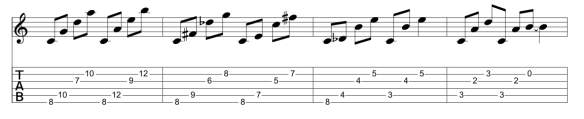
  • You can get a lot of mileage from just two alternating between 2 sets of triads (or any other type of 3 note cells – the end result is a Hexatonic – or 6-note scale).  Here I’ve used C major and the notes Db, F# B.  I start moving them through inversions and then mix an match to get some more interesting ideas out of the line.

Intervals 2

  • You could also try working in some chromaticism (D, Eb, G#, Bb) etc. for a 8 or 9- note scale:

Chromatic

  • This doesn’t even take into account approach notes (there’s a considerable amount of 1/2 step motion in the chord already (B-C, C-Db, F#G) but you could add in approach notes to B (Bb),  E(Eb), or F# (F) for example, superimposition of other arpeggios / tonalities or a number of other approaches – this is simply one simple approach to get some ideas flowing for approaching how to play over an unfamiliar chord.


  • One place where people get hung up on something like this is trying to take on too much at once.  “Seeing” the chord over the entire fretboard.  Working out arpeggios in all positions etc.. Notice that once I worked out a voicing in second position – many of the licks just worked around the chord shape there.  Start small!!!  Find a sound you like and run it into the ground with melodic possibilities and variations and lick ideas. Then try others. One eats an elephant one bite at a time.


Ultimately what to play over any given chord will depend on the melody, the chords before and after it, the mood of the tune, and your aesthetic.  It also depends on what you hear – so explore lot’s of variations and work on the ones that sound good to you!

As always, I hope this helps and thanks for reading!

-SC


An Update And A Lesson On Technical Recycling

“It’s been a long…long…time”

I just realized that it’s been a while since I posted anything here.  Life has a habit of getting in the way of well laid plans.  So here’s a bullet point list to create a quick update.

  • Korisoron – We are currently working on a new KoriSoron recording and our most intensive material will be on this one!  Initial tracking is in progress and we expect to have the recording out in September.  I’m also writing new material for the project and-  Booking new gigs for the fall.
  • TEDx – Korisoron has been asked to perform at TEDx Schenectady this fall and I’ll be delivering a related talk.
  • Old Project  – I don’t want to jinx anything but I should be getting together with some former band mates of mine and putting some finishing touches on a project that was very near and dear to my heart (and that I’ve mentioned in prior posts).   Fingers crossed – that will be another EP out this fall.
  • “Eel-Ech!-trick-a-coup-stick” – is the tentative title of a solo acoustic recording I’ve been working on.  I had previously recorded some tracks but wasn’t happy with them so I’ve been cleaning some things up and moving forward with getting that out the door by the end of the year.
  • The new pedagogy approach I mentioned a while back – I’ve been working on this but, quite honestly, I seriously underestimated the amount of prep I’d need to do to make this work so I’m just rolling up my sleeves and trying to pull ahead.  I took some notes back from the presentation I did at the HVCC Guitar Festival and have been pulling the material together – but I’ve learned more in the last 6 months about how to deliver everything (and what to deliver) than I learned in all my previous years.  I’m super excited about what this is becoming.
  • The other things – I have a few other musical things in the works that are too tentative to discuss, but, well, let’s just say that it’s a lot of electric guitar in various fashions that will be disruptive.  Other things also include a lot of revision plans for this site as well.

A lesson while you’re waiting

One of the things that hold up posts are the fact that I don’t write them in an organized way.  I write them in real time based on a theme in my head because it makes the writing more immediate and (hopefully) engaging for the reader.  Good for the reader – bad for productivity.  A post with any kind of lesson content typically takes 3-5 hours but some of the mode ones took 10-12 hours in editing, layout etc. so that’s why the posts get a bit sporadic for actual lesson material.

The value of recycling

One trap I still find myself falling into is the trap of “short attention span theater” or playing an idea, discarding it like a child’s toy and then picking up another idea and doing the same.  Maybe it’s a little cultural ADHD kicking it – but it’s very easy to loose site of taking a theme and really developing it into something.  (A great example of this for me is Bill Frissell’s Nashville where you can really hear each of the players take care in developing musical solos based on the melody).

From a technical standpoint, this approach can also be really useful.  It can take a long time to really master technical aspects of performance (particularly at the early stages).  Finding new ways to utilize the approaches you’ve been practicing will dramatically reduce the time it takes to learn new things.  For example, alternate picking takes a long time to develop at the early stages of playing, but once you have it down it makes everything  you have to lean to play with alternate picking easier to perform.

Optimize

Let’s take an A minor pentatonic lick.

Pentatonic Lick 1

Let’s say that you’re using hammer ons and pull offs to create a more legato feel.

For me, the most legato part of this passage is the last three notes.  I’ll move the E on the B string to the 9th fret of the G string to put 3 notes to that string and make the pattern more fluid.

(Note the change in fingering)

Pentatonic Lick 1a

This is more of how I approach pentatonic fingerings so I adapted the first fingering for one that works better for me.  Here’s the first part of the lesson – assuming that you have a base level of technique acquired – find fingerings that make sense for you!

If this fingering isn’t one that’s common for you and you want to practice the approach.  Here’s how I would do it.

 1.  Isolate. There are two technical hurdles in this lick. Combining the 1 note per string and 3-note per string notes with picking

 Lick 1CAnd this:

Lick 1D

And the transition between the two:
Lick 1E
2.  Practice

The first step is to just get the initial fingering and picking down.

  • Set a metronome for 5-10 minutes.
  • Slow it down! Playing fast before you’re ready just adds tension and makes the lick sloppier and harder to play.  The goal is to take something you can play perfectly and effortlessly and then systematically develop it so you can play it perfectly and effortlessly faster.

Lick 1 Slow

  • Pay attention to the 3 T’s (Timing, Tone and hand Tension).  If you find your attention wandering this will get it back.  Are there any biffed notes? (Watch that pinky!)  Is any part of the hammer-on/pull-off uneven? (Bonus credit – make a video recording and listen back.  Pay attention to what both hands are doing.  Be critical but not judgemental.  Imagine you are watching a friend play this.  What constructive criticism could you add to help him or her play it better?)
  • Write down what you just did.
  • Adapt this to the second lick and the transitional lick if need be.  Get it to the point that the entire lick can be played without mistakes.
  • Repeat as long as time allows.  Do daily (and if possible, multiple sessions daily).
  • Typically with something like this, I’ll also practice it as sextuplets and a few other rhythmic variations to have those at my disposal if need be.

3.  Extrapolate.

This is something I improvised over a C minor-ish feel that uses the same technical approach that I used on the previous lick with a C Blues scale.

Cmin Lick

Click on image to see a larger version

From a technical standpoint – this is the same basic idea as the first 6 notes from the previous A minor example.

C min lick 1
(Ah – the fingering is missing here – I’m using 2-1-2-3 for each of these)

Sequenced here from the b7:
C Min Lick 2
And from the 5th here:
C Minor Lick 3

In fact the only new thing is the string skipping at the end:

(I got lazy here – I’m using the tritone F#/Gb interchangeably).

Cm String Skip
If the string skipping is unfamiliar to you you can just use the same approach to get it down outlined above.

(Yet another) Shawn Lane Observation

I was watching some footage of Shawn Lane that someone posted the other day and this technical recycling was VERY apparent to me in the footage.  From a technical standpoint, it appears to me that he took six or seven technical approaches beyond the realm that anyone else was willing to develop them to (fretting hand taps as opposed to hammer-ons, rhythmic groupings variations (5,6,7,9, etc), wide interval string skipping, Hindustani / Carnatic slide playing and blues phrasing) and adapted those to all of the different music he was engaged in.

In Karate, it always comes back to the Kata.  In boxing – the basics, the jab, the hook, cross, the uppercut.  You can practice fundamentals your whole life and STILL find things to improve.  New techniques take a long time to get down.  Invest the time wisely to get the one’s you need REALLY down to help realize what you want to express and then explore your sonic world with the tools you’ve developed.  (and if you’re not sure which techniques those are – a good teacher can help!  You can email me at guitar (dot) blueprint at gmail if you’re interested in setting up skype lessons to help realize your goals.)

As always, I hope this helps!

Thanks for reading,

SC


The GuitArchitect’s Guide To Modes – Part 14 Not-peggios – Melodic Minor Version

Hey everyone,

As promised, here’s a follow-up lesson that takes the approach I explored in Part 13 and applies it to the Melodic Minor scale.

I’ll use C Melodic Minor in this case – but this idea will work on any root.

Chords

Before we get too far into the lick side of this let’s look at the chords to see what we can play this over.

Here are the diatonic triads and 7th chords.


Try playing any of the following C Melodic Minor shapes over any of these chords..

Some Melodic Minor Notes:

  • Melodic Minor is an old scale.  Originally it was played as melodic minor when ascending but natural minor when descending.  Not a whole lot of people perform it that way in Jazz circles but mixing and matching the two can have some interesting sounds (i.e. it’s something you should consider experimenting with if this area interests you and you haven’t already).
  • Melodic Minor is a Dominant machine.  If you check out the harmonization above you’ll see that Melodic Minor has two 7th chords in it’s harmonization.  As Jazz standards use a LOT of dominant devices – this is a scale you’ll want to investigate if you have an even remote interest in Jazz.
  • Melodic Minor is a weird sound.  Yes it is.  The I chord is a minor (maj7) chord and that whole b3 mixed with the natural 6th and 7th makes for some interesting moments.  The only metal guy I knew who was really into that sound was David Chastain and he was doing instrumental stuff that didn’t really sound like anyone else. (Hint – this is worth exploring if you’re a rock or metal guy)
  • Hip trick alert:  since the ii chord is a minor chord -try playing C Melodic Minor lines over Bb Minor as well!

.

Now let’s talk about visualizing the scale.

“You take the good you take the bad – you flat the third and there you have…”

Melodic Minor

I’ve talked about my approach to Melodic Minor briefly in part 9 of this series – but as a brief review:

Major Scale/Modal Visualization Review

  • The guitar fingerboard can be divided into 3 sets of two strings. Any 2-string fingering pattern that starts on the B string can be moved to the same starting pitch on the D or the low E string and keep the same fingering.
  • The major scale can be broken down into seven two-string modes that follow a specific order based on its scale degree from the parent scale (Ionian, Dorian, Phrygian, Lydian, Mixolydian, Aeolian, Locrian). The two-string patterns are modular and can be adapted to positional playing.
  • Instead of thinking of individual modes when playing,  I tend to think of larger tonal systems (i.e. I think of C Major all over the fingerboard instead of D Dorian or A Aeolian.)
  • By thinking of the fingerboard in a larger scale – it makes it easier for me to navigate Melodic and Harmonic Minor as – solely from a fingering/sonic visualization standpoint – I just see it as variations of the Major scale patterns.

To visualize Melodic Minor patterns – simply flat the 3rd of the Parent Major scale. (i.e. to visualize C Melodic Minor just play C major but change every E  to Eb).

It’s important to note that all of the fingering conventions mentioned here are solely to assist with visualization as Melodic and Harmonic Minor really aren’t directly related to the Major scale sonically.

Here’s C Major

Here’s the audio.

Note:

In all the audio examples, I’ve played the example first as sextuplets – then at a slower tempo (i.e. 16ths) – then as sextuplets again.

Here’s C Melodic Minor

(the only difference is that the E has been changed to Eb)

.

.

Melodic Minor short cuts:

Using the Parent Major patterns above here’s a list of short cut’s to help you visualize the patterns.

.

Note: in the F Lydian shape – there’s no change from the major shape since there’s no Eb in the 2-string pattern.

.

.

.

Not-Peggios

Now let’s take this not-peggio idea from the last lesson and apply it to C melodic minor starting from G.

In each of the following I’ll show the 2-string pattern followed by the 4-note “notpeggio” extraction from that fingering and then show the multi octave form.

Note:  The extraction always starts from the second note of the 6-note pattern – so while the first example is extracted from the F Lydian fingering – it’s viewed as a G based pattern.

From G

G based pattern

Note: this G pattern is the same as the C major G shape.

From A

A based pattern

Note: this is a new shape from the Major patterns. The R-b3-4th-b5 shape may remind you of the A blues scale.

From B

B based pattern

Note: this is also a new shape from the Major patterns. The R-b3-b4th-b5 shape is something you may want to explore over diminished chords.

From C

C based pattern

Note: this C pattern shape is the same as the A minor form from C major.

From D

D based pattern

Note: this D pattern shape is also the same as the A minor form from C major.  This shape and the C minor shape above on their own really won’t give you much of the Melodic Minor flavor on their own – but alternating between the two of them will.  More on that in a future lesson.

From Eb

Eb based pattern

Note: this is a new shape from the Major patterns. The Eb Maj7 (#5) based pattern has been deconstructed into almost a whole-tone idea.  This is one of my favorite “outside” sounds in this scale.

From F

F based pattern

Finally,  this F pattern shape is the same as the F Lydian form from C major.

Here’s an audio sample of the 3/4 measures in ascending order from G

Next TIme?

In the next lesson I’ll look at applying this to Harmonic Minor and then I’ll look at working through these ideas positionally (Spoiler Alert – this is where this approach gets really cool!!).
As always, focus on the 3 T’s (Timing, Tone and hand Tension) when playing through these and make sure to have the timing locked in as you increase the metronome speed.  This approach is just a short cut to getting the patterns under your fingers.  By practicing them slowly and increasing the performance tempo gradually, you’re also getting the sound of them in your head – which is critical if they’re something you want to integrate in your playing!
As always, I hope this helps and thanks for reading!
– SC
PS – One plug here.  If you like this idea – I go MUCH deeper into similar concepts in my Guide to Chord Scales book – which covers every unique melodic combination from 3 notes to 12-note scales!!
Print editions of this book are available  on lulu.com or on Amazon (amazon.comamazon.co.uk, or amazon.fr).
.

The GuitArchitect’s Guide To Modes – Part 13 Not-peggios

Hello everyone!

It’s been a while since I’ve posted anything mode related. So I thought I’d make up for some lost time by posting this lesson.

Not-peggios?

Those of you who have been following the licks in this blog for a while have probably figured out that one of my favorite melodic approaches is to work in the area between scales and arpeggios.

For those of you who remember all the way back to part 11 of this series – this idea works on the same approach but with triads.

Step 1: Extracting the Not-peggio

This idea uses the same 3-note-per-string / two string idea that’s behind all the visualization process here.  But to review:  Let’s start with a B Locrian scale pattern on the E and A strings:


C Ionian
From there:  I’m going to remove the 1st and 3rd notes of the pattern:


Not Peggio Extraction

Leaving a C major major triad with an added 4th which is something that intervallically lies somewhere between an arpeggio and a scale.  Technically it’s a close voiced arpeggio but the “not-peggio” tag has worked better for me when I explain to people so I’ll use it here as well.

Call it scrapple, grapple or anything else that will help you remember it – the naming convention is much less important than getting it under your fingers and in your ears so you can play it.

The good news is that applying this approach to a Major scale only produces four unique qualities of these melodic devices which I’ll talk about below.

One brief technical note:  I recommend either one of following picking patterns for any of the 4-note shapes presented here:

Picking Examples

If you’re used to alternate picking, that will work as well but I find that the semi-swept approach of the first example gives me a more uniform sound for legato playing.  It’s counter-intuitive but check the A minor straight ascending mp3 below to see what I mean.

Major add 4

Major Add 4 shapes

This shape doesn’t really work that well over major chords because the 4th (aka 11) is an avoid tone over a major chord.

However they do work well over minor chords. Try playing the C Ionian shape over an A Minor but for the most part, I find the major add # 4 shape to be one I use much more often.

Major add #4

Major add # 4 shapes

.

I’ve talked about this before – but a kind of cool applied theory trick is that Lydian and Dorian are relative major/minor substitutions.  By that I mean that while C major is the relative major key of A natural minor related chords scales C Lydian and A Dorian both come from the same parent major scale (in this case G Major).  So licks generated from this source will do double duty over both major and minor chords.  A two-fer if you will (or won’t – I understand either way).

Let’s apply this idea to G Dorian.

Here’s the 4-note shape taken from F# Phrygian:

G add # 4 extraction

And here it is an a 3 octave form:

G add # 4 3 octave pattern

.

Here’s a more sequences lick type of approach:

G Lydian 3 Octave run

Here’s the audio – with a short descend of the patten ending on the G on the 8th fret of b string.

You can try this approach over E minor for an E Dorian type sound as well.

 Minor add 4

Minor add 4 shapes

Okay a couple of quick tips here.  Since you don’t get the natural 6 of Dorian or the b2 of Phrygian in these shapes – they’re not really going to give you much of the flavor of those modes.

In this case, I’ll use the A Aeolian shape over A minor and F Major chords.

A Minor:


A Aeolian part 1

In this audio example I play the 3 octave form and then play the multi-octvave sequenced idea.

A Aeolian over F lick

Used over F Major:

Now I’ll take the same sequenced idea and apply it over an F major lick.  Here’s an audio example.  I slid up to the G on the 15th fret of the high E string and then descended with some tremolo bar scoops along the way.

Normally, applying an A Aeolian idea over F major would give it a Lydian sound – but the lack of the B (#4) in the pattern makes it a little more open sounding to me.

Finally – here’s the Diminished form.

Diminished add 4

Diminished add 4 shapes

Looking at the notes here (B, D, F, E) – I see the upper notes of a G7 (add 13) chord: G [Root] – B [3rd] – D [5th] – F [b7] – E [13].  So this pattern is one I use in Dominant 7th situations.

Here’s the basic pattern:

B Locrian Multi Octave

And here’s the application over a G7 chord.  It uses the same pattern sequencing idea as the other examples ascending but bends into a couple of notes including the 3rd on the B string for the final note.

Next time?  Some Melodic and Harmonic Minor shapes to get under your fingers.

As always, I hope this helps!

-SC

PS – if you like the ideas in this approach – the following books will help you expand on this idea exponentially!

The GuitArchitect’s Guide To Chord Scales

The GuitArchitect’s Guide To Modes: Melodic Patterns

The GuitArchitect’s Guide To Modes: Harmonic Combinatorics

Hot Rodding Your Minor Arpeggios – Or A Little Theory Goes A Long Ways

Hey everyone!

This post is tangentially related to the Modal Arpeggio posts that I put online so I’ve adapted the title (just like I’m going to be adapting the arpeggios in the post).

.

 “Minor minor on the wall….”

Let’s look at a 5-string A minor arpeggio:

.

.

Now there’s nothing wrong with this form.  But I find that a lot of people practice this arpeggio ascending and descending and then when it’s time to play over an A minor chord guess how they play it?

There was a time in the ’80’s where just cycling an A minor arpeggio over an A minor chord would cut it, but now it’s (yawn) boring.  So what can we do to make it more interesting?

.

Start with the Top Side

.

In a previous post, I talked about modifying triads to get more complex sounds.  In this lesson I’ll apply that to arpeggios.

The following is a map of alterations to show how chord tones can be modified to create other sounds.

.

.

So with any triad:

The root of the chord can be lowered to the 7 or raised to the 9

The third of the chord can be lowered to the 9 or raised to the 11

The fifth of the chord can be lowered to the 11 or raised to the 13

 .

In this manner, a triad can be altered into almost any other functional chord.

.
Let’s apply this to a minor arpeggio.

In the case of A minor I’m going to change the C on the high E string to B.  This creates an A minor (add 9) sound.


.

.

This is already a more interesting sound over an A minor chord to my ears.  But cycling the top notes of the arpeggio creates an interesting arpeggio sequence along the lines of something Tosin Abasi of Animals For Leaders might cycle (Try combining this lick with the one before it to see what I mean).

.

.

.

Going under the Hood

 .

This modification idea can be applied to any of the notes of the arpeggio, but for a moment let’s go in the opposite direction.  

In the previous post I talked about superimposing arpeggios.  Here I’ll take the same arpeggio form and drop the low note.  

Instead of stacking ascending thirds  like so:

A [up a 3rd]

C [up a 3rd]

E

I’m going to go a 3rd below A to F.  In this example I hammer on the 2nd note and then play the rest with sweep picking.

.

.

Over F, these notes become:

F (Root), A (Major 3rd), C (5th), E (Major 7th) and B (#11) or F Maj7 #11.

.

Using F# instead:

.

.

.

These notes then become:

F# (Root), A (Minor 3rd), C ( flat 5th), E (minor 7th) and B (11) or F Minor 7 b5 (add #11).

.

You could also make to low note G on the 10th fret for an A minor 9 sound (starting from the b7 – G) or make the low note an E which creates a A minor (add 9) arpeggio starting from the 5th.

.

For now, let’s stick with the F major 7 (add #11).  If we stack another 3rd below the F, we get D which creates a D minor 9 (add 13) sound. 

.

.


The natural 13 with the minor 9 is truly a Dorian modal arpeggio sound.  To play a simplified version –  just play the F major 7 (#11) arpeggio above over a d minor chord.

.

In the following example, I’ve added an open A string to the F major 7 (add #11) arpeggio.  Try playing this as a repeating figure which changing chords over the top of it.  It might give you a new song idea!

.

.

.

Hopefully this has given you some ideas and some new things to work on.  In the next lesson post, we get back into modes and get deeper into the individual modes.

.

Thanks for reading and I hope this helps!  

-SC

.

PS If you like this post you may also like:.

The Modal Microscope And A Sequenced Arpeggio Approach

Slash and Burn – Creating More Complex Sounds With Slash Chords

.

CREATING CHORDS AND LINES FROM ANY SCALE – A HARMONIC COMBINATORICS / SPREAD VOICINGS LESSON

AUGMENT YOUR KNOWLEDGE: SONIC SHAPES AND GETTING MORE FROM AUGMENTED CHORDS

Slash and Burn – Creating More Complex Sounds With Slash Chords

.

GETTING HIPNESS FROM A MAJOR TRIAD OR MORE CHORD RECYCLING PART 3

Getting Hipness From A Major Triad Or More Chord Recycling Part 2

GETTING HIPNESS FROM A MAJOR TRIAD OR MORE CHORD RECYCLING PART 1

.

RECYCLING CHORDS PART II: TRIAD TRANSFORMATION

RECYCLING CHORDS PART I OR WHERE’S THE ROOT?

RECYCLING SHAPES OR MODULAR ARPEGGIOS FOR FUN AND PROFIT

.

Some Useful Online Practice Tools

POSSESSION IS 9/10S OF THE LAW BUT PERCEPTION IS EVERYTHING OR PRACTICING PART VII

TESTING YOUR VOCABULARY OR PRACTICING PART VI

PRACTICE WHAT YOU PLAY OR PRACTICING PART V

.

DEFINITIONS AND DOCUMENTS OR PRACTICING PART IV

TENSION AND THE SODA CAN OR PRACTICING PART III

PROPER POSTURE IS REQUIRED FOR PROPER PERFORMANCE – PRACTICING PART II

PRACTICE MAKES BETTER AKA PRACTICING PART I

The GuitArchitect’s Guide To Modes Part 12 – Getting Into Modal Arpeggios – Superimpostion

Hello everyone!

Greetings from NYC!  While I’m still unpacking and waiting for instruments and boxes to make it here from South Pasadena I thought I’d mix and match a few ideas from my GuitArchitect’s Guide to Chord Scales book and modal arpeggios and talk about more ways to recycle things you already know!

.

2-string or not 2-string

(is that really the question?)

.

I’ve been talking a lot about 2 string arpeggios.  They’re really useful things in soloing because you can take a figure like this:

.

.

and move it in octaves while keeping the same fingering.

.

.

.

It’s a really useful visualization tool, and a relatively easy way to cover a lot of range on the instrument.

.

The real secret behind this approach is how you use the arpeggio or:

“So what about this superimposition thing?”

.

Superimposition is simply playing one thing on top of something that’s related but not in an immediately direct way.   Logic would dictate that you would play a C major 7 arpeggio over a C major chord.  That’s certainly one valid use, but it’s really not superimposing the chord because their directly related (i.e. Cmaj7 and C major).  Playing a C major 7 arpeggio over say a d minor or an e minor chord is getting more into what we’re talking about here.

In the examples below, I’ll be using a bass note to indicate tonality.  If you have a recording of a chord (or a bass note) to play over – just play the c major 7 arpeggio over one of those – otherwise you can use your fretting hand to tap each of the notes of the arpeggio (see the glass noodles post if you’re unfamiliar with the technique) and use your picking hand to tap the bass notes in the figure (and to help mute the strings)!

.

.

If the C major 7 chord is created by stacking ascending 3rds (C, E, G, B) then we should be able to go the reverse direction using descending 3rds from the root.  Going a 3rd below C gives us A which creates A, C, E, G, B or an A minor 9 arpeggio (no root):

.

.

Going a 3rd below A gives us F which implies: F (root), A (3rd), C (5th), E (7th), G (9th) and  B (#4 or #11)  or a F major 9 #11 arpeggio (no root, no 3rd):

.

.

(Note: This concept is explored in much more depth in the Harmonic Combinatorics book but you can get some information about the approach from the slash chords post or the recycling triads posts as well.)

.

You could continue on with this approach, and each time figuring out how the arpeggio functions over different chords, but there is an easier way!

.

The Chromatic Root Interval Chart

In The GuitArchitect’s Guide to Chord Scales, I devised a chart that would tell the reader how any chord scale would function over any root.  I’ve adapted that chart and utilized it for arpeggios in this lesson.  Here’s the full chart:

.

.

At first glance, this can look confusing but it’s REALLY useful for determining how scales and arpeggios (or chords) function over different tonal centers.  

.

In the steps below, I’m going to outline every step that could be taken to visualize this, but once you understand the process, you can skip a lot of the steps and understand what’s happening almost immediately.

.

Let’s go back to the C maj 7 arpeggio.  The formula for the arpeggio is Root (or R) 3rd, 5th and 7th.  Here’s what it looks like superimposed into the chart.  

.

.

I’ve taken the extra step of removing all of the information in the other columns of the chart to solely show how the Root, 3rd, and 5th of a particular chord functions over other tonal centers. It’s also important to note that this chart accommodates all possible root notes.  So while sharped roots (#R) or flat roots (bR) are really heard as b2 (b9) or 7ths respectively, they’re listed here to show the functions of specific notes over tonal centers (e.g. C maj 7 arpeggio played over a C# tonality).

Okay – now let’s move the information in the chart to the key of C:

.

.

Presented this way,  we can see how things function.  Played over D for example – the C, E, G, B functions as a b7th, 9th, 4th (or 11th) and a 6th.  As a D Dorian sound (C major over D implies D Dorian) you lose the minor 3rd but get the natural 6th flavor of the mode.

.

.

I’ll simplify the chart a little more:

.

.

Again, it’s also important to note that this chart accommodates all possible root notes.  So while sharped roots (#R) or flat roots (bR) are really heard as b2 (b9) or 7ths respectively, they’re listed here to show the functions of specific notes over tonal centers (e.g. C maj 7 arpeggio played over a C# tonality).  This also counts for b4 (which will be heard as a 3rd), and double flats (like bb7 which will be heard as a 6th or bb3 which will be heard as a 2nd).

.

From intervals to chord tones

Since this chart was initially created for chord scales, the intervals all exist within an octave.  For the purposes of chords and arpeggios it’s more beneficial to think of:

  • 2nds as 9ths
  • 4ths as 11ths and 
  • 6ths as 13ths 

.

I’ve converted these intervals to chord tones in the chart below:

.

 .

One sound I get out of this immediately is the Ab which gives a Ab maj 7 (#5, #9 no root) sound.  I’ve resolved it to Ab in the example below – but give it a shot – it takes a generic C major 7 arpeggio and gives it a shot glass of tabasco.

.

.

.

When I went to Berklee and got knee-deep into analysis, my teacher gave me this pearl of insight, 

“Actually the whole point of harmony 1-4 [classes] is to show you how any chord can follow any other chord”.

.

The reality behind all of the charts and theory is, if you understand how an arpeggio functions then you’re more likely to be able to resolve it – regardless of what chord you play it over.  

That’s a big picture concept – you may want to give it a second to let it sink in.

.

The thing to start to focus on is how things sound to you – specifically how various chord tones and intervals sound over various chords you’re using.  How do you like the sound of a #4 over a major chord?  Or a b9 on a minor chord?  As you start to find chord tones that you like over those areas, you’ll start to find that you’ll seek those sounds out.   The chart is just a shortcut for seeing how things function – but it’s reliant on what you hear.

My recommendation is take this arpeggio, play it (slowly at first) over all the tonal centers and really be aware of how the notes are functioning.  And (here’s the step most people skip) if it sounds “bad” to you – find a way to resolve it (like going to the Ab in the example above).  I call this the Van Halen approach, there are plenty of times that Eddie hits clams – but he finds cool ways to work them around so that you say, “wow what a cool idea” rather than “oh he botched that one”.

I’ll talk more about the importance of knowing how to “fix” things in a future post, but trust me – it’s worth spending some time on.

.

In the next lesson post, I’ll get into arpeggio modification slash chord stylie.  It’ll be really cool and if I have my audio converters delivered in time I can even go back to posting audio clips again!

ah the joys of moving….

.

I hope this helps and thanks for reading!

.

-SC

GuitArchitect’s Guide To Modes Part 11 – Geting Into Modal Arpeggios – 7th chords

Hello everyone!!

In the previous modal arpeggio lesson, I covered how to visualize triads from 3-note per string patterns.  In this post, I’m going to apply the same concept to 7th chords.  If you haven’t checked out part 10 of the series, you may want to review the approach before moving on.

.

Major Scale Harmonization

.

Any major scale is made up of the following triads and 7th chords based on scale degree.

.

.

Related to the key of C major, this breaks down into:

.

  • Triads: C major, D minor, E minor, F major, G major, A minor and B diminished.
  • 7th chords: C major 7, D minor 7, E minor 7, F major 7, G7, A minor 7 and B minor 7b5

.

This means that there are 4 unique qualities of 7th chords for a major scale:

  • major 7 (C major 7 and F major 7 in the key of C)
  • minor 7 (D minor 7, E minor 7 and A minor 7 in the key of C)
  • dominant 7 (or 7) (G7  in the key of C)
  • minor 7 b5 (B min7b5  in the key of C)

.

Played as 2-string fingerings there are 4 possible inversions of each arpeggio.

.

.

.

.

.

To see how these shapes relate to the modes, let’s look at an ascending C major scale on the B and E strings:

.

.

Previously, we extracted every other note to reveal the triads related to each 6-note shape.

.

.

This time, we’ll remove the 3rd and the 5th note from each shape.  This will create a 7th chord arpeggio in the 3rd inversion (i.e. starting from the 7th).

.

.

Here it is written as 16th notes:

.

Chord sequence Dm7-Em7-Fmaj7-G7-Am7-Bm7b5-Cmaj7

.

While the approach I’ll demonstrate will work with any inversion, all the examples here will utilize the 3rd inversion.

.

The first important visualization with each form is that the 2nd note of each arpeggio in this lesson is acting as the root.

.

Step one: Using the patterns diagonally

.

As I mentioned in the previous arpeggio post, a distinct advantage of 2-string patterns is that you can move them in octaves and maintain the same fingering.  Here’s a C major 7 arpeggio moved in octaves on the middle and top set of strings.

.

.

Michael Angelo Batio was the first rock guy I saw playing this type of pattern in a shred context but now the sound of it is pretty common rock/metal vocabulary.  This idea will get covered more in part 12 of this series, but to make it sound a little cooler, instead of playing it over a C major chord  – try playing the above arpeggio over an A minor chord:

.

  • when C major 7 (C, E, G, B) is played over A the notes act as (b3rd, 5th, b7th and 9th) or A minor 9 (no root)

.

Step 2: Putting it together positionally

 .

At the top of the page, I showed how I extracted arpeggios by eliminating the 3rd and 5th note from an ascending 3-note per string pattern.  This same process can also be applied positionally.  For example, here’s a 3-note per string C major scale played  in 8th position.

.

.

Now I’ll apply each of these arpeggio shapes to the C major scale starting with the root position. Notice that the 6-string shape links together a D minor 7, C Major 7, and a B minor 7b5 into one big arpeggio. 

.

.

To visualize the arpeggios across 6 strings just remember: 

 as the pitches ascend, the related arpeggios descend (and vice versa)!

.

Also remember that the 2nd note of the arpreggio acts as the root, so if you want the C major 7 arpeggio on the low E string

.

.

you’ll extract it from B Locrian.

.

.

The pattern creates a different flavor of modal arpeggio than the triadic version in part 10 of the guide.  Where the triadic version moves in diatonic thirds, this pattern keeps a diatonic 2nd between each 7th chord arpeggio. Here are all of the positional arpeggios of  the C major scale derived this way:

.


Big Picture Alert!!

 .

Since all of the notes of the C major scale are presented in the linked arpeggios, you could technically play this over any diatonic 7th chord in C major if you resolved it properly.  As a recap of the modal microscope lesson, I tend to view things from a parent scale perspective so:

.

  • If you play any of these patterns over a C major 7 chord – you’ll imply a C Ionian sound
  • If you play any of these patterns over a D minor 7 chord – you’ll imply a D Dorian sound
  • If you play any of these patterns over an E minor 7 chord – you’ll imply an E Phrygian sound
  • If you play any of these patterns over a F major 7 chord – you’ll imply a F  Lydian  sound
  • If you play any of these patterns over a G7 chord – you’ll imply a G  Mixolydian  sound
  • If you play any of these patterns over an A minor 7 chord – you’ll imply an A Aeolian sound and
  • If you play any of these patterns over a B minor 7b5  chord – you’ll imply a B Locrian sound

.

Now I’ll apply each of these arpeggio shapes to the C major scale.  Feel free to try these over any of the chords listed above (although you may want to read the note about “The Problem with Ionian” below if you’re playing any of them over C major 7).  I’m partial to playing them over D minor 7 or D minor 9 depending on which note I’m starting or ending on.

.

.

.

.

.

.

.

.

The “trouble” with Ionian

.

The “problem” with the Ionian mode in general is that the natural 4th is an avoid tone over major 7th chords with the same root.  (i.e. C Ionian played over C maj7).  For this reason, I generally avoid Ionian as a mode and instead focus on the major scale for visualization purposes.   If I were to use this approach over a C major 7 chord,  I would probably be more likely to go with a Parent Major scale of G major for a C Lydian sound (i.e. change the “F” in each pattern to “F#”). 

.

.

Step 3 – Adaptation

.

While I dig these arpeggios as is – I tend to use them as visualization tools.

.

You may notice that these arpeggios are all 2-note per string.

Just like a “box” position pentatonic scale….

“Hey”, you might be thinking, “what if you adapted all of those pentatonic variations and sequences that you worked out to these arpeggios?”

Good Idea!!!

.

 As a starting point, I’m partial to playing this form over D minor as it already has some of the step-wise shapes I associate with pentatonics:
.
.
so I’ll use it for the examples below.  In the first one, I’m applying a descending group of threes to a pattern. (This also works ascending as well).
.

A big thing I work on with pentatonics is string skipping.  Here, I’ve adapted an idea to the linked arpeggios.

.

.

Here’s a cool variation on this lick – replace the 8th fret “G” on the B string with an “A” to match the major 3rd interval on the G string.  Once you can visualize a lick making variations like this is relatively easy (and it sounds cool!!)

.

From there it’s easy to mix and match things,  Now that you see the pattern it comes from, the lick below just removes the F to create a different arpeggio shape.  It starts off as C major 9 but links into a D minor shape to create a D minor 13 sound followed by some string skipping.  Grab your guitar and give it a whirl!

.

.

The key with any approach like this is to keep it simple.  Mind you, some of these ideas might not sound simple, but the approach really comes from mastering the 2-string visualization idea, and then usurping it in cool ways!  Try coming up with your own variations!  

.

Extra Credit!!

.

Like I said before, while I’m sure that they’re out there, I don’t know any other guitarist who approaches fingering modal apreggios with the interlocking 7th chords,  but if these shapes are already familiar to you or if you’re looking to expand outside of this tonality, I have a few small tweaks that have BIG implications.

.

  • Lowering the E –> Eb in any of the C major patterns above will give you all of the Melodic Minor 7th chord linked arpeggios.
  • Lowering the E–> Eb and lowering the A –> Ab in any of the C major patterns above will give you all of the Harmonic Minor 7th chord linked arpeggios.

.

In other words, “Thar’s gold in them thar’ hills!!”  If you put some time into working with these ideas methodically, I’m sure you’ll get some unique approaches under your belt that’ll pay dividends (even if they don’t get you a tab at the general store).

.

Part 12 gets into superimposition.  It’ll be short, sweet and really cool!

.

I hope this helps!

.

-SC

.

 .

GuitArchitect’s Guide to Modes Part 10 – Getting into Modal Arpeggios – Triads

Hello everyone!!

I’ll be delving into individual modes in more depth in the coming weeks and months ahead but as a preliminary step, I wanted to get into modal arpeggios a bit as they’ll be important components in future lessons.

.

Scales = Chords

.

Since chords and scales are made up of the building blocks (notes), they are essentially 2 sides of the same coin.

For example, let’s look at an ascending C major scale on the B and E strings:

.

If we remove every other note of the first for notes we can see arpeggiated versions of the triads associated with those modes.

While 2-string arpeggios are often neglected by guitarists, they are certainly worth investigating for helping with visualization.

.

2-String Triadic Visualization

.

The major scale is made up of three types of triads:  major, minor and diminished. Played as unique notes, any triad has three typical voicings:

  • Root position with the root as the bass note: (i.e. Root, 3rd, 5th)
  • 1st inversion with the 3rd as the bass note: (i.e. 3rd, 5th, Root)
  • 2nd inversion with the 5th as the bass note: (i.e. 5th, Root, 3rd)

.

Here are some sample fingerings of each of the chord types played as 2-string arpeggios in each inversion:

.

.

.

.

.

.

.

2-string Major Scale Triads

.

Now I’ll apply each of these arpeggio shapes to the C major scale starting with the root position.

As a reminder here are the triads of the C major scale.

.

 .

Since the fingerings are on 2-strings, they’ll be the same on the E/A, D/G and B/e strings.

.

.

Here are the arpeggios in 1st inversion.  Again, since the fingerings are on 2-strings, they’ll be the same on the E/A and B/e strings as well.

.

C major scale triads in 1st inversion ascending by scale degree

.

And finally, here are the arpeggios in 2nd inversion.

.

.

Putting it together positionally

 .

At the top of the page, I showed how I extracted arpeggios from ascending 2 string patterns.  This same process can be applied positionally.  For example, here’s a 3-note per string C major scale played  in 8th position.

.

.

Now I’ll apply each of these arpeggio shapes to the C major scale starting with the root position. To create a modal arpeggio, simply remove every other note.  Doing so with this scale creates a C Ionian modal arpeggio.

.

.

Modal arpeggios are sonically cool because they convey the full sound of the mode but break it out of a scalar pattern.

Modal arpeggios are cool in this method, because if you can visualize a scale then making the arpeggio is relatively easy.

.

The trouble with Ionian

..

The “problem” with the Ionian mode in general is that the natural 4th is an avoid tone over major 7th chords with the same root.  (i.e. C Ionian played over C maj7).  For this reason, I generally avoid Ionian as a mode and instead focus on the major scale for visualization purposes.  

.

With that in mind, here ‘s another approach for using this arpeggio.

.

I really dig playing this particular arpeggio over D minor – to create a D Dorian type of sound. In the example below, I’ve used the C and the E pitches on the low E string to encircle the D (one note above and one below) to help emphasize the D minor 13 sound of the arpeggio and end it on the 9th.

.

.

The final visualization trick

.

If we look at the positional arpeggio again:

.

.

Take a close look at the positional modal arpeggio!  If you look at it as a group of 3-note shapes you’ll see that it’s actually made of of 3 triadic arpeggios: C Major, B diminished and A minor.  

.

C Ionian = C maj + B dim + A min

.

Going back to the 2-string scalar observation in part 3 of this post, as the pitches ascend, the related arpeggios descend.  This is true of any of the modal arpeggios – so it might be a cool way for you to visualize it! Try it with your own arpeggio forms!

 .

In the next post, I’ll go through 7th chord arpeggios.  In the meantime, try practicing the 2-string arpeggios over all of the chords of the C major scale:

  • C maj 7
  • D min 7
  • E min 7
  • F maj 7
  • G7
  • A min 7
  • B min7 b5

.

and then over whatever other tonal centers inspire youI hope this helps!  As always, thanks for reading!

.

-SC

.

PS  – if you like this post, you may also like:

.

Books:

.

Lessons

Visualizing Video Game Licks Or An Intro To Symmetrical 12 Tone Guitar Patterns

Hello everyone!

Update:  My updated 12-tone pattern book is out!  I want to give you a precursor by showing you a cool approach to working 12-tone ideas into your playing.  This is a really long lesson because it’s tough to distill 200+ pages of material into a web post, but just take it in bite sized chunks and come back to it as you need to and I’m sure you’ll get something from it.

First, a little bit about the book!

12 Tone Cover small

The physical book and the e-book pdf are available on Lulu.com or on Amazon.com (or any of the international Amazon sites).

Symmetrical_12_Tone_Cover_Low Res

Symmetrical Twelve Tone Patterns is a 284 page book with a large reference component  and about 100 pages of extensive notated examples and instruction.

What makes this book different (apart from the cover) and what I’m most excited about offering is a bundle of files that will help readers maximize material in the book.  The bundle contains:

  • Guitar Pro files of all the examples in the book (in GP6 and GP5 format). For those of you unfamiliar with this musical notation, tablature platform and playback program, having Guitar Pro files means that the reader can hear the examples without having a  guitar handy and can work as a phrase trainer to help the reader get the examples to up to speed.

  • MIDI files of the musical examples.
  • PDFs of the musical examples.
  • MP3s of all the musical examples (again, exported from the same material).

Symmetrical Twelve-Tone Patterns presents 12-tone patterns in both improvisational and compositional contexts.  It shows how to create various intervallic lines and creates the outline of a tune and dissects how all the parts were created using this method.  If you’re looking for ways to explore new avenues in playing or in your writing this is the book for you!

.

Fire up the video game

When I heard the Praxis Transmutation (Mutatis Mutandis) record, I was blown away with Buckethead’s playing.  It also came at a time that I was getting into a lot of 12-tone music and trying to figure out how to adapt those things to guitar and his intervallic/atonal tapping ideas in particular seemed to go in a completely different direction that the 12-tone ideas I heard Jason Becker and Marty Friedman throw into their playing.

Public Service Announcement (i.e. a brief note about playing out):

Playing out just means playing note choices outside of a given tonality.  By its very nature, playing out requires an ability to play “in” because it requires a contextual contrast. So my suggestion is that you make sure you develop your ability to play in a tonality as well as outside of it.  (Also as a FYI – playing out is easy, but musicians are often judged by how musically they get back in).

.

Every once in a while, I get a hankerin’ for what I call “video game licks” (or symmetrical interval legato licks with a lot of gain and an unclear harmony).  Shawn Lane could veer into that territory when he wanted to but for me, Buckethead is pretty much the king of this approach.

In the lick below, I’ve worked all 12 tones into a two-handed idea that uses pick and fret hand tapping. I’ve kept it short so that you can focus on the coordination between both hands, but I’ve included a longer version of the lick after it.  As the lick uses all 12 tones, it doesn’t belong to any one key so try playing it over various chords or riffs of your choosing.

.

Technical Notes:

  • If you want to get this lick under your fingers, pay attention to the 3 T’s (hand tension, timing and tone) as you practice this.
  • Try to make sure that the motion from the fingers for striking the strings comes from the large knuckle of the hand (for more information on this see the glass noodles post).
  • The pattern is a variation on the tapping figure Greg Howe uses in kick it all over.  It’s written in groups of 6 to fit into one bar –  but just practice it slowly as triplets to get the initial speed and coordination down.
  • I never got into muti-finger tapping on phrases like this one (I just use the middle finger of the picking hand while I hold the pick with the index finger and thumb), but using the ring, middle and first finger on the picking hand for the upper register tapping you could probably work the phrase up to a tempo 30 bmp faster than this one.

.

.

Short lick faster

.

Short lick slower

.

Here’s an extended variation that moves the fingering pattern to the B and D strings.  While the pattern doesn’t keep all of the same intervals as the first example, it has enough continuity to sound like the same 12 tone idea. One recommendation I have is not to get into the dogmatic practice of having to use all twelve tones. If 10 notes work well, use ten notes. In any process like this, use the rules that work for you and discard the rest.

While not notated, this pattern uses all of the same fingerings and note attacks as the first example.

.

.

Longer lick faster

.

Longer lick slower

.

Here’s how I’m visualizing this and how you can generate a lot of ideas from this one approach.

.

The 12-tone pattern vs the 12 tone row

When I first got into 12 tone music and tried to think of a way to incorporate it into improvising, I grabbed some Webern and Berg tone rows (in an over-simplified description – a tone row is a restructured chromatic scale that is used for melodic and harmonic material) and tried improvising with them.

It was pretty dismal.

I found them really hard to improvise with because the row material was difficult to memorize and the number of notes made it difficult to use in an improvisation and then I thought about generating 12-tone patterns instead of working with rows.

.

Patterns can be useful in improvisation because:

  • they can be used to generate motifs, or themes
  • they can be manipulated in real-time and
  • they can establish recognizable elements of control in an improvisation.

The other advantage of a pattern is that its intervallic consistency adds an internal drive to melodic ideas.   The notes of the pattern move in and out of various tonalities, so it sounds “out” but not random (although you can modify it to be as random as you’d like.

In the 12 tone pattern book I wrote, I used a chromatic scale as a template for generating symmetrical patterns for improvisation. Intervallically uniform, the 12 notes of the chromatic scale are evenly divisible by the numbers: 1, 2, 3, 4, 6 and 12.  Since divisions of 1 and 12 do not divide the row into a more useable set, they can be ignored.  This leaves:

.

6 equal divisions:

(of a descending chromatic scale staring on C)

C B / Bb A /Ab G /Gb F / E Eb / D Db

Taking the first note of each division gives us:

 C, Bb, Ab, Gb/F#, E, D

aka: Whole tone scale (any note root)

.

A 12-tone pattern can be created by putting notes in between the notes of the whole tone scale.   Note that the intervals between all the 2-note divisions are symmetrical.

.

C B / Bb A /Ab G /Gb F / E Eb / D Db

C A / Bb G /Ab F /Gb Eb / E Db / D B

C G / Bb F /Ab Eb /Gb Db / E B / D A

C F / Bb Eb /Ab Db /Gb B / E A / D G

C Eb/ Bb Db /Ab B /Gb A / E G / D F

C Db/ Bb B /Ab A /Gb G / E F / D Eb

.

One advantage to symmetrical patterns is that they work off of divisions you probably already know.  If you can visualize a whole-tone scale, for example, filling in the other notes of the pattern becomes relatively easy.

.

4 equal divisions of the row:

C B Bb /A Ab G / Gb F E / Eb D Db

aka: C, Eb, Gb, A (Bbb)

aka: Diminished 7 chord (any note root)

.

3 equal divisions of the row:

C B Bb A /Ab G Gb F / E Eb D Db

aka: C E G#

aka:Augmented triad (any note root)

.

2 equal divisions of the row yields:

C B Bb A Ab G  / (Gb/F#) F E Eb D Db

aka: Tritone interval either note could be root

.

Using the divisions to create a 12-tone pattern

Here’s how I came up with the original example.  Using a diminished 7th chord as a starting point, the rest of the twelve tones could be filled in by playing three additional notes off each chord tone. Let’s say you have D diminished 7th chord (since any note in a diminished 7th chord can be a root it’s also a B, F and Ab diminished 7th chord).

.

B D F Ab

.

By adding 3 notes not already in use to each starting pitch you can create a 12-tone row. If you work out the same intervals on these notes you get a symmetrical twelve-tone pattern.

B  (Perfect 5th down) E, (minor 2nd down) D#

D (Perfect 5th down) G, (minor 2nd down) F#

F (Perfect 5th down) Bb, (minor 2nd down) A

Ab (Perfect 5th down) Db, (minor 2nd down) C

.

Adapting it to guitar

Where this gets cool part 1:

If we restructure the order of the first notes we get two tritones a minor 3rd apart.  Since the E and G strings are a minor 3rd apart this means that the fingering pattern will be the same on both sets of strings.

.

.

Where this gets cool part 2:

As I’ve mentioned before, using standard tuning the guitar can be visualized as three sets of strings tuned in 4ths.  So this means that the same fingering can be used to generate the same intervals on the G and D strings.

.

.

From here, you can see where the approach for the first lick came from.

.

.

Taking it further

.

Another nice thing about patterns is that they’re easy to manipulate and draw other ideas from.  Let’s take a look at the first 12 notes:

.

You can change the last four notes to create new lines.

.

.

Here are these two ideas in notation and tab.

.

.

You could apply the same two-handed idea we’ve been looking at to any of these patterns or, better yet, apply your own!

.

Here are the last two patterns starting with F-Bb

.

.

The next step is to change the middle notes of the pattern.

.

.

This creates 4 new patterns that start with F-E-A, F-E-Eb/D#, F-E-C and F-E-F#.

.

.

.

Here’s the same idea applied to F-C#/Db

.

.

.

.

And finally, patterns starting with F-G.

.

.

.

.

To sum up, that’s 16 very different licks all pulled from one approach and one initial pattern.  This is really the tip of the iceberg for this concept but as you can see, you really don’t need more than one approach to get the ideas flowing and use them on your own.

.

Note:

Sometimes you get an idea and think that you’re doing something unique. You get all excited about it until (if you’re me) you realize that Dave Creamer addressed many of these points back in the June 1989 issue of Guitar Player. Dave’s article inspired me to continue to research this book and try to present similar material my own way.

.

* (I should also mention in passing that (with the better part of a year’s worth of research) –  The GuitArchitect’s Guide to Symmetrical 12-Tone Patterns shows all possible symmetrical patterns for the 2, 3, 4 and 6 note divisions above.)

.

I hope this helps and thanks for reading!

-SC

.

12 Tone Cover small

The physical book and the e-book pdf are available on Lulu.com or on Amazon.com (or any of the international Amazon sites)

Symmetrical_12_Tone_Cover_Low Res

Symmetrical Twelve Tone Patterns is a 284 page book with a large reference component  and about 100 pages of extensive notated examples and instruction.

What makes this book different (apart from the cover) and what I’m most excited about offering is a bundle of files that will help readers maximize material in the book.  The bundle contains:

  • Guitar Pro files of all the examples in the book (in GP6 and GP5 format). For those of you unfamiliar with this musical notation, tablature platform and playback program, having Guitar Pro files means that the reader can hear the examples without having a  guitar handy and can work as a phrase trainer to help the reader get the examples to up to speed.

  • MIDI files of the musical examples.
  • PDFs of the musical examples.
  • MP3s of all the musical examples (again, exported from the same material).

Symmetrical Twelve-Tone Patterns presents 12-tone patterns in both improvisational and compositional contexts.  It shows how to create various intervallic lines and creates the outline of a tune and dissects how all the parts were created using this method.  If you’re looking for ways to explore new avenues in playing or in your writing this is the book for you!

I like physical books and the softbound version looks really good on my music stand – but I understand that some people like pdfs. The softbound copy GuitArchitect’s Guide To Symmetrical Twelve-Tone Patterns is $35 (though it’s currently selling for $31.50 on Amazon) and the e-book pdf is $15.   Both are available from The GuitArchitecture Product page on Lulu.


Creating Chords And Lines From Any Scale – A Harmonic Combinatorics / Spread Voicings Lesson

Hello everyone!

.

I wanted to post a lesson up that uses one of my approaches to harmonizing scales from my Harmonic Combinatorics book.  It’s a cool way to not only get away from stock voicings but also to generate new lines as well!

I’m using C Major as the tonal center for this lesson but the approach can (and probably should be) be adapted to any scale.

.

A couple of lessons ago, I talked about the modal microscope  – which was a term I used to discuss examining modes on multiple levels and the advantage of viewing modes as subsets of a parent scale.  Before I get into the harmonization approach I want to expand on this idea of the microscope analogy and apply it to harmony.

.

The Harmonic Microscope

If I harmonize a parent major scale in the key of C, I’ll end up with the following chords on each scale degree.

.

.

So if you’re playing in the key of C and want to get into more harmonic depth on an E minor chord, it’s time to reach into your chord bag and pull out your stock  minor 11 (b9, b13) voicing.  Oh, you don’t have one?  Don’t worry – most guitarists don’t.  Learning stock voicings and inversions for this specific chord form probably isn’t the best use of your time anyway.

Using the microscope analogy, this is really looking at the chord on a 2x setting.

.

Here’s the 1x setting for this example:

playing any combination of the notes from C Major over the root E creates some variant of an

E min / min7 / min7 (b9) / min 11 (b9, b13)  chord.

.

And here’s the bigger picture:

Once you are aware of the types of sounds that are created from various chord types, you can start thinking about chords and chord voicings on the macro (i.e. parent scale) level. This means that if I’m playing over a D minor chord and using notes from the C major scale, I don’t have to analyze each indidual chord because I know it’s all under some type of generic D minor 7/minor 9/minor 11 or minor 13 umbrella. 

Harmonic Combinatorics

Harmonic Combinatorics refers to a process of identifying “countable discrete structures” harmonically.  In other words, it examines unique combinations of notes on all of the possible string combinations for the purposes of develop harmonic and melodic possibilities.  One way to do this is through a method that I use to generate unique ideas through a process that some people refer to as spread voicings.

.

A Systematic Method For Harmonizing Any Scale Or Mode On The Guitar

It’s important to state at the outset that the method I’m employing is only one possible way to approach this exploration.  I’ve taken this approach to maximize the number of unique voicings, but you should feel free to take any of the rules that I’ve applied to this approach (like eliminating octaves) with a grain of salt.  The object is to gain new sounds – so change the patterns here in whatever ways necessary.

.

Here’s an approach that will give you more voicings and lines than you might have thought possible.

.

  • Step 1:  Write out a scale and write the scale degree under each note.

(Example:  C Major)

.
  • Step 2:  On a blank chord sheet – write out the scale degrees on each string up to the 5th fret.

.

(To clarify: The numbers on the left hand side of the diagram are the fret numbers ).

.

.

  • Step 3:  Starting with the lowest note on the lowest string, write out all the initial voicing of all possible 2, 3, 4, 5 or 6 note harmonies by scale degree on different string sets.

.

For example, if I was looking at the G, B and high E strings, some sample initial voicings would be

573, 574, 576, 513, 514, 516, 523, 524, 526, 534, 536

673, 674, 675, 613, 623

713, 723

173, 174, 175, 176, 123

.

You may have noticed that I skipped some voicings:

.

If you want to save some time and increase the number of unique chords try the following parameters:

.

  • No doubling of chord tones (Ex. 363).  (Again – if you like that sound – use it!  but the point of this process is to generate unique voicings with unique notes.)
  • At least one note in the voicing has to be the lowest on a string.  If you look at 614 on the G, B and high E strings you’ll see that it’s really the second voicing of 573 on the frets below it.  Having at least one note be the bottom note on any string will help ensure that you’re not just working out voicings that you may have already done.
  • The highest fret to be used in the first voicing is the 5th fret.  This last step is going to produce some voicings that aren’t playable on the lower frets, but might work in the upper registers.

.

  • Step 4:  Select a string set and move the voicing in scale-wise motion up the strings to the octave.

.

For the purposes of this lesson – I’m going to focus primarily on 3 string groups, but this idea is applicable on any 2-6 string set of strings.  (It’s worth mentioning that – Harmonic Combinatorics does all the work for this process for all string sets – (it’s also why it’s over 400 pages long!!)).

.

.

(Again, while this book follows this process through the key of C Major, this process can be applied to any tonal center.)

.

  •  I’ve written out an example based on the D, G and B string set (i.e. 432) and gone with an initial voicing of a F, G and D (or 452).

.

(Note:  The reason I start with numbers instead of notes is 1.  It’s a lot easier to see if I’ve missed a number in a sequence when working these things out and 2.  It eliminates the initial step of wondering what harmony I’m creating.  This is simply a process that I’ve used with good results.  If the numbering is weird for you, just use what works for you.)

.

.

.

  • This creates seven different voicings which could be played as a modal chord progression, used as the basis for a melodic idea or even isolated into individual chords.  If this process yields even one chord that you like it’s worthwhile.

.

  • The function of the voicings will depend on the root. If you want to dig deeper into this area, you can use other notes as a root (note Harmonic Combinatorics includes a chart which shows all chord tones based on scale degree).  I’ve posted  the sound of the chords being played against an A root below. A was picked as a root because it’s an open string, but you could just as easily tap any note from the C major scale to create various modal sounds:

.

  1. Playing C as the bass note will give you C Ionian sounds
  2. Playing D as the bass note will give you D Dorian sounds
  3. Playing E as the bass note will give you E Phrygian sounds
  4. Playing F as the bass note will give you F Lydian sounds
  5. Playing G as the bass note will give you G Mixolydian sounds
  6. Playing A as the bass note will give you A Aeolian sounds
  7. Playing B as the bass note will give you B Locrian sounds

.

Check out these chord sounds over A.  In addition to possible comping ideas, these can be arpeggiated for melodic ideas as well.

.

.

A few notes on working with voicings

.

Here are some additional points to consider when using this process:

.

  • Common sense is your friend.  If a chord seems difficult to play:

.

.

there is almost always an easier way to play it on another string set.

.

.
Since the voicings presented are in the key of C Major with no sharps or flats, the information (and approach) here is easily adaptable to other scales, modes etc…

.

  • If you find a voicing in C Major you like, just move it to whatever other key you’re playing in.
  • To create all of the C Melodic Minor (i.e. Jazz Minor) voicings – just change any E to Eb.
  • To create all of the C Harmonic Minor voicingsjust change any E to Eb and any A to Ab.

.

Now I’ll talk about making melodic lines from this material.

.

Melodic Variations

.

As I mentioned earlier, these voicings can be played as melodies simply by playing the notes one at a time.  In The GuitArchitect’s Positional Exploration and the GuitArchitect’s Guide to Modes: Melodic Patterns, I’ve outlined a series of methods for generating melodic variations. But since this approach is about combining things, it makes sense to at least look at some melodic possibilities with regards to note choice.  I’ve decided to take a three-note voicing as it offers enough possibilites to be interesting, but not too many to be over-whelming and have chosen this pattern simply because I like the first voicing.

.

.

It sounds a little deceptive if you play it as is.  This is because the first voicing is actually a G major chord in 1st inversion (i.e. with B in the bass).  Here it is with the root of each chord added to the low E string (Try working them out and playing them!!  There are come challenging chords there.)

.

.

but when you play it with the B as the lowest note it sounds like a B minor with the b3rd on the B string.

.

.

If you play it without harmonic backing, try changing any F natural to F # and it should sound more pleasing to you.

.

“Variety is the spice of life”

.

There are six unique melodic variations of any three-note chord or pattern.

.

.

These numbers represent note order.  Assigning 1 as the lowest note and 3 as the highest – here are the unique variations on the first three notes.

.

Applying this idea, one possibility for 123 looks like this:

.

.

.

Two things to consider:

.

1.  I’ve notated this as triplets for ease of reading, but the very first thing you should probably do (after getting the notes under your fingers is look for a more musical phrasing).

.

.

2. Again, if you play this without harmonic backing this may sound more “right” to you:

.

.

Alternating groups of 123 and 321 for each chord produces:

.

.

.

Combining the first 2 chords into a 6-note pattern allows even more flexibility.  Here, I’ve moved the number order around and made a more interesting line.

.

.

.

One part of this phrase has caught my ear:

.

.

When I add a low E root, I get a cool little Phrygian phrase (with a couple of notes snuck in on the high E string).

.

.

The GuitArchitect’s Positional Exploration and the GuitArchitect’s Guide to Modes: Melodic Patterns, has a systematic approach to exploring these types of variations.  Having said that, those of you who want to do the work, could just write down a collection of numbers and apply them to different ideas and see what happens.

.

The first important thing, however, is to experiment with different rhythms (including rests!), phrasings (like slides, hammer-on/pull offs) and make some music out this raw material.

.

The second important thing to consider is that with any approach like this you should:

  • take the things you like
  • use them in what you’re currently working on (songs, solos, etc)
  • make what you keep part of your sound and discard (or ignore) what you don’t use.

.

I cover some other approaches and break down the theory a little more in depth in Harmonic Combinatorics but I hope this lesson here helps and if you like this idea – you should check out the book (if you haven’t already)!

.

Thanks for reading!

.

-SC

.

If you like this post you may also like:

.

Books:

The Modal Microscope And A Sequenced Arpeggio Approach

Slash and Burn – Creating More Complex Sounds With Slash Chords

Making Music Out Of Scales

.

Chords/Triads/Superimposition/Arpeggios:

AUGMENT YOUR KNOWLEDGE: SONIC SHAPES AND GETTING MORE FROM AUGMENTED CHORDS

.

GETTING HIPNESS FROM A MAJOR TRIAD OR MORE CHORD RECYCLING PART 3

Getting Hipness From A Major Triad Or More Chord Recycling Part 2

GETTING HIPNESS FROM A MAJOR TRIAD OR MORE CHORD RECYCLING PART 1

.

Getting Through The Gig – Negotiating A Chord Chart Part 3

Getting Through The Gig – Negotiating A Chord Chart Part 2

GETTING THROUGH THE GIG – NEGOTIATING A CHORD CHART PART 1

.

RECYCLING CHORDS PART II: TRIAD TRANSFORMATION

RECYCLING CHORDS PART I OR WHERE’S THE ROOT?

.

FAVORED CURRY OR SPICING UP CHORD SCALES AND TRIADS PART 2

FAVORED CURRY OR SPICING UP CHORD SCALES AND TRIADS PART 1

.

RECYCLING SHAPES OR MODULAR ARPEGGIOS FOR FUN AND PROFIT

GLASS NOODLES – ADAPTING A PHILIP GLASS ARPEGGIO APPROACH TO GUITAR

.