The GuitArchitect’s Guide To Modes Part 3b – Seeing The Six-String Major Scale

Hello Everyone!  Here’s the second 1/2 of the GuitArcitecture Mode visualization lesson 3 extravaganza!

.

This lesson, is only the six-string examples from the first 1/2 of the lesson.  If the charts or the rules don’t make any sense – you may want to read the first 1/2 of this lesson (found here) for clarity.

.

(If you need to go back further, you may also want to check out part one or part two of the series.)

.

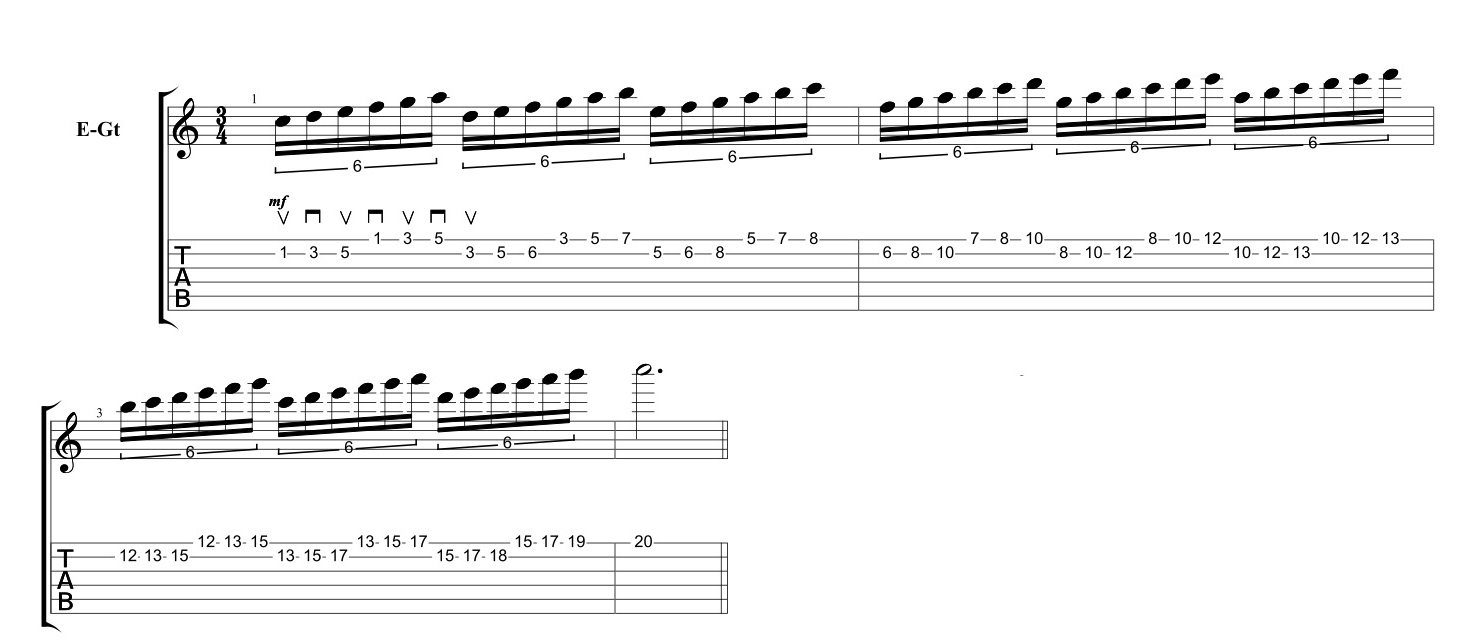
A set of examples showing all the positional three-note-per-string modal fingerings in the key of C Major follow.

.

Note:

The sextuplet rhythms are merely presented as a logical rhythmic division of a six note pattern, and are by no means the only rhythms that should be practiced for these modes.

.

Ascending Parent Major Modal Patterns

(As the scale ascends the patterns descend)

.

.

.

.

.

.

.

.

Descending Modal Patterns:

(As the pattern descends across the strings, the modes ascend in order)

.

.

.

.

.

.

.

Here are the important things to focus on for now:

(It may seem like a long list – but really most of it is holdover from part 2 of the lesson series)

.

1. Theoretical:

  • The guitar fingerboard can be divided into 3 sets of two strings. Any 2-string fingering pattern that starts on the B string can be moved to the same starting pitch on the D or the low E string and keep the same fingering.
  • The major scale can be broken down into seven two-string modes that follow a specific order based on its scale degree from the parent scale (Ionian, Dorian, Phrygian, Lydian, Mixolydian, Aeolian, Locrian). The two-string patterns are modular and can be adapted to positional playing (see rules above).
  • The sound of the mode is based as much on the notes of the mode as it’s related chord.  So for right now – this is just a whole lot of ways to see C Major on a fingerboard – you should adapt the process to other keys as well.
  • In addition to using a time keeping device of some kind (like a metronome, drum loop, etc) playing along to a chord or a bass note will help establish tonality and help associate each pattern with a sound).  For now try playing the patterns over the related major chord (C Major / C Major 7) or the relative minor chord (A minor/A minor 7 chord).
  • For those of you looking to skip ahead, try playing the root of each 6 note pattern as a bass note and then playing the pattern over it. (i.e. D Dorian over D, E Phrygian over E etc.) one you get the initial patterns in your ears as C Major.

.

2.  Technical:

  • While it’s natural to want to progress quickly, trying to play too quickly too soon results in excess hand tension which will increase the difficulty of what you’re trying to play.  Fluidity comes from focused, relaxed repetition.  
  • Fretting hand: When playing these patterns, practice using just the fingertip to fret the notes and use the minimum amount of tension needed for the note to sound cleanly.  Additionally, try to keep the fingers down on the strings when playing and remove them from the string only when necessary.
  • Picking Hand:  Try using the above picking pattern on the top two strings or alternate picking.
  • Practice the scale ascending and descending and really focus on clarity of notes, hand tension and timing.  Even many intermediate to advanced players can gain something by really focusing on making clean transitions between the fingering shapes.
  • Isolate problem areas and work out.  You’re not going to be able to play the sequence cleanly if any of the individual components aren’t 100%.  This isn’t a bad thing.  Things you develop over time are more likely to stay with you (and thus be accessible when you’re improvising).

.

3.  Musical:

  • Making music from the patterns is a whole other skill set, but you need to know where to put your fingers on the strings while you  bend, slide and phrase your way into making music.  Having said that, since the visualization process doesn’t take that long,  as soon as you get the patterns down I’d recommend to start manipulating the patterns to try to make them more musical to your ear.   See Part 2 of this series for more specifics or the making music out of scales post.

.

The Obligatory book plug:

The GuitArchitect’s Guide to Modes: Melodic Patterns takes all possible permutations and variations of 1, 2, 3, 4, 5 and 6 note groups of these 2 string shapes and then shows how to build them up into extended melodic sequences.   As a 300+ page book, it is a substantial reference/informational text, and goes into further depth than any other known book on the subject.  You can find out more about it here.

.

In the next lesson, I’m going to cover chords associated with the forms and start to move towards the individual modes and making music out of them.  As before, I recommend that you just go through the lesson at your own pace and return as you need to.  Please feel free to post any questions you might have (or pm me at guitar.blueprint@gmail.com).

.

I hope this helps and as always, thanks for reading!

.

-SC

.

P.S. If you like this post – you may also like:

.

THE GUITARCHITECT’S GUIDE TO MODES PART 2 – SEEING THE TWO STRING MAJOR SCALE

The GuitArchitecture Guide To Modes Part 1 – Seeing The Single String Major Scale

MAKING MUSIC OUT OF SCALES

A BRIEF THOUGHT ABOUT MUSIC THEORY

PRACTICE MAKES BETTER AKA PRACTICING PART I

PROPER POSTURE IS REQUIRED FOR PROPER PERFORMANCE – PRACTICING PART II

TENSION AND THE SODA CAN OR PRACTICING PART III

DEFINITIONS AND DOCUMENTS OR PRACTICING PART IV

PRACTICE WHAT YOU PLAY OR PRACTICING PART V

TESTING YOUR VOCABULARY OR PRACTICING PART VI

POSSESSION IS 9/10S OF THE LAW BUT PERCEPTION IS EVERYTHING OR PRACTICING PART VII

SOME USEFUL ONLINE PRACTICE TOOLS

WARMING UP: FINGER EXERCISES, THE 3 T’S AND THE NECESSITY OF MISTAKES

The GuitArchitect’s Guide To Modes Part 3a – Seeing The Six-String Major Scale

Welcome to Part 3 of the GuitArcitecture Mode visualization lesson series!

.

In this lesson, I’m going to show how to utilize the 2-string patterns from part two of this series in a positional way.  Since this post was pretty lengthy,  I’ve split it in half:

.

If you want to get right into the patterns – just click here!

If you want to see how these patterns work – just keep reading!!

(Either way, if you go back and forth between the two posts the concept will become clearer for you)

.

If you see anything unfamiliar here, you may want to check out part one or part two of the series, but in the meantime, here’s a quick recap:

.

To Review:

  • Any major scale can be broken down into seven 2-string modal shapes that are derived from their scale degree (i.e. position in the scale)
  1. Ionian
  2. Dorian
  3. Phrygian
  4. Lydian
  5. Mixolydian
  6. Aeolian
  7. Locrian
  • The order of the modes is always the same.
  • The fact that the 7th note of each mode is missing from the initial fingering pattern is irrelevant because it will be played in the pattern that follows it.
  • A logical fingering pattern can be established by playing the modal fingerings up and down the fingerboard, because they move in an ascending modal order.

.

A Pedagogical note:

I’ve had extensive debate with myself on the best sequence to present this information.  Conveying it effectively is something that’s much easier to suss out with an individual student, and much harder to get across in the digital version of a one room schoolhouse.

Since the initial emphasis of this lesson series is on sonic visualization and making sense out of 2-string and positional fingerings, I am only dealing with visualizing the parent major scale as a whole here.

While modes are always associated with a chord or a chord progression, I’m limiting harmonic options only to C Major/A minor for now.

Extremely important elements in this process, such as harmony, modal interchange, arpeggios, individual modes and actual music making will all be dealt with in future posts.  Having said that, it is important to state again, that modes (or any scale), in and of themselves, are not music but are only a tool in making music.   Anything I post here should always be filtered through your own aesthetic and utilized, adapted or even ignored accordingly (i.e. take what works for you).

.

Establishing A Logical Positional Modal Fingering

.

Let’s look at a sample scale shape.  In this case I’ll use an 8th position C Ionian 3-note-per-string scale:

.

A Picking note:

On 3-note-per-string scale shapes, I often use the semi-sweep picking approach detailed below as it allows me to use a single picking pattern for each string.  If I’m using this as part of a pattern, I’ll often alternate pick it.  The picking patterns below then, should be viewed as a suggestion.

.

Broken down into the six-note shapes discussed earlier, this C Ionian fingering can be seen as containing three distinct patterns:

.

 Two-string sets of C Ionian

.

As the fingering pattern ascends across the strings, the six note modal fingerings descend to the next modal pattern.   This is true of any modal pattern.

.

HOW THIS WORKS:

By using an initial six-note pattern on two strings, the continuation of the mode will always require starting the next pattern on the 7th note of the mode.

.

Six-note C Ionian Pattern On The E and A Strings

.

The next note in the scale is B.  In the key of C, this implies a Locrian pattern.

.

Six-note B Locrian Pattern On The D and G Strings

.

Now that we have a way to connect these two string patterns across the finger board, the next questions you might have are probably:

.

  •  What fret on the fingerboard do the patterns on the D and G strings start?  and
  •  What fret on the fingerboard do the patterns on the B and high E  strings start?

.

Let’s start with the D and G Strings.

.

Determining The Fret Position On The D And G Strings

.

The good news is there are only three rules:

.

Rule 1: 

When starting from the Ionian mode on the E and A strings, the Locrian mode on the D and G string set will start one fret higher.

.

C Ionian To B Locrian

.

Rule 2: 

If Lydian is the pattern played on the E and A strings, the Phrygian pattern on the D and G Strings will start on the same fret as the first note on the A string not the E string.

.

F Lydian To E Phrygian

.

Rule 3: 

Aside from the two exceptions above, the first note of the mode on the D string set always starts on the same fret as first note of the mode on the E string.

.
.

Determining The Fret Position On The B And E Strings

.

Rule 1: 

The  strings of the guitar are tuned in 4ths except between the G and B strings.  Since the distance between the G and B String is a 3rd apart instead of a 4th, patterns on the B and E strings will start 1 fret higher.

.

.

Rule 2: 

The only exception to the above rule occurs when Ionian is the pattern on the D and G strings.  In that case, since Locrian would move up 1 fret anyway, and the G/B 3rd tuning would require moving any pattern up 1 fret, the first note of the Locrian pattern would start 2 frets higher.

.

C Ionian To B Locrian

..

If you made it this far, you might be ready for the second 1/2 of this post!  

You can find all the examples, technical notes and overview here:.

.

If you’re ending it here for now, I recommend you just go through the lesson at your own pace and return as you need to.  Please feel free to post any questions you might have (or pm me at guitar.blueprint@gmail.com).

.

I hope this helps.   As always, thanks for reading!

.

-SC

P.S. If you like this post – you may also like:

.

THE GUITARCHITECT’S GUIDE TO MODES PART 2 – SEEING THE TWO STRING MAJOR SCALE

The GuitArchitecture Guide To Modes Part 1 – Seeing The Single String Major Scale

MAKING MUSIC OUT OF SCALES

A BRIEF THOUGHT ABOUT MUSIC THEORY

PRACTICE MAKES BETTER AKA PRACTICING PART I

PROPER POSTURE IS REQUIRED FOR PROPER PERFORMANCE – PRACTICING PART II

TENSION AND THE SODA CAN OR PRACTICING PART III

DEFINITIONS AND DOCUMENTS OR PRACTICING PART IV

PRACTICE WHAT YOU PLAY OR PRACTICING PART V

TESTING YOUR VOCABULARY OR PRACTICING PART VI

POSSESSION IS 9/10S OF THE LAW BUT PERCEPTION IS EVERYTHING OR PRACTICING PART VII

SOME USEFUL ONLINE PRACTICE TOOLS

WARMING UP: FINGER EXERCISES, THE 3 T’S AND THE NECESSITY OF MISTAKES

.

The GuitArchitect’s Guide To Modes Part 2 – Seeing The Two String Major Scale

Welcome to part two of modal/parent major scale lesson series that’s been adapted from the forthcoming, GuitArchitect’s Guide To Modes book.  In the last post, I showed how to visualize a major scale on a single string using seven connecting patterns. (Note: you can see that lesson here).  In this lesson, I’m going to expand on those fingerings to include 2-string patterns and start to get into the actual modes themselves.

.

The power of 2 (strings)

.

In the first lesson, I discussed how to visualize a pattern on a single string.  The advantage to this type of visualization is that it’s applicable to any fretted string instrument.  Whether its a bass or a banjo or a mandolin – the fingering pattern applies to a single string scale.  If you ever see guys at a music store pick up 3-4 different stringed instruments and be able to get around on them, this is the type of visualization that they’re typically using.

Now it’s time to expand on that visualization process.  Let’s look at the standard guitar tuning.  Here’s a blank fingerboard with the string numbers on the top and the tuning below.

.

.

You may have missed an important observation; namely that the open strings are tuned in 4ths except for the second string, B, which is tuned a 3rd above the G string.

.

This means that the six-string guitar can be viewed as three sets of two strings that are tuned in 4ths

(i.e. the E and A strings, D and G strings and B and high E strings).

.

.

This also means that any fingering pattern contained on those two strings will be the same fingering pattern on the other two-string sets.

.

First Steps

In a future lesson post, I’m going to show how these modular patterns connect, but the first step is visualizing the initial 2 string patterns and then associating them with a related mode.

So if, for example, we combine the C major scale on the B string:

.

.

with the C major scale on the E string:

.

We get a series of interconnecting patterns that can played as a melodic sequence like this:

.

.

Note:  

Don’t worry about the odd time signature.  It’s included here to show all seven 2-string patterns, but this can easily be adapted to any time signature.

.

I’m going to talk about each pattern – but first I need to talk about modes.

.

Modes

mode is a type a scale that starts from a note in a parent scale and is tied to a specific chord type.

For example:  C major has seven unique notes.  The scale degree of each note in the parent scale determines the name of the associated mode.  Here are the modes in sequential order.

.

Note:

While this has been applied to the key of C major, the modal order is the same for any parent major scale.

.


.

Each mode then, can be viewed as just playing the parent major scale starting from a different note and played over a related chord.

.

Modes = notes + chords 

While these modes all share the same notes of the parent major scale, they all have different sounds based on the harmony that they are played against – provided that harmony is not the first chord of the parent major scale.  

For example:  if I play any of the modes above over a C major or a C major 7 chord, it’s all going to sound like C major.  I’ll get into the associated chords for each mode in next week’s lesson, for now understand that a mode is:

  • derived from a parent scale
  • always follows a specific order and
  • is associated with a specific chord.

.

The two-string/6 note modal fingerings

.

As a first step, let’s go back and visit that initial 2-string pattern:

.

Here the same pattern broken down into seven individual shapes.

.

Note:

while the fingering pattern only includes 6 of the seven notes of the scale, since the patterns are interconnecting, you’ll pick the missing up note in the next pattern in the sequence.

.

I – Ionian

.

II – Dorian

.

III – Phrygian

.

IV – Lydian

.

V – Mixolydian

.

VI – Aeolian

.

VII – Locrian

.

Don’t worry about how these fingerings relate yet or how to use them outside the initial 2 string patterns – that will all be covered in the next lessons.

.

Here are the important things to focus on for now:

(It may seem like a long list – but really it’s only a few key points presented in multiple ways)

.

1. Theoretical:

  • The guitar fingerboard can be divided into 3 sets of two strings.
  • Any 2 string – fingering pattern that starts on the B string can be moved to the same starting pitch on the D or the low E string and keep the same fingering.
  • The major scale can be broken down into 7 two-string modes that follow a specific order based on its scale degree from the parent scale (Ionian, Dorian, Phrygian, Lydian, Mixolydian, Aeolian, Locrian).  While the fingering pattern only includes 6 of the seven notes of the scale, since the patterns are interconnecting, you’ll pick the missing up note in the next pattern in the sequence.
  • Combining these 2 ideas:

The 2 string modal fingerings on the B and High E strings

(C Ionian, D Dorian, E Phrygian, F Lydian, G Mixolydian, A Aeolian, B Locrian then back to the C Ionian and D Dorian).

.
A technical note and a tech note:

I played the examples as 16ths then sextuplets.  I changed the ending a bit for the sextuplets on this example to fit the 4/4 phrase better (it’s just the last sextuplet descending and ascending on the B and high E strings).

The drums are the same raga drum file I’ve used before – but I sped the drums up with an AU plug in – AU Varispeed:

.

It’s a cool plug in to use for sonic mangling – or in this case when I needed to track something quickly.

.

.

Follow the same fingering pattern and order on the other string sets, but start from a different mode.

.

D and G Strings

(E Phrygian, F Lydian, G Mixolydian, A Aeolian, B Locrian, C Ionian and D Dorian)

.

.

.

and the Low E and A strings:

(F Lydian, G Mixolydian, A Aeolian, B Locrian, C Ionian, and D Dorian)

 .

Sorry!!  

I thought I recorded at least versions of this but the one I tracked was recorded too hot and in distorted (in a very unpleasant way).  

.

  • The sound of the mode is based as much on the notes of the mode as it’s related chord.

.

2.  Technical:

  • While it’s natural to want to progress quickly, trying to play too quickly too soon results in excess hand tension which will increase the difficulty of what you’re trying to play.  Fluidity comes from focused, relaxed repetition.  
  • Fretting hand: When playing these patterns on 2 strings, practice using just the fingertip to fret the notes and use the minimum amount of tension needed for the note to sound cleanly.  Additionally, try to keep the fingers down on the strings when playing and remove them from the string only when necessary.
  • Picking Hand:  Try using the following picking pattern on the top two strings.  By starting on an upstroke and using alternate picking, the pattern ends on a downstroke on the E string and sets you up to start on an upstroke again.

  • Practice the scale ascending and descending and really focus on clarity of notes, hand tension and timing.  Even many intermediate to advanced players can gain something by really focusing on making clean transitions between the fingering shapes.
  • Isolate problem areas and work out.  You’re not going to be able to play the sequence cleanly if any of the individual components aren’t 100%.  This isn’t a bad thing.  Things you develop over time are more likely to stay with you (and thus be accessible when you’re improvising).
  • In addition to using a time keeping device of some kind (like a metronome, drum loop, etc) playing along to a chord or a bass note will help establish tonality and help associate each pattern with a sound).  For now try playing the patterns over the related major chord (C Major / C Major 7) or the relative minor chord (A minor/A minor 7 chord).
  • For those of you looking to skip ahead, try playing the root of each 6 note pattern as a bass note and then playing the pattern over it. (i.e. D Dorian over D, E Phrygian over E etc.) one you get the initial patterns in your ears as C Major.

.

3.  Musical:

  • Making music from the patterns is a whole other skill set, but you need to know where to put your fingers on the strings while you  bend, slide and phrase your way into making music.  Having said that, since the visualization process doesn’t take that long,  as soon as you get the patterns down I’d recommend to start manipulating the patterns to try to make them more musical to your ear.   There are a number of different ways to do this:
  1. Try changing up the ascending note order.  While the example here is presented as 1-2-3-4-5-6 (C, D, E, F, G and A) , you can try other note orders such as: 1-3-2-4-5-6 (C, E, D, F, G and A), 2-1-3-4-5-6 (D, E, C, F, G and A) or 2-3-1-4-5-6 (D, E, C, F, G and A) as starting variations.
  2. Try using different rhythms (16th notes, etc).
  3. Try integrating rests in the patterns.
  4. Try sliding between pitches instead of using different fingers.  Like-wise try bending to notes (Example play C, D and then bend it up to E )

..

Obligatory book plug:

The GuitArchitect’s Guide to Modes: Melodic Patterns takes all possible permutations and variations of 1, 2, 3, 4, 5 and 6 note groups of these 2 string shapes and then shows how to build them up into extended melodic sequences.   As a 300+ page book, it is a substantial reference/informational text, and goes into further depth than any other known book on the subject.  You can find out more about it here.

.

In the next lesson, I’m going to cover how to make positional sense of these forms and start to move towards making modes (and music) out of them.

The next posts in the series will be substantially shorter (and have more examples) but in the meantime, I recommend that you just go through the lesson at your own pace and return as you need to.  Please feel free to post any questions you might have (or pm me at guitar.blueprint@gmail.com).

.

I hope this helps and as always, thanks for reading!

.

-SC

P.S. If you like this post – you may also like:

.

THE GUITARCHITECT’S GUIDE TO MODES PART 3B – SEEING THE SIX-STRING MAJOR SCALE

THE GUITARCHITECT’S GUIDE TO MODES PART 3A – SEEING THE SIX-STRING MAJOR SCALE

THE GUITARCHITECTURE GUIDE TO MODES PART 1 – SEEING THE SINGLE STRING MAJOR SCALE

MAKING MUSIC OUT OF SCALES

MAKING SENSE OF THE PENTATONIC SCALE – DIAGONAL FORMS – PART TWO

MAKING SENSE OF THE PENTATONIC SCALE – DIAGONAL FORMS – PART ONE

A BRIEF THOUGHT ABOUT MUSIC THEORY

PRACTICE MAKES BETTER AKA PRACTICING PART I

PROPER POSTURE IS REQUIRED FOR PROPER PERFORMANCE – PRACTICING PART II

TENSION AND THE SODA CAN OR PRACTICING PART III

DEFINITIONS AND DOCUMENTS OR PRACTICING PART IV

PRACTICE WHAT YOU PLAY OR PRACTICING PART V

TESTING YOUR VOCABULARY OR PRACTICING PART VI

POSSESSION IS 9/10S OF THE LAW BUT PERCEPTION IS EVERYTHING OR PRACTICING PART VII

SOME USEFUL ONLINE PRACTICE TOOLS

WARMING UP: FINGER EXERCISES, THE 3 T’S AND THE NECESSITY OF MISTAKES

The GuitArchitect’s Guide To Modes Part 1 – Seeing The Single String Major Scale

Welcome to part one of a lesson series that’s been adapted from the forthcoming, GuitArchitect’s Guide To Modes book!  Over the next several months, I’m going to post related lessons on modes, scales, chords and 12-tone guitar from my GuitArchitecture book series.

This first posting is an entry-level post for the beginning or intermediate guitarist who may have heard some music theory terms but weren’t really clear about what they meant.

If you’re already familiar with basic musical terminology and single string scales, you may still find some useful tips and observations below and use this post as a useful primer and/or review.

Note:

If you’re new to this, there’s a lot of initial ground work to cover, but once we get past it the applications are really useful (read: cool) !

.

So you want to know about Modes?

.

I have some good news and some bad news about learning modes.

.

I’ll start with the good news. 

The Major, Melodic Minor and Harmonic Minor scales (and their associated modes) make up a lot of the melodic and harmonic material used in western pop and jazz music in the 20th (and 21st century).

If you’re an intermediate player with a basic understanding of intervals, chords and scales, I can show you a way to adapt a positional fingering pattern for all of the above scales or mode that can be modulated to any key in about 10 minutes – 20 minutes depending on your skill level.

Given a 1/2 hour or more, I can show you an integrated way do the same thing anywhere on the fingerboard using seven core fingerings and a simple visualization method that can be applied to any scale.

.

The Bad News:

Making music from those fingerings will take a lot longer.

To paraphrase W.A. Mathieu, “There are only a few notes and learning them takes forever.”

I can’t teach you to be musical in an hour-long lesson – but I can certainly try to guide you towards being more musical when you leave the lesson than when you walked in.  One way to do that is to bring your attention to some benefits associated with sonic visualization.

.

Sonic Visualization?

Here are a few notes to clarify what I’m talking about:

.

  • The GuitArchitecture concept, in broad strokes, is that the nature of the guitar’s fretboard and tuning lends itself to visualizing fingering patterns.
  • While patterns performed mindlessly can be a bad thing, they can allow people to realize ideas more readily.
  • More importantly, patterns can be associated with sounds and visualizing how to realize a sound by seeing its shape on the fretboard makes performing it easier.  Hence the term Sonic Visualization.

.

If I hear a sound in my head, and know how to finger it on the fretboard before I play it, that not only allows me to create the sound but also offers me more flexibility when improvising.

.

Likewise, if I stumble across a sound I’ve never heard before, and understand the fingering behind it – it makes it easier for me to remember that sound for future use.

.

The GuitArchitecture Process

While GuitArchitecture utilizes sonic visualization as it’s core foundation, the process behind developing and utilizing that process can be adapted to any musical context.  The process itself is fairly straightforward:

.

Understand the approach (harmonic or melodic)

Develop a fingering pattern to use with that approach

Associate the pattern with a sound

Manipulate the patterns to make music

.

Now let’s start to apply this to Major Scale Modes.  In order to understand modes, we need to have a grasp of the Parent Major scale.

..

Understand the Approach or

Parent Scales and Painless Theory

A parent scale is a sequential collection of notes within an octave that define a tonality. An example of a parent scale would be the C Major scale which has no sharps or flats and is spelled, C, D, E, F, G, A, B and C.  The easiest way to visualize this on the fingerboard initially is on a single string.

Played on the B string it looks like this in standard notation.

Note:

Instead of speaking about notes (which are tied to specific scales), when speaking about scales in general, musicians sometimes refer to their location in the scale as scale degrees and use numbering based on the Roman numeral system to indicate their position (this will come much more into play when we get to chords).   In this specific case:

.

C=I : D=II : E=III : F=IV : G=V : A=VI and : B=VII

.

Building Blocks:

The smallest unit of measurements on the fingerboard are the 1/2 step (1 fret) or the whole step (2 frets).

If you look at the tablature above, you’ll see that the Major Scale is made up of a series of whole steps with 1/2 steps between the IIIrd and IVth degrees (E and F in this case) and the VIIth and VIIIth degrees (B and C).

.

This general formula applies to any Major Scale.

.

All major scales are made up of whole steps 7 scale degrees with a 1/2 step between the 3rd and 4th scale degree and the 7th and 8th.  The distances between these notes are constant.  If we move the C major scale to the E string:

.

.

Since C is still the root of the scale (also refered to as the tonic), the 1/2 steps still occur between the IIIrd/IVth and the VIIth/VIIIth degrees.  Since this is true of any major scale, any major scale can be visualized this way, but the number of components makes it cumbersome to get around.  So let’s look at positional shapes.

.

Positional Playing

Or developing a fingering pattern to use with that approach

A position is usually defined as a four-fret section of the fingerboard.  If the scale is broken down into positional components, we end up with a series of three-note shapes.  We’ll number each one from the scale degree for now:

.

A Brief Interruption

When practicing anything on the guitar, you should pay attention to what I call the 3 T’s (Tension, Timing and Tone).   If you are unfamiliar with practicing methodology, you may want to read through my practicing posts (you can find them under the lessons heading on the Blueprints page).

.

I

First here’s the tab:

.

.

And a generic 3 note shape.  The numbers indicate recommended fret hand fingers to use.

.

.

II

.

.

.

III

.

.

.

IV

.

.

.

V

.

.

.

VI

.

.

.

VII

.

.

.

Putting it all together

.

If you combine all of the patterns together.  You’ll get something that looks like this:

.

.

Notice that the fingering patterns move in sequential  order (I, II, III… etc) up the B string.  If we play the C Major scale on the E string:

.

The fingering pattern now starts with pattern #3, but continues in sequential order.

.

Next steps:

I’ve covered a lot of groundwork here, so this is a good place to stop for now.  In the meantime, here are some things to consider:

1. Theoretical:

  • The important things here are learning the initial pattern fingering sequence, and associating each of them with a sound.
  • In addition to using a time keeping device of some kind (like a metronome, drum loop, etc) playing along to a chord or a bass note will help establish tonality and help associate each pattern with a sound).  For now try playing the patterns over the related major chord (C Major / C Major 7) or the relative minor chord (A minor/A minor 7 chord).
  • Sing.  The most tried and true method to attach the sounds made with your hands to your ears is to sing what you’re playing.  This isn’t an American Idol audition, so you don’t have to worry about how good you are as a vocalist.  Instead, just work paying attention to the tuning and timing between your voice and your guitar (and check out some George Benson guitar solos to hear at least one place where this approach can take you.)

2.  Technical:

  • While it’s natural to want to progress quickly, trying to play too quickly too soon results in excess hand tension which will increase the difficulty of what you’re trying to play.
  • Fluidity comes from focused, relaxed repetition.  From a technical standpoint, this observation is really important.  (As in: you may want to write that down on a piece of paper and tape it to your guitar level of important).
  • Even many intermediate to advanced players can gain something by really focusing on making clean transitions between the fingering shapes.

3.  Musical:

  • Making music from the patterns is a whole other skill set, but you need to know where to put your fingers on the strings while you  bend, slide and phrase your way into making music.  Having said that, since the visualization process doesn’t take that long,  as soon as you get the patterns down I’d recommend to start manipulating the patterns to try to make them more musical to your ear.   There are a number of different ways to do this:
  1. Try changing up the ascending note order.  While the example here is presented as 1-2-3 (C, D, E) , you can try other note orders such as: 1-3-2 (C, E, D), 2-1-3 (D, E, C), 2-3-1 (D, E, C), 3-1-2 (E, C, D) or 3-2-1 (E, D, C) as variations.
  2. Try using different rhythms (16th notes, etc).
  3. Try integrating rests in the patterns.
  4. Try sliding between pitches instead of using different fingers.  Like-wise try bending to notes (Example play C, D and then bend it up to E )

.

In the next lesson, I’m going to cover how to exploit standard tuning in visualization, expand on the single string fingerings for these forms and continue to move towards making modes (and music) out of them.


The next posts in the series will hopefully be a little shorter (and have more examples) but in the meantime, I recommend that you just go through the lesson at your own pace and return as you need to.  Please feel free to post any questions you might have (or pm me at guitar.blueprint@gmail.com).

.

I hope this helps and as always, thanks for reading!

.

-SC

P.S. If you like this post – you may also like:

.

A BRIEF THOUGHT ABOUT MUSIC THEORY

PRACTICE MAKES BETTER AKA PRACTICING PART I

PROPER POSTURE IS REQUIRED FOR PROPER PERFORMANCE – PRACTICING PART II

TENSION AND THE SODA CAN OR PRACTICING PART III

DEFINITIONS AND DOCUMENTS OR PRACTICING PART IV

PRACTICE WHAT YOU PLAY OR PRACTICING PART V

TESTING YOUR VOCABULARY OR PRACTICING PART VI

POSSESSION IS 9/10S OF THE LAW BUT PERCEPTION IS EVERYTHING OR PRACTICING PART VII

SOME USEFUL ONLINE PRACTICE TOOLS

WARMING UP: FINGER EXERCISES, THE 3 T’S AND THE NECESSITY OF MISTAKES

MAKING MUSIC OUT OF SCALES