
Welcome to part two of modal/parent major scale lesson series that’s been adapted from the forthcoming, GuitArchitect’s Guide To Modes book. In the last post, I showed how to visualize a major scale on a single string using seven connecting patterns. (Note: you can see that lesson here). In this lesson, I’m going to expand on those fingerings to include 2-string patterns and start to get into the actual modes themselves.
.
The power of 2 (strings)
.
In the first lesson, I discussed how to visualize a pattern on a single string. The advantage to this type of visualization is that it’s applicable to any fretted string instrument. Whether its a bass or a banjo or a mandolin – the fingering pattern applies to a single string scale. If you ever see guys at a music store pick up 3-4 different stringed instruments and be able to get around on them, this is the type of visualization that they’re typically using.
Now it’s time to expand on that visualization process. Let’s look at the standard guitar tuning. Here’s a blank fingerboard with the string numbers on the top and the tuning below.
.
![]()
.
You may have missed an important observation; namely that the open strings are tuned in 4ths except for the second string, B, which is tuned a 3rd above the G string.
.
This means that the six-string guitar can be viewed as three sets of two strings that are tuned in 4ths
(i.e. the E and A strings, D and G strings and B and high E strings).
.
![]()
.
This also means that any fingering pattern contained on those two strings will be the same fingering pattern on the other two-string sets.
.
First Steps
In a future lesson post, I’m going to show how these modular patterns connect, but the first step is visualizing the initial 2 string patterns and then associating them with a related mode.
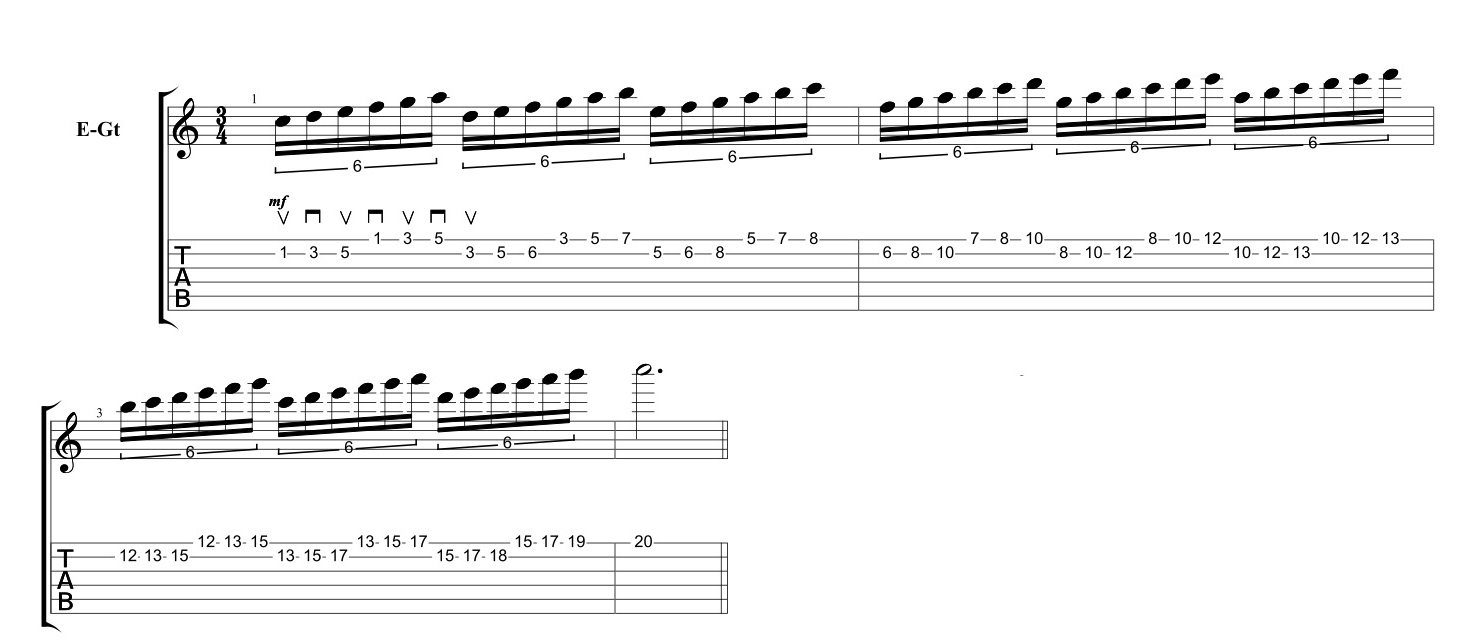
So if, for example, we combine the C major scale on the B string:
.
 .
.
with the C major scale on the E string:

.
We get a series of interconnecting patterns that can played as a melodic sequence like this:
.

.
Note:
Don’t worry about the odd time signature. It’s included here to show all seven 2-string patterns, but this can easily be adapted to any time signature.
.
I’m going to talk about each pattern – but first I need to talk about modes.
.
Modes
A mode is a type a scale that starts from a note in a parent scale and is tied to a specific chord type.
For example: C major has seven unique notes. The scale degree of each note in the parent scale determines the name of the associated mode. Here are the modes in sequential order.
.
Note:
While this has been applied to the key of C major, the modal order is the same for any parent major scale.
.

.
Each mode then, can be viewed as just playing the parent major scale starting from a different note and played over a related chord.
.
Modes = notes + chords
While these modes all share the same notes of the parent major scale, they all have different sounds based on the harmony that they are played against – provided that harmony is not the first chord of the parent major scale.
For example: if I play any of the modes above over a C major or a C major 7 chord, it’s all going to sound like C major. I’ll get into the associated chords for each mode in next week’s lesson, for now understand that a mode is:
- derived from a parent scale
- always follows a specific order and
- is associated with a specific chord.
.
The two-string/6 note modal fingerings
.
As a first step, let’s go back and visit that initial 2-string pattern:
.
Here the same pattern broken down into seven individual shapes.
.
Note:
while the fingering pattern only includes 6 of the seven notes of the scale, since the patterns are interconnecting, you’ll pick the missing up note in the next pattern in the sequence.
.
I – Ionian

.
II – Dorian

.
III – Phrygian

.
IV – Lydian

.
V – Mixolydian
.
VI – Aeolian

.
VII – Locrian

.
Don’t worry about how these fingerings relate yet or how to use them outside the initial 2 string patterns – that will all be covered in the next lessons.
.
Here are the important things to focus on for now:
(It may seem like a long list – but really it’s only a few key points presented in multiple ways)
.
1. Theoretical:
- The guitar fingerboard can be divided into 3 sets of two strings.
- Any 2 string – fingering pattern that starts on the B string can be moved to the same starting pitch on the D or the low E string and keep the same fingering.
- The major scale can be broken down into 7 two-string modes that follow a specific order based on its scale degree from the parent scale (Ionian, Dorian, Phrygian, Lydian, Mixolydian, Aeolian, Locrian). While the fingering pattern only includes 6 of the seven notes of the scale, since the patterns are interconnecting, you’ll pick the missing up note in the next pattern in the sequence.
- Combining these 2 ideas:
The 2 string modal fingerings on the B and High E strings
(C Ionian, D Dorian, E Phrygian, F Lydian, G Mixolydian, A Aeolian, B Locrian then back to the C Ionian and D Dorian).

.
A technical note and a tech note:
I played the examples as 16ths then sextuplets. I changed the ending a bit for the sextuplets on this example to fit the 4/4 phrase better (it’s just the last sextuplet descending and ascending on the B and high E strings).
The drums are the same raga drum file I’ve used before – but I sped the drums up with an AU plug in – AU Varispeed:
.

It’s a cool plug in to use for sonic mangling – or in this case when I needed to track something quickly.
.
.
Follow the same fingering pattern and order on the other string sets, but start from a different mode.
.
D and G Strings
(E Phrygian, F Lydian, G Mixolydian, A Aeolian, B Locrian, C Ionian and D Dorian)

.
.
.
and the Low E and A strings:
(F Lydian, G Mixolydian, A Aeolian, B Locrian, C Ionian, and D Dorian)

.
Sorry!!
I thought I recorded at least versions of this but the one I tracked was recorded too hot and in distorted (in a very unpleasant way).
.
- The sound of the mode is based as much on the notes of the mode as it’s related chord.
.
2. Technical:
- While it’s natural to want to progress quickly, trying to play too quickly too soon results in excess hand tension which will increase the difficulty of what you’re trying to play. Fluidity comes from focused, relaxed repetition.
- Fretting hand: When playing these patterns on 2 strings, practice using just the fingertip to fret the notes and use the minimum amount of tension needed for the note to sound cleanly. Additionally, try to keep the fingers down on the strings when playing and remove them from the string only when necessary.
- Picking Hand: Try using the following picking pattern on the top two strings. By starting on an upstroke and using alternate picking, the pattern ends on a downstroke on the E string and sets you up to start on an upstroke again.

- Practice the scale ascending and descending and really focus on clarity of notes, hand tension and timing. Even many intermediate to advanced players can gain something by really focusing on making clean transitions between the fingering shapes.
- Isolate problem areas and work out. You’re not going to be able to play the sequence cleanly if any of the individual components aren’t 100%. This isn’t a bad thing. Things you develop over time are more likely to stay with you (and thus be accessible when you’re improvising).
- In addition to using a time keeping device of some kind (like a metronome, drum loop, etc) playing along to a chord or a bass note will help establish tonality and help associate each pattern with a sound). For now try playing the patterns over the related major chord (C Major / C Major 7) or the relative minor chord (A minor/A minor 7 chord).
- For those of you looking to skip ahead, try playing the root of each 6 note pattern as a bass note and then playing the pattern over it. (i.e. D Dorian over D, E Phrygian over E etc.) one you get the initial patterns in your ears as C Major.
.
3. Musical:
- Making music from the patterns is a whole other skill set, but you need to know where to put your fingers on the strings while you bend, slide and phrase your way into making music. Having said that, since the visualization process doesn’t take that long, as soon as you get the patterns down I’d recommend to start manipulating the patterns to try to make them more musical to your ear. There are a number of different ways to do this:
- Try changing up the ascending note order. While the example here is presented as 1-2-3-4-5-6 (C, D, E, F, G and A) , you can try other note orders such as: 1-3-2-4-5-6 (C, E, D, F, G and A), 2-1-3-4-5-6 (D, E, C, F, G and A) or 2-3-1-4-5-6 (D, E, C, F, G and A) as starting variations.
- Try using different rhythms (16th notes, etc).
- Try integrating rests in the patterns.
- Try sliding between pitches instead of using different fingers. Like-wise try bending to notes (Example play C, D and then bend it up to E )
..
Obligatory book plug:
The GuitArchitect’s Guide to Modes: Melodic Patterns takes all possible permutations and variations of 1, 2, 3, 4, 5 and 6 note groups of these 2 string shapes and then shows how to build them up into extended melodic sequences. As a 300+ page book, it is a substantial reference/informational text, and goes into further depth than any other known book on the subject. You can find out more about it here.
.
In the next lesson, I’m going to cover how to make positional sense of these forms and start to move towards making modes (and music) out of them.
The next posts in the series will be substantially shorter (and have more examples) but in the meantime, I recommend that you just go through the lesson at your own pace and return as you need to. Please feel free to post any questions you might have (or pm me at guitar.blueprint@gmail.com).
.
I hope this helps and as always, thanks for reading!
.
-SC
P.S. If you like this post – you may also like:
.
