Making A Longer Phase From A Few Notes

Just like Ratt – I’m back for more (hopefully you are also).

(Please feel free to insert another random hair metal reference if that suits you better).

I’m in the midst of a bunch of recording and gig preparation, and I thought one of the things I pulled out in a piece might help you.

I have an instrumental track that’s based on a pentatonic I’ve heard in Hindustani music before but don’t know the name of.  Other players have gravitated to this sound as well and in print I’ve only seen it listed as “Indian Pentatonic” (which, if we’re going to call it that, we might as well call it “Vindaloo” because vindaloo is at least tasty.)

Here’s the scale in A descending and then ascending.  Don’t let the time signature throw you off.  It’s just there to get all 5 notes in a bar.

A Pentatonic Asc Desc
In A  – I see R, 3, 4, 5 b7 (aka an A Mixolydian extraction) so this would work over chord taken from the parent scale D major.  In this case I’m using over a G – A vamp.

Start Small

Notice in the descending version I used one note on the B string and then 3 on the G string.  I do this because keeping only one note of the scale on the middle string of a 3 string group (in this case E, B, G) allows me to set up a sweepable version of the scale.

Why do I do that?

Here’s a little secret about guitar.  Certain techniques will take you a VERY long time to get under your fingers so if you’re going to spend the time to work on them make sure you find ways to use them to get the sounds you’re looking for.

Here I’ve taken the ascending scale and added 2 descending notes.  I’ve included 2 picking variations in the first two examples.  In my own playing I find that I end up going to the first Down Up Up pattern more often than not – but it’s worth the time to be able to do both of them.

For the example below – choose ONE picking variation and use it for all the groups of notes.  Pay attention to the 3 T’s (Timing, Tone and Hand Tension) and try playing it over a chord to associate the scale with a harmony.

A Pent 3 Note Sweeps

You might notice in the example that the E string always uses the index finger of the fretting hand and the G string always uses the pinky.  That leaves either the 2nd or 3rd finger for the B string note.  The fingering consistency also makes it easier to memorize the patterns.

Then build up

A Pent 5 Note

Now I’ve added a few notes on the G string.  One nice thing about Pentatonics is that they have some built in intervals larger than a major or minor 2nd that make them sound less “scale-ish” to my ears.  I’ve only included one picking idea above.  The 2-note sweep in the middle with the alternating picking would allow you to repeat the picking pattern, but you could also use pull-offs on the notes on the G string.

If the scale can descend on the G string – it can also ascend on the E string.  Here’s a two bar lick based on the idea above and adding in some notes on the E string as well.

A Pent Descending Line

Let’s Break This Down

A Pent Breakdown
I’ve broken this down in overlapping phrases to show how I expanded the initial idea into something larger.

Bar 9 Above:  This is a simple descending / ascending of the scale on the E string

Bar 10: There’s the sweep

Bar 11: This is a similar 7-note descending / ascending idea as bar 9

Bar 12-13: I broke this out to show the position shift to add the C# again with a similar idea as bar 9 and 11

Bar 14: There’s the sweep again

Bar 15: this is an the same idea as before but one octave lower.

Notice how there are two simple pieces of “connective tissue” the sweep and the short one string scale passage that ties the lick together.

Let’s look at another (and more challenging) idea:

Lick #2

A Pent Lick 2

Here I expanded on the initial idea.  I’m using sextuplets now so it’s faster.  In the first measure – there’s a slight pause on the last A in beat 3 to accommodate a position shift for the following beat.  As a phrase, I’d likely sit on that A for a beat or two before continuing but I shortened the time to fit it in a smaller graphic.

The position shift allows me to set up a sequence to ascend the scale again and build a little excitement.  Technically this uses all the ideas that have already been used.

Again – these techniques take time to get them under your fingers so they sound good.  Don’t take shortcuts.  Really focus on the 3 T’s and then find ways to incorporate them in ideas you already are using.

And one for the road

So far in this lesson we’ve been exploring string ascending / descending scales.  Adding in things like string skipping will give you some wider intervals to incorporate and get you further away from the scale sound.  Here’s one variation below.

Idea 3

My suggestions (should you choose to take them)

  • Find fingerings that work for you
  • incorporate some of the scale sequence ideas into the phrases you create
  • mix and match see how far you can go in one direction or the next before you run out of notes
  • incorporate different scale sequence ideas.  (For more information on this my Melodic Patterns book can open some doors here).


I hope this helps and as always, thanks for reading!

-SC

An Update And A Lesson On Technical Recycling

“It’s been a long…long…time”

I just realized that it’s been a while since I posted anything here.  Life has a habit of getting in the way of well laid plans.  So here’s a bullet point list to create a quick update.

  • Korisoron – We are currently working on a new KoriSoron recording and our most intensive material will be on this one!  Initial tracking is in progress and we expect to have the recording out in September.  I’m also writing new material for the project and-  Booking new gigs for the fall.
  • TEDx – Korisoron has been asked to perform at TEDx Schenectady this fall and I’ll be delivering a related talk.
  • Old Project  – I don’t want to jinx anything but I should be getting together with some former band mates of mine and putting some finishing touches on a project that was very near and dear to my heart (and that I’ve mentioned in prior posts).   Fingers crossed – that will be another EP out this fall.
  • “Eel-Ech!-trick-a-coup-stick” – is the tentative title of a solo acoustic recording I’ve been working on.  I had previously recorded some tracks but wasn’t happy with them so I’ve been cleaning some things up and moving forward with getting that out the door by the end of the year.
  • The new pedagogy approach I mentioned a while back – I’ve been working on this but, quite honestly, I seriously underestimated the amount of prep I’d need to do to make this work so I’m just rolling up my sleeves and trying to pull ahead.  I took some notes back from the presentation I did at the HVCC Guitar Festival and have been pulling the material together – but I’ve learned more in the last 6 months about how to deliver everything (and what to deliver) than I learned in all my previous years.  I’m super excited about what this is becoming.
  • The other things – I have a few other musical things in the works that are too tentative to discuss, but, well, let’s just say that it’s a lot of electric guitar in various fashions that will be disruptive.  Other things also include a lot of revision plans for this site as well.

A lesson while you’re waiting

One of the things that hold up posts are the fact that I don’t write them in an organized way.  I write them in real time based on a theme in my head because it makes the writing more immediate and (hopefully) engaging for the reader.  Good for the reader – bad for productivity.  A post with any kind of lesson content typically takes 3-5 hours but some of the mode ones took 10-12 hours in editing, layout etc. so that’s why the posts get a bit sporadic for actual lesson material.

The value of recycling

One trap I still find myself falling into is the trap of “short attention span theater” or playing an idea, discarding it like a child’s toy and then picking up another idea and doing the same.  Maybe it’s a little cultural ADHD kicking it – but it’s very easy to loose site of taking a theme and really developing it into something.  (A great example of this for me is Bill Frissell’s Nashville where you can really hear each of the players take care in developing musical solos based on the melody).

From a technical standpoint, this approach can also be really useful.  It can take a long time to really master technical aspects of performance (particularly at the early stages).  Finding new ways to utilize the approaches you’ve been practicing will dramatically reduce the time it takes to learn new things.  For example, alternate picking takes a long time to develop at the early stages of playing, but once you have it down it makes everything  you have to lean to play with alternate picking easier to perform.

Optimize

Let’s take an A minor pentatonic lick.

Pentatonic Lick 1

Let’s say that you’re using hammer ons and pull offs to create a more legato feel.

For me, the most legato part of this passage is the last three notes.  I’ll move the E on the B string to the 9th fret of the G string to put 3 notes to that string and make the pattern more fluid.

(Note the change in fingering)

Pentatonic Lick 1a

This is more of how I approach pentatonic fingerings so I adapted the first fingering for one that works better for me.  Here’s the first part of the lesson – assuming that you have a base level of technique acquired – find fingerings that make sense for you!

If this fingering isn’t one that’s common for you and you want to practice the approach.  Here’s how I would do it.

 1.  Isolate. There are two technical hurdles in this lick. Combining the 1 note per string and 3-note per string notes with picking

 Lick 1CAnd this:

Lick 1D

And the transition between the two:
Lick 1E
2.  Practice

The first step is to just get the initial fingering and picking down.

  • Set a metronome for 5-10 minutes.
  • Slow it down! Playing fast before you’re ready just adds tension and makes the lick sloppier and harder to play.  The goal is to take something you can play perfectly and effortlessly and then systematically develop it so you can play it perfectly and effortlessly faster.

Lick 1 Slow

  • Pay attention to the 3 T’s (Timing, Tone and hand Tension).  If you find your attention wandering this will get it back.  Are there any biffed notes? (Watch that pinky!)  Is any part of the hammer-on/pull-off uneven? (Bonus credit – make a video recording and listen back.  Pay attention to what both hands are doing.  Be critical but not judgemental.  Imagine you are watching a friend play this.  What constructive criticism could you add to help him or her play it better?)
  • Write down what you just did.
  • Adapt this to the second lick and the transitional lick if need be.  Get it to the point that the entire lick can be played without mistakes.
  • Repeat as long as time allows.  Do daily (and if possible, multiple sessions daily).
  • Typically with something like this, I’ll also practice it as sextuplets and a few other rhythmic variations to have those at my disposal if need be.

3.  Extrapolate.

This is something I improvised over a C minor-ish feel that uses the same technical approach that I used on the previous lick with a C Blues scale.

Cmin Lick

Click on image to see a larger version

From a technical standpoint – this is the same basic idea as the first 6 notes from the previous A minor example.

C min lick 1
(Ah – the fingering is missing here – I’m using 2-1-2-3 for each of these)

Sequenced here from the b7:
C Min Lick 2
And from the 5th here:
C Minor Lick 3

In fact the only new thing is the string skipping at the end:

(I got lazy here – I’m using the tritone F#/Gb interchangeably).

Cm String Skip
If the string skipping is unfamiliar to you you can just use the same approach to get it down outlined above.

(Yet another) Shawn Lane Observation

I was watching some footage of Shawn Lane that someone posted the other day and this technical recycling was VERY apparent to me in the footage.  From a technical standpoint, it appears to me that he took six or seven technical approaches beyond the realm that anyone else was willing to develop them to (fretting hand taps as opposed to hammer-ons, rhythmic groupings variations (5,6,7,9, etc), wide interval string skipping, Hindustani / Carnatic slide playing and blues phrasing) and adapted those to all of the different music he was engaged in.

In Karate, it always comes back to the Kata.  In boxing – the basics, the jab, the hook, cross, the uppercut.  You can practice fundamentals your whole life and STILL find things to improve.  New techniques take a long time to get down.  Invest the time wisely to get the one’s you need REALLY down to help realize what you want to express and then explore your sonic world with the tools you’ve developed.  (and if you’re not sure which techniques those are – a good teacher can help!  You can email me at guitar (dot) blueprint at gmail if you’re interested in setting up skype lessons to help realize your goals.)

As always, I hope this helps!

Thanks for reading,

SC


“Guest Lesson” With Jack Sanders

Jack Sanders

Years ago when I was at CalArts.  I studied with Miroslav Tadic and he had me play something for him and immediately came up with this analysis.

“Your left hand is completely compromising your playing.  You have to address your fingers and your pinky or you’re never going to get to where you want to go.”

Correcting that was a lot harder than I thought it would be.  It turns out that I had YEARS of bad habits ingrained in my muscle memory and adapting to proper technique was a real struggle.

Enter Jack Sanders.

Jack is a brilliant luthier (check out this video and this interview I did with him on his builds) and also an incredible teacher.  He happened to be teaching at CalArts my last semester and so I took lessons with him that completely changed how I approach guitar.  So much of the things that I assist students with in terms of hand tension, positioning, posture and attack now came directly from things Jack and Miro and I worked on.

Guitar Salon (a cool blog that has been kind enough to repost several of my rantings) has uploaded several mini lessons that Jack did for them that use scales as a diagnostic for left and right hand technical issues.

The advice he gives is gold, and well worth your time.

KoriSoron comes to Boston

In other news – KoriSoron is making its Boston debut at Johnny D’s on Wednesday October 21st on a VERY early show (we go on at 7pm) opening for Bob Forrest (Thelonius Monster / Dr. Drew).  Ticket info here.  Facebook here.

We’re really excited to be playing this show.  As a preview, you can see some Al DiMeola / Vlatko Stefanovski inspired improvised soloing on “Drowsy Maggie” here.

And we hope to see you there!

Some Lessons From A Boxing Match

Let’s start with the sweet science

My last post used a quote from boxing, and this post uses some lessons a friend of mine taught me about boxing.  The reason for this is that, in my head, there are a number of parallels between sports and guitar playing, the biggest one being that both require a seemingly endless amount of training and preparation to be able to pull of a performance at the best of your ability in front of an audience.

As I write this, UFC champion “Rowdy” Ronda Rousey just took her 12 straight win to remain undefeated with a knock out in 34 seconds.  This means that the sum total of her last three fights is under a minute.  Her detractors say this doesn’t mean anything.  They want to see her go the distance in a fight.  I disagree with them.  The fact that she can finish those fights so quickly says EVERYTHING about how much work and preparation she put into those fights.

I read Ronda’s biography and the thing that resonated with me (other than the endless grueling training – I thought back to a LOT of 12-hour days at Berklee while reading this) is how much she got up and kept going when she was knocked down in her life.  When she was back in the states after getting a bronze in the Olympics for judo with no gainful employment she tended bar, worked at an animal shelter and worked as a gym receptionist while living in a car, and managed to get her head in the game and turn herself around from that situation to become the most dominant athlete (male or female IMHO) on the planet.  (You have to have the mental and the physical skills to get to the top of your game.)

Back to the boxing

A good friend of mine (who just happens to be an unbelievable guitar player, musician, songwriter and guitar builder ) Chris Fitzpatrick, recently “celebrated” a milestone birthday in an unconventional way when he signed up to raise money by fighting in a Haymakers For Hope event.  (Haymakers for Hope is an organization that sponsors fights to raise money for cancer research).

It is impossible to understand the physical and mental demands that are required to walk into (and out of) a boxing match if you’ve never stepped foot in a ring.  Some people take a 1/2 hour boxing cardio class and think, “that’s not so hard – I could do 3 minute rounds” not understanding that it’s a whole other thing to try to throw punches when there’s another person there determined to knock you out.  If you haven’t prepped, even if you can avoid getting hit – you’re likely not going to make it out of the first round.

(Some language NSFW.  This excerpt is from the film Heckler, but I’d also recommend Raging Boll which shows more footage from this fight.)

My friend Fitz trained for months to get ready for his fight which required intensive diet and training, getting up at ungodly early hours and pushing his body to the absolute limit.  This was more remarkable given that this fight is something sane people 20-30 years younger might do on a dare.  He won the fight which you can see here.

While he was training, we talked a lot about the similarities between learning how to fight  and learning how to play guitar.  After the fight, there’s a whole post-fight period of introspection – kind of like a post gig introspection, and during that I asked him what lessons he learned.  The lessons he learned are a great guide for guitar playing, or any other venture you want to engage in.

With that – here’s a short sweet list of lessons courtesy of Chris Fitzpatrick.  Remember that the difference between thinking something and knowing something is that knowledge is experiential – so I hope you’ll learn these hard fought lessons of knowledge easier than Fitz had to learn them!   (Also, make sure to check out his Strange County Drifters project and keep an eye out for some forthcoming FnH guitars!)

Lessons:

  1. Don’t be outworked.
  2. Practice for perfection, understanding that perfection is a just a goal, not to be used as a judgement of success or failure.
  3. Push through your limits, you will be amazed at what you discover about yourself and what you can do.
  4. Your comfort zone is a place to rest, not a place to live.
  5. There will always be someone better, Always. learn from them.
  6. Ego is the most dangerous barrier to achievement.
  7. Your mind is so incredibly powerful that it can override your physical being. We all live this everyday and don’t even realize it. Use it.
  8. No one cares except for you. Don’t bother trying to make others care. Care for yourself.
  9. Breathe and relax.

All of these apply to everything, but my discipline is music and guitar.

To which I would add the famous Samurai maxim, “Seven times down – Eight times up.”

There are real limits in life.  If you haven’t ever done a bench press (and never done a similar physical activity) you’re not going to pop a heavy weight off your chest on a bench your first time- but that doesn’t mean that you won’t ever be able to do it.

You don’t know what you can’t do today until you try.
You don’t know what you can’t do tomorrow when you put the work in today.
You don’t know what you can’t do a year from now when you put the work in everyday.

A limit you have today doesn’t necessarily have to be a life long limit if it’s something you can change with consistent, focused work.

I hope this helps!  Thanks again to Chris Fitzpatrick for sharing!

-SC

You May Need A Teacher Or Buying Something Isn’t The Same As Doing Something

Talkin’ Yourself Out Of A Job

There’s a study excerpt I read, (probably a link from a TED Talk page), that talked about new research that shows that when you talk to people about doing something that it has a similar chemical process in the brian as actually doing that thing.

You may have experienced this if you’ve ever gotten amped talking with your friends about something you’re going to do, resolve to start your life-changing journey the following day, and find yourself out of gas. (The band X has a great song line on the track, Lettuce and Vodka: “Last night’s judgment day is this morning’s cartoon…” that sums up this predicament well.)

Personal experience has shown me that it’s not just talk that has this effect.  Education can often work this way as well.

For example, you get all excited because guitarist X has released a new book on the topic you want to know more about.  You buy the book to study the material and after some initial examination of the material, you find it in the pile with the other materials that have gone neglected.

How many people buy gym memberships and then never go to a gym?  It’s those same people who are often making statements like, “Yeah…I know I have a membership and everything, I really need to go….”

The Point of College

One thing that surprised me a lot about college was coming to the conclusion that what I learned at the time only accounted for a fraction of it’s value.  Going to college:

  • Exposed me to new ideas
  • Honed my aesthetic and made me realize why I liked or didn’t like things
  • Exposed me to new players
  • Forced me to play with others on a higher level
  • Taught me how to learn.

That last one is the big ticket item in the list.  You might not have to go to college to learn that lesson but you do need to devote a lot of concentrated study to learn what works for you.

For example, there were times in my life that a gym was a really good fit for me.  There were times that a gym was a bad fit for me.  Being a home owner now, and realizing that it was easier to clock in at home and put the time in made it a much easier decision to get a stationary bike and some weights because that worked better for me.  Some people need to go to a gym to get in the proper mindset (and to have access to the right equipment) to work out.

So the first point is that everyone is different.

But, acknowledging that everyone is different, everyone starts from the beginning at multiple points in their life.  In my experience, the big difference between people who stay with it and people who drop out is what and how they are learning.

A large percentage of the lessons I have taught have been correcting misinformation.  For example, if left to your own devices and watching YouTube videos that tell you that even with two working legs that the “proper” way to run involves only using your left leg, you might get really skilled at running with just your left leg and be able to run with one leg faster than anyone that you come across, but not matter how much time or effort you put in, you are never going to outrun a trained athlete who runs with both legs.

It’s the same thing with technical things like picking, hand tension or fretboard attacks.  Sure you can learn it wrong and get to a certain point, but you will invariably plateau and then wonder why you aren’t progressing any further.

The Flamenco Dance Master Class Lesson Scam

I’ve already posted about this, but I can tell you all about, what I believe to be, a brilliant scam that I’ve seen perpetrated by multiple Flamenco dance teachers in the states.  It works like this:

A well known dancer who happens to be in town for a show advertises a master class for students through the promoter.  While you might think that a master class would imply that only advanced students would attend, generally a lot of beginning and intermediate students show up and  jockey for the best position in their class to see the teacher.  Two things happen with this:

  1. It automatically drops the level of the class to the lowest common denominator
  2. It becomes very difficult to see the choreography

This is also the point in the scam to mention that typically ANY recording device will not be allowed in the class.  Sometimes they’ll let you record the audio but video is generally forbidden.

Then the class is taken through some warm up exercises and then through the choreography.

Here’s the scam.  Unless you’re a trained dancer familiar with the style, there is no way you will be able to get the choreography down without recording it.

Here’s the genius of this.  Later, when the student is trying to figure out the choreography and getting it wrong they blame themselves for not having the ability to remember the steps.

The dance teachers know this.  They’re profoundly protective of their choreography because they had to learn it the same way everyone else did.  By working with their teachers repeatedly and learning the choreography slowly over time.

So, they either have two choices.  They cross an item off their bucket list and go onto something else or they take more lessons and learn the pieces.

Now “scam” is a harsh term for this.  The only scam aspect of it is that it presents a masters class that won’t offer a lot for most people to learn.  Only a microscopic percentage of people who take an individual master class will walk away with something substantial.  What this system does accomplish is perpetuating the need for a teacher.

While no one want’s to be out of a job here’s the thing:

A good teacher will teach you a skill.

A great teacher will teach you what you need to learn and a great teacher will ultimately teach him or herself  out of a job because the student won’t need the teacher anymore.

While this might seem like a terrible business plan it works on numbers.  Great teachers do this because there are always new students on the horizon who need to learn.  And students who get what they need will refer other people to those teachers.

Buying Something Isn’t The Same As Doing Something

While there are some people who can teach themselves by picking up a book and working through the material, many people will need someone to help guide them and challenge them to get the material down.

If you pick up a book or a video and don’t make any progress, don’t despair!  It may just mean that you need to schedule some lessons to get on track and have someone help guide you to get to your goals.

Buying something isn’t the same as doing something but it’s a great start!

The important thing is to figure out what works for you and then take the appropriate action.
I hope this helps!
-SC
ps – if this applies to you and you feel like lessons may benefit you – feel free to send me an e-mail at guitar.blueprint@gmail.com for information about lessons.

Inspiration Versus Intimidation

As a followup to Podcast #4, I thought I’d talk about perception and playing guitar.

I’ve gotten some emails from people who read through my GuitArchitecture blog, and wanted to know what they should do if they’re not the next Guthrie Gowan, Hendrix, Holdsworth or the next (insert great player here).  I understand where they’re coming from.  If you turn on a computer it’s hard not to find some terrifying audio or video clip of someone playing really advanced guitar.

The implication that you could come to is that everyone in the world is playing guitar at an amazing level and the pressure many guitarists (and I suspect other musicians as well) feel is that they need to meet that standard.

Before I attempt to defuse this argument, I’d like to address the leap in technical advances on guitar and then talk about why it doesn’t matter.

.

Free Bird as an aphrodisiac

A friend of mine, who’s an excellent guitarist, was talking to me about the radical shift in technical standards in guitar playing and said, “You know – I remember when “Free Bird” was considered a virtuoso guitar solo.  If you could play that you were pretty much guaranteed to go home with someone at the end of the gig.  But now…I’ve got guys who have been playing for less than a year who can play that.”

.

Knowledge might seem arithmetic in its application
but like technology it’s exponential.

When I say that technology is exponential, I mean that technological advances typically build on previous technological breakthroughs.  For example, the ENIAC (i.e. the first computer-depending on how you define “computer”), used punch cards, weighed 30 tons, took up approximately 1800 square feet and used around 18,000 vacuum tubes. (No word on what kind of tone it had!)  All of this for a processing speed comparable to a calculator.  Notice the timeline in each step beyond that initial innovation (taken in part from The computer history timeline):

.

  • ENIAC
  • the invention of the transistor
  • the invention of  FORTRAN computer language
  • integrated circuits
  • the ram chip
  • the microprocessor and the floppy disc
  • IBM home computer and MS-DOS
  • Apple Lisa (with first GUI)
  • Windows

and then a series of major advances in microprocessor speed and size.  Each one of these changes ultimately created exponential innovations. In order for me to run a laptop guitar rig, I need a laptop with an operating system, a  fast processing speed, substantial ram, a fast hard drive, an audio converter, and software to make sense of what I’m trying to input and output from the computer.  None of this was even remotely in the thoughts of a potential application for a computer when ENIAC was built.

.

Where before they took years or decades, advances now occur daily or sometimes hourly because each piece of technology allows someone else to build on it  and make their own innovation by taking it in a different direction.

.

When Nicolò Paganini was alive, he was able to position himself uniquely as he was not only a virtuoso performer, but also developed a repertoire that only he had the technical skill set to play.  But once the music was published, other people started being able to play the music.  Some of the techniques became standardized, and pedagogical approaches improved.  With each passing generation more and more people were able to play it.

.

Now, while still difficult music, it’s nowhere near as impossible as it initially seemed.  Here’s some footage of Sarah Chang when she was 10 years old in 1990 performing some of his music.

.

If you think about it in the history of shred guitar, you would not have current innovators without people like Yngwie Malmsteen and Eddie Van Halen.  When those initial recordings came out they were considered impossible.  No one knew what the hell to do with Eruption.  It was Ed’s big middle finger to everyone – because no one could touch what he was doing at the time of Van Halen 1.  When I hear Far Beyond The Sun, I think back to people listening to the Rising Force CD and shaking their heads in disbelief.  Now either one of those pieces is something that you could learn to play given the proper instruction, music, time and a audio/visual demonstration.

.

The reason for this is it’s much easier to do something when you hear or see it being done.  

.

Once you hear someone play a solo at a high speed, you know that speed is attainable – because you’ve heard them play it and it transcends your limitations. When you see a video of them playing it, it makes it even easier as you can see more of the physical nuances of how something is being played.


With every recording and video, there is probably someone who is adapting or learning a technique associated with that recording and using it as a stepping stone. This is why there is such a glut of guitar videos, and why it seems that everyone is making one.

.

There certainly are a lot of videos out there but they don’t tell the full story of the player.  And with that in mind, it’s now time for:

.

Another Berklee story:

.

My first day at Berklee, I was in my dorm room and heard someone playing Tony MacAlpine.  I grabbed my guitar and went looking for the room to see what was going on.  The music was coming from the dorm room directly beneath me – at the time I had a black Aria Pro II Knight Warrior I knocked on the door and the door swung open and there was another guitarist also named Scott who also had a black Aria Pro II Knight Warrior strapped onto his body (this turned out to be a fortuitous moment for me because Scott today is one of my dearest friends (and an unbelievable guitarist)).  I introduced myself and walked in.  Scott sat down on his bed and started playing some terrifying 2 handed pattern on his guitar.  I processed that for a moment and then went to go meet his roommate, Drew.

.

Scott might disagree with me now, but here’s what I remember –  Drew was one of the most technically proficient guitarists I’ve ever seen.  He had literally taken the Michael Angelo instructional video and learned all of the licks but was playing them just as cleanly but even faster.  When he improvised a solo, he kind just re-arranged parts of those licks – but it was still incredibly impressive.

.

I left pretty stunned.  I had just seen the two most technical guitar players at the school, but what I thought I had seen were two typical guitarists and that this was the performance standard of all the guitarists there.  I was starting to wonder just how far in over my head I was at this school.

.

A couple of days later, I walked by the practice rooms.  A transcription of an Eric Johnson piece had just gotten published in one of the guitar magazines and I was now listening to twenty guitar players all playing the same lick at different speeds.  I processed that for about ten minutes – and realized my initial perception about the general level of skill amongst my fellow players was completely wrong.

Looking back at it now, I recognize that my thinking was faulty on multiple levels.

  • I assumed that everyone was “better” than me.


  • I assumed that “better” was a universal definition.


  • I assumed that my value as a player was only a comparative value related to how well other people play.

.

Now I think all of these assumptions were wrong.

.

To be sure, there are markers that you are improving as a player.  Maybe it’s fluency, maybe it’s repertoire, maybe it’s connection with the music or the instrument.  For each person, how they are getting better is ultimately self-defined.

.

If you define it solely based on what other people can do, you’re selling yourself short.

.

There are technical hurdles to playing music.  If someone counts off a tempo and you play your hot lead line over it – you can either cut it or you can’t.  There’s no real debate over that.  It’s strictly a performance issue.  You can, for example, either play an arpeggio at a certain tempo consistently or you can’t.  If the player next to you can play that arpeggio consistently at that tempo, then they have achieved a higher skill set on performing that arpeggio – but that has no reflection on either of your abilities to play music.  Just like your speed at filling gas tank has no direct reflection on your ability to drive.

.

I’ve had students who have come to me and said, “I’m never going to be able to play like (player x) so why even bother?”  This is like saying, “Noam Chomsky speaks English and I speak English, but I’ll never speak about linguistics in English like Noam Chomsky so I might as well not even say anything at all.”  Hopefully, this line of thinking sounds silly when you put it in context.  English is only a language.  You use it to express yourself.  It doesn’t matter what judgements people put on it, it only matters that you can communicate effectively.  The same is true for music as well.

.

Unfortunately, the social lesson that many people learn is that their value is comparative.

.

  • We value ourselves based not only on how much money we make, but how much other people make
  • on how our lives and the things in our lives stack up against other people’s
  • on how many cds we’ve sold versus other cd sales, etc, etc….

.

If you fall into this category here’s one way to turn this line of thinking around that will be more beneficial to you:

.

Ask not “how do I stack up against others?”, but instead, “what can I gain from this?”

.

If  I see someone playing an awesome solo, I don’t think, “Oh man I wonder if I can play that well?” (Although I certainly used to!)  I listen for the things that I like (or sometimes don’t like) and then see how I could incorporate that into my playing.   I take the things around me and try to use them for inspiration.  That way I don’t waste energy on getting intimidated.

.

It can be hard to maintain that observation, but if you perceive getting better as a self-made standard that others can help you rise up to rather than a standard of others that you need to reach, I think it may serve you much better.

.

I mention Guthrie Govan’s playing here because I really dig it.  I think he’s a brilliant guitarist.  But I really don’t give a toss about how I stack up against him. The world doesn’t need another Guthrie Gowan.  We already have one, and he’s great but what I do care about is how I can take every innovation of his I like and adapt it to what I do to advance my playing.

.

“Do not seek to follow in the footsteps of the men of old; seek what they sought.”

.

Lord Basho was once asked by an acolyte what could be done to make the world a better place.  He was purported to have replied, “be the best person you can be – and then there will be one less rascal in the world.”

.

The world doesn’t need another version of anyone, it instead needs you to become the best version of yourself you can.

.

As always, thanks for reading!

-SC

The GuitArchitect’s Guide To Modes – Part 14 Not-peggios – Melodic Minor Version

Hey everyone,

As promised, here’s a follow-up lesson that takes the approach I explored in Part 13 and applies it to the Melodic Minor scale.

I’ll use C Melodic Minor in this case – but this idea will work on any root.

Chords

Before we get too far into the lick side of this let’s look at the chords to see what we can play this over.

Here are the diatonic triads and 7th chords.


Try playing any of the following C Melodic Minor shapes over any of these chords..

Some Melodic Minor Notes:

  • Melodic Minor is an old scale.  Originally it was played as melodic minor when ascending but natural minor when descending.  Not a whole lot of people perform it that way in Jazz circles but mixing and matching the two can have some interesting sounds (i.e. it’s something you should consider experimenting with if this area interests you and you haven’t already).
  • Melodic Minor is a Dominant machine.  If you check out the harmonization above you’ll see that Melodic Minor has two 7th chords in it’s harmonization.  As Jazz standards use a LOT of dominant devices – this is a scale you’ll want to investigate if you have an even remote interest in Jazz.
  • Melodic Minor is a weird sound.  Yes it is.  The I chord is a minor (maj7) chord and that whole b3 mixed with the natural 6th and 7th makes for some interesting moments.  The only metal guy I knew who was really into that sound was David Chastain and he was doing instrumental stuff that didn’t really sound like anyone else. (Hint – this is worth exploring if you’re a rock or metal guy)
  • Hip trick alert:  since the ii chord is a minor chord -try playing C Melodic Minor lines over Bb Minor as well!

.

Now let’s talk about visualizing the scale.

“You take the good you take the bad – you flat the third and there you have…”

Melodic Minor

I’ve talked about my approach to Melodic Minor briefly in part 9 of this series – but as a brief review:

Major Scale/Modal Visualization Review

  • The guitar fingerboard can be divided into 3 sets of two strings. Any 2-string fingering pattern that starts on the B string can be moved to the same starting pitch on the D or the low E string and keep the same fingering.
  • The major scale can be broken down into seven two-string modes that follow a specific order based on its scale degree from the parent scale (Ionian, Dorian, Phrygian, Lydian, Mixolydian, Aeolian, Locrian). The two-string patterns are modular and can be adapted to positional playing.
  • Instead of thinking of individual modes when playing,  I tend to think of larger tonal systems (i.e. I think of C Major all over the fingerboard instead of D Dorian or A Aeolian.)
  • By thinking of the fingerboard in a larger scale – it makes it easier for me to navigate Melodic and Harmonic Minor as – solely from a fingering/sonic visualization standpoint – I just see it as variations of the Major scale patterns.

To visualize Melodic Minor patterns – simply flat the 3rd of the Parent Major scale. (i.e. to visualize C Melodic Minor just play C major but change every E  to Eb).

It’s important to note that all of the fingering conventions mentioned here are solely to assist with visualization as Melodic and Harmonic Minor really aren’t directly related to the Major scale sonically.

Here’s C Major

Here’s the audio.

Note:

In all the audio examples, I’ve played the example first as sextuplets – then at a slower tempo (i.e. 16ths) – then as sextuplets again.

Here’s C Melodic Minor

(the only difference is that the E has been changed to Eb)

.

.

Melodic Minor short cuts:

Using the Parent Major patterns above here’s a list of short cut’s to help you visualize the patterns.

.

Note: in the F Lydian shape – there’s no change from the major shape since there’s no Eb in the 2-string pattern.

.

.

.

Not-Peggios

Now let’s take this not-peggio idea from the last lesson and apply it to C melodic minor starting from G.

In each of the following I’ll show the 2-string pattern followed by the 4-note “notpeggio” extraction from that fingering and then show the multi octave form.

Note:  The extraction always starts from the second note of the 6-note pattern – so while the first example is extracted from the F Lydian fingering – it’s viewed as a G based pattern.

From G

G based pattern

Note: this G pattern is the same as the C major G shape.

From A

A based pattern

Note: this is a new shape from the Major patterns. The R-b3-4th-b5 shape may remind you of the A blues scale.

From B

B based pattern

Note: this is also a new shape from the Major patterns. The R-b3-b4th-b5 shape is something you may want to explore over diminished chords.

From C

C based pattern

Note: this C pattern shape is the same as the A minor form from C major.

From D

D based pattern

Note: this D pattern shape is also the same as the A minor form from C major.  This shape and the C minor shape above on their own really won’t give you much of the Melodic Minor flavor on their own – but alternating between the two of them will.  More on that in a future lesson.

From Eb

Eb based pattern

Note: this is a new shape from the Major patterns. The Eb Maj7 (#5) based pattern has been deconstructed into almost a whole-tone idea.  This is one of my favorite “outside” sounds in this scale.

From F

F based pattern

Finally,  this F pattern shape is the same as the F Lydian form from C major.

Here’s an audio sample of the 3/4 measures in ascending order from G

Next TIme?

In the next lesson I’ll look at applying this to Harmonic Minor and then I’ll look at working through these ideas positionally (Spoiler Alert – this is where this approach gets really cool!!).
As always, focus on the 3 T’s (Timing, Tone and hand Tension) when playing through these and make sure to have the timing locked in as you increase the metronome speed.  This approach is just a short cut to getting the patterns under your fingers.  By practicing them slowly and increasing the performance tempo gradually, you’re also getting the sound of them in your head – which is critical if they’re something you want to integrate in your playing!
As always, I hope this helps and thanks for reading!
– SC
PS – One plug here.  If you like this idea – I go MUCH deeper into similar concepts in my Guide to Chord Scales book – which covers every unique melodic combination from 3 notes to 12-note scales!!
Print editions of this book are available  on lulu.com or on Amazon (amazon.comamazon.co.uk, or amazon.fr).
.

Making Music Out Of Scales

Hello everyone, and welcome to the largest GuitArchitecture lesson I’ve ever put up online!

.

In this lesson (an excerpt of some ideas from my forthcoming GuitArchitect’s Guide to Modes book), I’m going to talk about the difference between scales and music and show some concrete ways to adapt scales into unique phrases.

 .

When I first started playing guitar, I listened to a lot of metal and the players I was into were fond of working ascending and descending scales into their solos.   (I also listened to a lot of Al DiMeola on Friday Night in San Francisco as well).  So I initially focused a great deal on scales and got to the point where I could play them quickly (but not really cleanly).  The flash of this got me noticed by other players in my area, but I always felt like something was missing.

 .

At best, scales are only ½ of the equation

 .

Seeing where my fingers needed to go was important but phrasing is where the real music is happening.

.

Note:

There’s a lot of information below.  Just take your time and go at your own pace.  It’ll still be there later.

.

Here’s another way to think of it.  Scales are like basic vocabulary.  They’re your nouns and verbs and no matter how you speak (with arpeggios, intervals or chords), they all have a basis in scales.

Your phrases are your sentences.  Guys with great phrasing can play a scale and make sentence out of it.  But a scale is, in and of itself, largely just a tool in making music and not music itself.

First Steps: Music is a language.  

So approach it the way you approach your native language

.

The way we learn language is by listening to other people speak and then emulating their speech.  Initially it’s nonsensical.  Then some disjointed vocabulary emerges which eventually gives way to sentences.  There is typically a period of formal study where reading is taught, and students are required to write ideas down.  Eventually, we take on unique characteristics that make our voices distinct.  With daily exposure language, and our understanding of it is constantly evolving.

Learning music is the same thing.  It first requires active listening.  You need to find music that you’re passionate about and really work on learning it by ear.  Music theory is also important, because it can help you make shortcuts to understanding a sound (for example, “that Phrygian pattern” gives the informed listener an idea of what a sound is before he or she even hears it), but really getting into phrasing requires an aural understanding.   Initially, this will take a long time and you probably won’t have all of the technical skills that you’ll need to get it at 100% accuracy.  That’s fine.  Get what you can – but really pay attention to phrasing details like pitch (vibrato, slides, bends, etc) and rhythm.  If at all possible – try to sing along with what you’re trying to learn.   If you get to the point that you’re not enjoying it – move on and come back to it.  The more you actively enjoy what you’re doing, then more you will get out of it.

.

Step 2 involves listening out of your comfort zone.

.

Try checking out music from other (non-guitar playing) musicians and cultures as well.  A lot of my pointillist rhythm ideas were copped directly from Japanese Koto approaches.  I stole a lot of things from Arabic music (specifically Turkish folk and classical music, the Iranian Radif and various maqams), Hindustani music, and vocal music from around the world.  I copped gypsy violin and accordion licks and Klezmer clarinet lines.   Lately I’ve been super into the insanely wide vibrato and pitch bends in Vietnamese Dan Bau music.   The important thing is searching out for other sounds, getting inspired by them and taking something from them.

For me a lot of this has been the nonsense portion of trying to speak other musical languages.   Not everything I do translates in multiple musical situations.  It’s not always correct or accurate, and sometimes that’s even better because then it’s my own spin on it.

Really importantly  – not all of it sticks.  I spent a lot of time learning things that didn’t directly work its way into my playing.  That’s fine.  The important things are the things that will ultimately stick with you.  What it’s given me are some things that are distinctly mine now.  A distinct accent if you will, that immediately identifies a handful of things that I say as me.

 .

Next Steps:

 .

In addition to learning things by ear, having a few different approaches to using scales in your bag can help give you the flexibility to express some really musical things.  I’ve already posted on the area of limiting options, and with that in mind I think it’s more important to go deep with a few ideas, rather than just scatter-shot a number of approaches and deal with them all superficially.  So I’ll cover some of them here

 .

Starting point: The Scale

 .

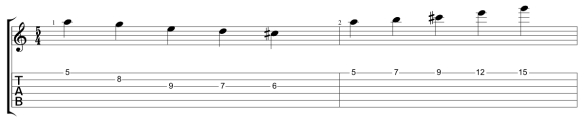
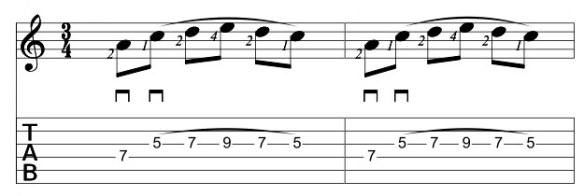
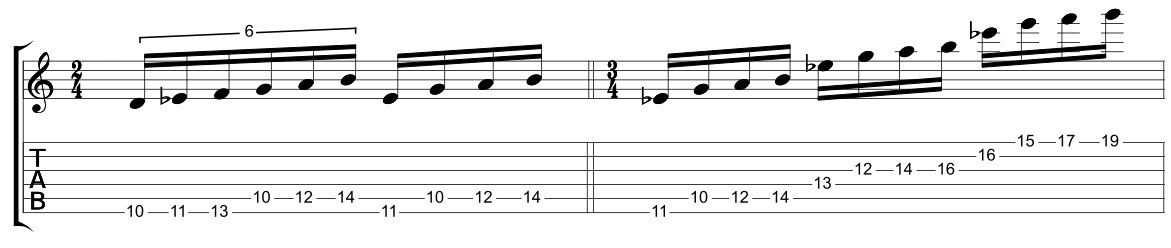
For an initial starting point, I’m going to look at a 3-note-per-string C Aeolian scale.  Try running this scale a few times with the fingering and picking patterns I’ve provided to make sure it’s under your fingers.

 .

.

 .

In the mp3 above, I’ve played the scale in 16th’s, a C minor 7 chord (to hear a harmonic context) and then as sextuplets.

.

Note:

In some textbooks you’ll see the b6 as an avoid tone against a minor 7 chord (i.e. the Ab as an avoid tone for C minor 7).  You can always just play a minor triad or a 5th for a similar effect.  I’ve included the minor 7th here because – aesthetically – it doesn’t bother me and I like the sound of a minor 7th better than the triad.

Picking this as I have above results in a smoother (almost legato) sound than I could get using alternate picking, even though I’m still picking every note.  For the initial fingering, I’m playing the first 2 notes of each grouping with my 1st and 2nd fingers to facilitate the slight positional shift on the B and E strings.

.

Note:  When practicing any musical idea, it helps to have a melodic and rhythmic context.  A time keeping device can certainly help, but I’ve included a short C note for a drone and a drum loop for your convenience below:

.

.

 .

Approach #1:  Skipping notes and using patterns

 .

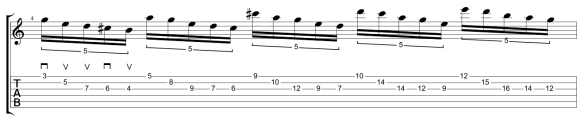
The only time I use straight ascending/descending scales is if I have a target note that I’m specifically trying to get to.  In those cases, having some velocity to get there can build tension and make it exciting to hear.  Otherwise when you hear one note after another in straight ascending or descending scalar patters, it gets very predictable pretty quickly.

Here’s a sample phrase I improvised based on the scale above.  I’ve added some notes below.

 .

.

.

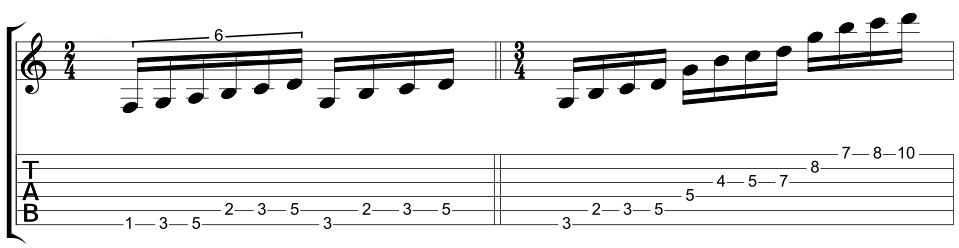
  1. On the first part of the phrase on the A and G strings, I’m only playing the notes C, D and Eb.  Adding a string skip and doubling the C at the octave creates more excitement in the phrase.  I’ve provided an optional notation indicating picking the octave C with the pick hand middle finger to give it a little snap – but you can certainly flatpick it as well.
  2. Starting on the Bb on the G string,  I’ve rhythmically copied the same phrase as on the A and G strings.  By playing it as a pattern, it creates some consistency in the phrase.  While the rhythm is sextuplets – the phrasing is alternating groups of 4 and 6.
  3. The last 6 notes break out of the pattern by just playing a straight ascending scale.

 ..

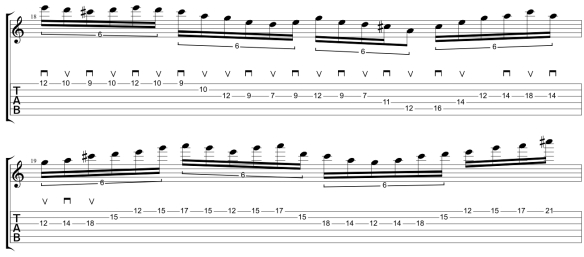
Here’s another track variation.  I’m picking every note on this one:

.

.

Approach #1a:  Skipping notes part 2 (Pentatonics)

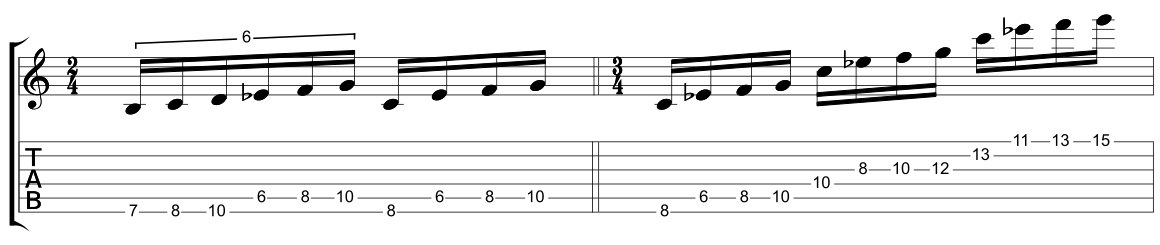
Another way to work scalar ideas into a musical context is to reduce scales to pentatonics.  For example:  Here is my initial scale again:

.

And now I’m going to remove the F and the Bb from the scale.   This leaves a five-note pentatonic (C, D, Eb, G, Ab) – sometimes called Hirajoshi.

 .

.

.

The term, “Hirajoshi”,  actually refers to a Koto tuning.  In the Japanese scale system, this collection of intervals would be recognized as belonging to the In scale.  But since so many guitarists refer to this as Hirajoshi, I’ll use that nomenclature here.

Regardless of what you call it, sonically it’s a very cool scale.  The skips between the Eb/G and Ab/C really open the scale up sonically.

.

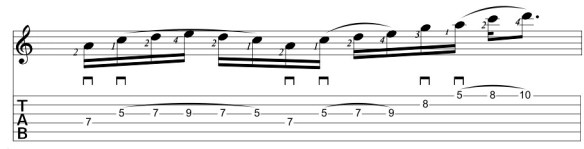
Here’s a variation on the lick above using this pentatonic idea in the second ½ of the phrase.

.

.

.

Technically, in addition to some of the challenges of the first lick, another tricky thing here is the skip from the C to the Eb on the G and B strings because the D, C, Bb pull off wants to go back up to D.  Sonically though it adds a really nice contour to the phrase.

 .

Approach #2:  Sequences

 .

Sequences are a cool way to use scales in a way that generate melodic momentum but contain an internal logic.  Here’s an example of using the pentatonic in descending groups of 3s.

 .

.

.

This is a very Marty Friedman-esque idea.  A little goes a long ways with this type of approach, but these sequences are great devices to work into phrases as a way to get more mileage out of a scale.

. .

Approach #3:  Octave displacement

 .

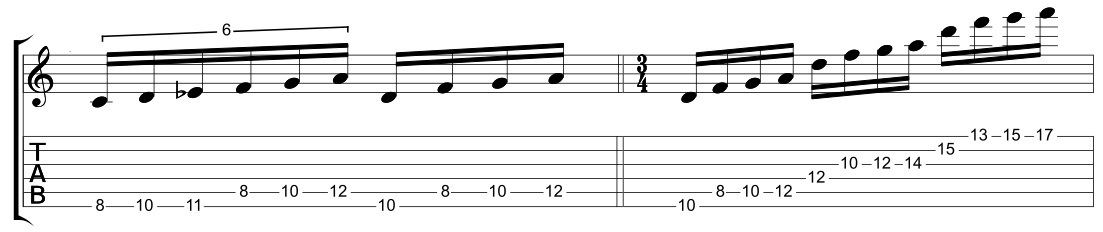
Playing notes in order can be boring, but as we saw with the octave C jump in the first lick, alternating scale notes in different registers can be much more interesting melodically.  Since the A and B string are a 9th apart, playing an ascending melody between the strings works well positionally.

The first step in this process involves being able to visualize the scale on each individual string:

 .

 .

Here’s a melodic idea that works off of this ascending/descending idea.  It works without a trem as well, but adding the trem gives it more of a slidish feel.  The important thing is to let it all ring together in a controlled way.  I’ve recorded this at full tempo and then in 1/2 time and I think it works a lot better at 1/2 speed .

 .

.

.

If you look at the notes in the phrases (C, D, Eb), (D, Eb, G), (Ab, Bb, Ab), (G, F, Eb).  They’re all based on short simple melodic ideas that sound more complex when broken up over octaves.

.

Approach #4:  Modal Arpeggios

 .

Previously, I removed two notes to create a pentatonic scale but if I play every other note of a mode, I can create an extended arpeggio called a modal arpeggio.

For example, here’s the scale again:

 .

Taking every other note:

 .

.

And putting it into a phase gives me this:

 .

.

.

Note#1:

It’s interesting because while the scale and tonality is rooted in C, sliding the last note of the arpeggio up to D gave it a whole other texture.

.

Note #2:

A lot of phrasing is really about minute details.  Here’s the same arpeggio but I sit on the first note just a little longer.  It makes the phrase more musical to me:

.

.

Here’s another arpeggio idea with a repeated phrase in the middle.

.

.

.

Playing arpeggios on smaller string sets allows me to sequence ideas more easily (Like the first 5 notes).  The jump to the Eb is probably the biggest surprise in the phrase.  Short but sweet.

This modal arpeggio approach can be applied to any mode or scale and offers a great way to add some additional textures into your soloing.

 .

Some Concluding Thoughts

 .

Normally, I would have broken this up into multiple posts, but I though it was important to get the aural learning component and the melodic variations on the same page.I didn’t even get into rhythmic variations, double stops, chromatics, chordal applications, superimpositions or any of the literally dozens of other approaches that can be used to extract music from scales.  It really all comes back to how much music you’ve absorbed because the most used tools in your melodic toolbelt are going to be your ears and your aesthetic and those are both guided by what you’ve been exposed to.

For those of you using GuitarPro, you can download the .gpx file of this lesson (with an extra arpeggio thrown in for good measure) here.

 .

The GuitArchitect’s Guide To Chord Scales

 .

Chord Scales Cover Front And Back

I’ve mentioned before, that (for me) the biggest advantage of investigating harmony and theory is to expose people to sounds that they didn’t know where there.  This is the entire purpose behind the  GuitArchitecture series.  One of the GuitArchitecture books in that series, The GuitArchitect’s Guide To Chord Scales utilizes and expands on this idea by exploring all unique scales from 3-12 notes!!!   The above material is expanded on substantially in that book so if you like this lessons you’ll really like the book.

More info on the book here.

Lulu Link

Amazon link

If you like this book you might want to check out the other books in this series here.

As always, thanks for reading!

.

-SC

Making Sense Of The Pentatonic Scale – Diagonal Forms – Part Two

Hello everyone!!

Here’s part 2 of the diagonal pentatonic lesson..Hopefully you’ve checked out the posts on two string patterns and part one of the diagonal forms post  and have gotten the shapes and  visualizations down and under your fingers.  (if not – just take a moment and check out the other two posts).

.

In this lesson, I’m going to continue the process of combining the two approaches into 5-note diagonal shapes.

.

 5 Note Diagonal Pentatonics

.

Perviously, I took a look at one 5 note pattern on two strings.  This can be done by either putting 2 notes on one string and 3 on another (1.e. a 2-3 pattern):


..
or by putting 3 notes on one string and 2 on another (1.e. a 3-2 pattern):

.

.

..
Note:

Those of you looking at the picking pattern closely may notice that I play the 3-2 pattern with a partial sweep instead of strict alternate picking.  While the 2-3 pattern can be swept as well, you’d have to start it on an upstroke:

.

.

From a picking perspective – I find the 3-2 typically works best when ascending and the 2-3 works best when descending – but from a fingering standpoint – sometimes the reverse of this will be true.  A little experimentation goes a long ways here.

.

Working with these forms:

I’ve documented every 2-3 and 3-2 combination here – but in general I don’t recommend spending a lot of time practicing forms that you’re not going to use.

.

Instead, try the following:

.

  • Take the shapes that you like (or shape if only one works for you)
  • Practice it with a time keeping device like a loop or a metronome
  • Practice it with consistent picking or legato (i.e. using hammer-ons and pull offs) played over a chord to supply a harmonic context.

.

You may want to start with an E minor or Em 7 and then try other chords like C Maj 7, G Maj 7,  F Maj 7, D min 7 or A min 7.

.

  • Practice the pattern in different rhythms

.

“Ceci n’est pas une pipe” or when is  5 – 4?

.

In the previous lesson, I talked a little about altering the rhythms of any sequences that you’re playing. Dividing the beat with a different number of notes than the notes in your phrases can add some rhythmic tension and goose the melodic line a little.  For example, here’s the initial 3-2 pattern from above moved in scale wise motion through each note of the E pentatonic minor scale.  I’m playing the phrase below as quintuplets (i.e. 5 notes to the beat). 

(If you have trouble counting the phrase try saying (“here’s a group of five”).  If you do it over and over again in a shopping mall someone will probably call security – so you may want to use your internal voice for this)

.

On a more serious note – I’ve notated the phrase as 5/4 to make the rhythmic division clear.  In the mp3 below – I’m playing the phrase over a 4/4 drum groove so there are 3 beats of space (5 beats + 3 beats = 8 beats or 2 bars of 4/4) before the descending line starts.  Here’s the ascending line:

.

.

and here’s the descending line:

.

.

Now I’m going to take the same sequence but play it as 1/16th notes which does a very cool thing over the drum beat.  Where the previous phrase has the first note of each pattern start on a down beat, here the starting note keeps getting displaced.

.

Note :

I’ve notated the phrase as 7/4 to make the rhythmic division clear (just like the groups of 5).  In the mp3 below – I’m playing the phrase over the same  4/4 drum groove so there is 1 beats of space (creating a 2-bar phrase of 4/4) before the descending line starts.  Here’s the ascending line:

.

.

And the descending line….

.

.

and here they are back to back


.

The Shapes of things….


Now I’m going to go through each of the individual shapes and make some notes.  At the end of the shapes, I’ve included an mp3 of my preferred shapes in groups of 5 and then groups of 4.

.

Pattern 1

(Starting on the Root)

.

Here’s the 2-3 shape on the bottom 2 strings:

.

.

And played in octaves:

.

Note:

The stretch on the D and G strings isn’t very comfortable – so I’d most likely use this fingering only when descending.

.

.

Here it is in a 3-2 shape.  I’m playing the notes on the 3rd fret with the second finger, 2nd fret with the first finger and 5th fret with the pinky.

.

..

Here is the 3-2 shape in octaves.  The same fingering pattern applies just add the 1st finger for the “e”.

.


.

Pattern 2

(Starting on the b3)

.

Here’s the 2-3 shape.  It’s not very positional ascending – so again I use it primarily for descending ideas.

..

.

Here is the 2-3 shape in octaves:

.

Here’s the 3-2 shape.  The symmetrical fingering of the 2nd and 4th finger in this pattern is interesting to me.  I’m not a big finger exercise guy anymore, but if you’re looking for a fingering pattern to clean up your 2nd and 4th finger, smoothing out the octave runs on this shape will help with synchronization if you’re practicing it correctly. (You can check out the practice posts on my blog for some helpful practice tips – just look on the blueprint page).

.

.

Here’s the 3-2 shape in octaves:

.

.

Pattern 3

(Starting on the 4th)

.

Here it is in a 2-3 shape.  I actually prefer this pattern to the 3-2 shape as I find that by using my first and second fingers on the 5th and 7th frets, the pattern is more comfortable to me.

.

.

Here it is 2-3 in octaves.  I play this version primarily with alternate picking, but play two down strokes in a row to get from the G to the A to start every two string pattern on a down stroke.

.

.

Here’s the 3-2 shape.  If the 2nd pattern 3-2 shape is comfortable to you – you may like this one as well.

.

.

Here is the 3-2 shape in octaves:

.

Pattern 4

(Starting on the 5th)

.

Here’s the  2-3 shape.  I use fingers 1-3-4 for this one.

.

.

Here is the 2-3 shape in octaves.  I use the same picking pattern I described in pattern 3 for this pattern as well.

.

Here’s the 3-2 shape.  The focus here is the 3-4 finger shift.

.  

Here it is in octaves.

.

Pattern 5

(Starting on the b7 th)

.

Here’s the 2-3 shape.  This sits under the fingers very comfortably.

.

.

Here it is in octaves.  This is a great shape to repeat a few times before moving to the next octave.

.

.

Here’s the 3-2 shape.  This is a form I abandoned almost instantly – especially because the 2-3 form is so much easier.

.  

.

Here it is in octaves.  On the high B and E strings – this form can be useful when descending.  I use 3-1-4-2-1 for the fingering pattern. On the ascending 5s and 4s phrase, I played all the patterns in the 3-2 shapes to keep the picking consistent – so if you’re going to be playing the patterns on just  2-strings, you may want to familiarize your self with both divisions.

.

.

Finally here’s an mp3 of each group in order.  I recorded the patterns that I marked out as preferred patterns.  Typically I wouldn’t switch between phrases (and picking patterns) like this.   The same rhythmic idea as above (i.e. patterns notated for clarity but played over  2 bar 4/4 phrases).

.

.

Note:

These shapes are all adaptable to the blues scale as well by just adding an A#/Bb to the patterns.

.

“Ceci n’est pas une pipe” II or when is  five  six?

.

So here’s another way to manipulate the patterns into something more fluid.  Both pattern 3 and pattern 4 have symmetrical fingerings.  In pattern 3 for example, if I double the d between the 2 shapes I get a 6 note pattern with the same fingering.  This works best as a descending line to my ears:

.

.

.

Here’s the same idea with pattern 4 using a doubled E.

.

( 8/7/11 -Note:  the wrong graphic was posted here previously but this has now been fixed – SC)

.

.


By understanding patterns, it becomes possible to manipulate them and make them work for you.  The key is to take one idea or approach and put it through the paces and try to get something out of it that works for you.

.

I hope this helps!  In the meantime, if you like this approach, I have a book that includes this material you may be interested in

My Pentatonic Visualization Book

Minor Pent Front

is 100 + pages of licks and instruction and includes demonstrations and breakdowns of two-string fingerings, diagonal pentatonics, sweep picking pentatonics, pentatonic harmony and much more!  It’s available here.

.

Thanks for reading!

-SC

Making Sense Of The Pentatonic Scale – Diagonal Forms – Part One

Hello everyone!! After a lengthy delay – I’m posting this pentatonic lesson.  The amount of information over the next few posts will keep some of you busy for a while.

.

A general online lesson note:

.

The lessons I post here typically go into quite a bit of detail with the rationale that the reader (i.e. you) can take bite sized pieces of information and return to the material as needed.  If this more information than you will probably be able to process in a single setting, simply take one or two things that sound cool to you and apply them to what you’re currently playing (songs, solos, etc).

.

One idea applied well is worth more than a dozen ideas applied poorly.

.

In this lesson I’m going to combine 2-string pentatonic patterns into a diagonal approach.

.

Note: For those of you who want to adapt these ideas to the blues scale just add in the A#/Bb to the patterns listed below.

.

..

Diagonal Pentatonics

.

Playing two-string patterns in octaves moves the fretboard shape both horizontally and vertically (i.e. diagonally). Two-string diagonal playing can help with visualization as the same pattern is simply moved to the octave of the starting pitch.

.

To illustrate this – I’ll start with the following four-note shapes.  Use alternate picking for all of the following exercises.  With the exception of the first four notes which use open position, the rest of the patterns use the same fingering.

.

All of the following examples should be practiced with strict alternate picking or legato (i.e. using hammer-ons and pull offs) and (ideally) played over a chord to supply a harmonic context.

.

Some chords to try:

.

  • E minor or Em 7 chord 
  • C Major 7
  • G Major 7
  • F Major 7 
  • D minor 7 
  • A minor 7 or
  • whatever sounds good to you!

.

Here’s the 1st pattern moved in octaves.

.

.

Pattern # 2

.

.

Pattern # 3

.

.

Pattern # 4

.

.

Pattern # 5

.

.

Working with patterns

.

Note:

Pentatonic scales, or any kind of scale in general, are simply a tool in making music, but are not music in and of themselves.  The goal of this process is to use these shapes as a way to visualize sounds and then to be able to manipulate them in real-time.

.

Let’s generate a musical line using this approach. Here’s an idea in the style of Paul Gilbert.  I’m picking every note in the example – but you could use hammer-ons or pull offs for a more legato feel.  It’s played first with sextuplets and then slower at 16th notes to make the notes easier easier to hear.

.

.

.

The drums on this track are just a simple loop I pulled together for a song I was working on called Raga Jam.

.

.

While recorded at 105 bpm – the  mp3 can be downloaded and then slowed down or sped up to accommodate your tempo needs.  A number of applications will do this but if you’re looking for a recommendation –  I recommend Transcribe! by Seventh String Software.

.

There are several ideas here worth exploiting.

.

  • The initial pattern consisting of four notes, is played as sextuplets (groups of six).  Rhythmically, this adds a sense of tension that is absent in phrasing the group of four notes into a 1/16 note pattern.  This idea will be covered more in part two of this lesson.

.

In general, practice playing patterns in a variety of rhythms as you may find ideas you can use later.


  • The B on beat three breaks up the predictable note order a little.  It’s a small variation on the pattern that makes it sound a little less “patternish”.
  • The last five notes of the sextuplet break the four note melodic pattern.  This idea will be explored more in part 2. But in the meantime, here’s an initial fingering to get you going.  I’ve notated it as a group of 5 – But rhythmically it’s part of the sextuplet pattern above.

.

.

The use of the open E and A strings changes the overall fingering shape on the bottom, middle and top two strings which may make the lick more challenging to play.  

.

If you are having difficulty playing something melodically, take a close look at the fingering you’re using and see if it’s the most efficient one.

.

In the example below, I’ve taken the same notes and broken them up into melodic shapes that use the G, A and B pitches on the same string.  You will probably find this much easier to play.

.

Here’s a fingering variation of the above idea (watch the skip from G to B on the D string!)

..

.

.

Going a little further:

.

Sometimes patterns can lead us to unexpected melodic places.  Here,  in this approximation of an improvisation for example,

.

.

.

  • I’ve taken the initial E, G, A and B pattern shape and instead of moving it up a 1/2 step, (to accommodate the B/G string 3rds tuning), I kept the fingering shape the same.  This produces a whole tone shape on the B string that adds a melodic surprise.
  • I’ve then continued the whole tone idea to the high E string  – bringing in a C and then resolving it to B (The 7th fret B is missing in the tab but is on the notation line). The whole steps in the F#, G# and A# passage and the C, D and E passage have the same intervals as the G, A, B of the pentatonic scale.  Even though the G# clashes with the G in E minor – the line has enough of a melodic drive that it can work (as long as you resolve the idea  – in this case to a chord tone).

.

By understanding patterns, it becomes possible to  manipulate them and make them work for you.  In the next lesson we’ll play full pentatonic patterns on 2 string sets and bring in a few other ideas that will spice up your approaches

.

Tones:

.

Finally, for  those of you interested in the technical side of what I’m doing here are some screen shots of my set up. First the AU Lab rig:

.

.

Something that may be of  interest to you – I set Audio MIDI Setup to 88.2k for the DUET  – but run the LA Convolver speaker cabs at 44.1.  That way the audio conversion rate for the guitar signal stays higher but I can use things that run at 44.1 (like the audio player on the Generator 1 strip).

.

.

I’ve mentioned the AUAUDIO File Player on my AU lab posts – but it’s a cool plug-in.  Using it, I can bring in all kinds of samples or tracks and run them live with the guitar signal and record them with the click of the record button.  (It’s how all of these tracks are recorded btw – live into AU Lab).

There are two dirty sounds (I didn’t like my first tones so I re-recorded everything.  When I couldn’t find the first 5 audio files while typing this – I just went with the initial recordings since I didn’t have access to my guitar.)

.

Here’s the dirty side of the main tone (Tube screamer is set at 9%, 53% and 9% – BTW)

.

.

and the clean side:

.

.

Tracks 1-4 are just my standard Marshall Who? settings

.

.

Part two will be up soon!! In the meantime,  if you like this approach, I have a book that includes this material you may be interested in that features this material and much more!

Minor Pent Front

is 100 + pages of licks and instruction and includes demonstrations and breakdowns of two-string fingerings, diagonal pentatonics, sweep picking pentatonics, pentatonic harmony and much more!  It’s available here.

.

Thanks for reading!

-SC