New Lesson Part III – A Process To Get Better

Case Study

In part one of this series I laid a some ground work for the idea that improvisation can be utilized for a practice and compositional tool.  In part two, I showed how I used that approach to write a song and develop a lick for the solo .

Here in Part III of this series, I’m going to use the lick I came up with to show how I approach practicing.  While I’m demonstrating this to show how to get a specific lick under your fingers, this approach can be used for more rapid skill acquisition in any area.

Step 1: Separate A Specific Goal From A Desire

A lot of times, people will say they have a general goal like, “I want to get better at guitar” and then buy a book that they read a bit of any perhaps play something for a minute or two in an unorganized session and then play the same licks they were playing before and never open the book again.

“I don’t know why I don’t get any better.  I practice all the time and have dozens of books but I keep playing the same things.”

It’s because you have a desire but you don’t have a specific goal.

Desire is important.  It’s a motivator.  It’s the why behind the things that you do.  But desire doesn’t get things done.

“I want to be a jazz guitarist” is a desire.

“I’ve adopted a daily practice of learning a new standard in every key and transcribing my favorite artists soloing on those tunes.” is a more actionable goal that works in the service of the desire of becoming a Jazz guitarist.

Goals address what what and the how of the things that you do. The specific mentioned above  is important as:

Specific Goals Get Specific Things Done.

Depending on the thing you’re working on, a setting a realistic time frame for the goal might be make it easier to achieve as well.

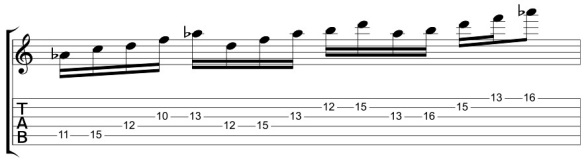
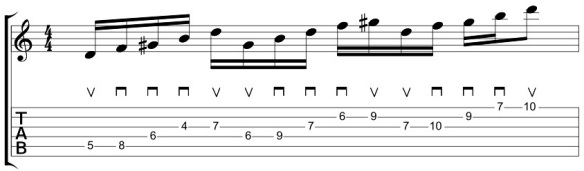
In this case, my goal is to try to get this lick:

32nd Note Lick Revised

up to the tempo of the song I want to use it in.

Step 2: Identifying The Thing(s) To Work On

In my example above, my goal is very specific so in this instance that’s the thing I’m going to work on.

It’s important to note that in going through this process you will very likely realize that what you’re working on uncovers all sorts of other areas that need to be developed to achieve that goal.

For a non-musical example, if you made a New Year’s resolution to loose 50 pounds by summer you might have identified working out at a gym as one of the things to work on but actually getting to the gym consistently might be a bigger problem in realizing that goal.  So you’d have to address things like willpower / motivation or other issues in addition to the initial area identified (the need for more exercise).

In the lick above, there might be a whole host of technical issues (sweep picking, string muting, etc.) that needs to be addressed in order to be able to play on the lick.  That aspect of it can become very frustrating if you didn’t anticipate it.  Just be aware that working on one thing will often mean working on multiple things.

Step 3: Contextualize And Analyze

One common mistake that I see people make is learning a lot of licks and then not knowing how to use them.  By understanding what you’re playing and how it works in a harmonic context, you can then take that information and re-contextualize it – (i.e. use it for soloing in other songs).

I already did a lengthy contextualization and analysis of this in part two of this lesson.  But here’s a cliff’s note version.

In this case:

32nd Note Lick Revised

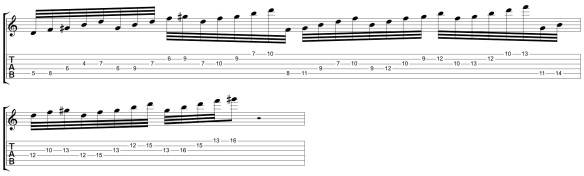
The lick is a diminished lick that I’m using as a solo over an ostinato.

Ganamurti Ost

Step 4: Deconstruct

So when faced with a lick like this:

32nd Note Lick Revised

many players will just set a metronome and just start whacking away at it to try to get it up to speed.

This is NOT the best way to address something like this.

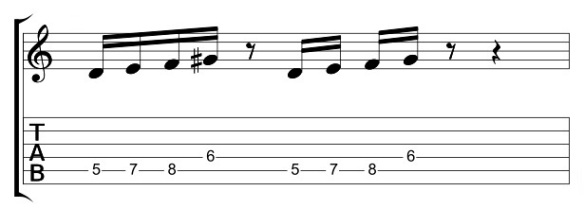
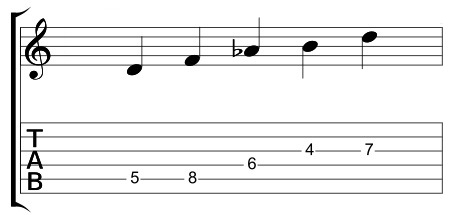
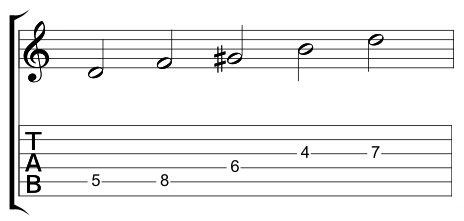
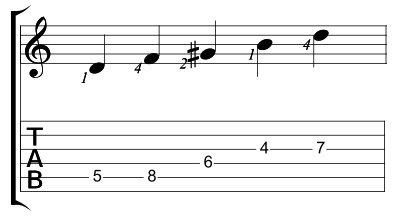
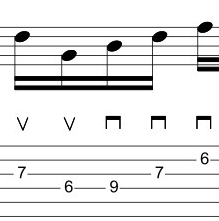
I recommend breaking it down into components.  So if I look at the first two beats and slow them down – essentially I see:

four four sixteenth first
Which is just the same fingering repeated at the 8th fret:

four four positional sixteenth two

and the 11th fret:

Four Four Positional three

So if I look at that first lick again:

four four sixteenth first

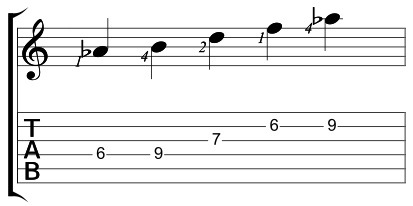
I can see that it’s the same basic idea on three strings in terms of picking and fingering – a minor 3rd on the same string, a single note on the next string and a minor third on the third string.

Or isolated further essentially this.

Diminished 7th quint

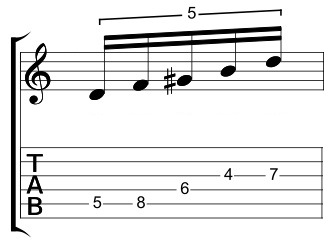
While the fingering might be adjusted slightly for the note on the middle string,  the first thing to do is address this initial shape.  Because if I don’t have this down then the rest of the lick won’t come together.

Step 5: Refine

If the lick features something really unfamiliar to me – I’ll break it down even further.

  • My initial focus is to just make sure I get the right notes.  Rather than even looking at 1/16th or 1/8th notes I might break it down to this:

D Dim 7 to octave

or even this:

5 Note half Note

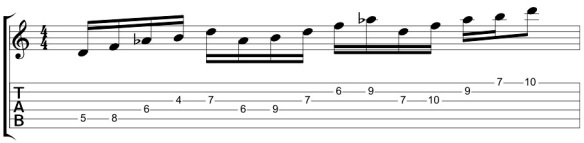
  • The first thing to address is the fingering.  I’ll use the 1st and 4th fingers for the notes on the outer strings and the 2nd finger on the inner string.

5 note fingering

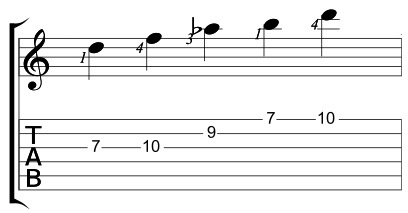
This will keep the fingering the same on the D-G-B strings:

5 Note fingering-2

And when I get to the G-B-E strings the only finger I’m changing is the note on the B string:

5 Note fingering 3

  • The next thing I’ll address is the picking.  Note that I’m going to pick the form in a semi-sweep pick that might seem unusual:

Initial Picking

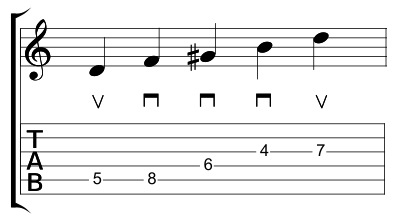
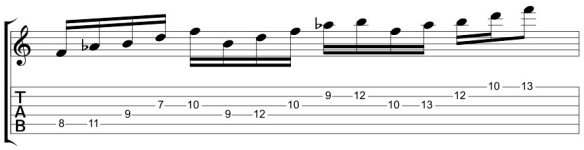
The reason for this can be seen better when you look at the lick in full position:

16th Note Initial Picking

The reason I start the lick on an up-stroke is to create a small sweep going between patterns:

Picking Excerpt

But this solution is just what works for me.  You could use hammer-ons to play the whole lick as downstrokes and that would work as well:
Hammer On Lick

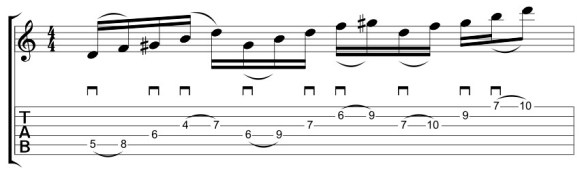
The point here is to find what makes the most sense to you to play the lick to make sure that you’re playing it properly.

Step 6: Measure

Tim Ferriss has frequently thrown out this quote (proper citing needed)

“That which gets measured gets managed.”

When I go on a trip, my sense of direction is typically terrible.  If the sun is out I can work out “the Sun rises in the East and sets in the West” to at least get my general bearings but at night – left to my own devices without a GPS of some kind – I will typically go in the wrong direction.

I mention this because past experiences have shown me that using perception without any kind of concrete markings is a terrible measure for how I’m progressing on something.

In my case, I do several things to help measure how I’m doing.

  1.  I use a stop watch.  I’ve been practicing for a while so I can sit for longer periods of time and generally stay on task, but for the beginner I’d recommend a 5-15 minute block.  If I only have an hour to work on a few things, I’ll take 4 15-minute blocks and really focus on only one thing for that interval.  That’s why the stop watch is so important because it allows you to focus on the task at hand without spending any mental bandwidth on how long you’re working on something.  (Bonus tip – 4 FOCUSED 15 minute sessions over the course of a day will get you infinitely further than one unfocused 1 hour practice session at a time).
  2. I use a metronome or a time keeping device.  If I can play the lick at the beginning of the session at 100 and end at 105 I’ve made progress.
  3. I write it down and by that I mean I (generally) keep a daily log of whatever I’ve practiced for whatever length of time I practiced it for and make any notes of things I addressed.

    Example:

    “3/13/16:  5-Note Diminished run- 15 mins @160.  Work on articulating middle notes.”

    That’s really important.  So many of my students who say that they’ve never made progress before become VERY surprised when they have to write something down and REALLY see exactly how much (or in most cases how little) time they’ve actually put into something.

Step 7: Play it (or perform it, or do it) and observe it

Okay – we’ve covered a LOT of preliminary groundwork but the reason for that is because practicing something wrong will only make you better at playing it wrong and you will plateau at a much lower performance level.  Playing it correctly (i.e. with no tension, proper form, timing and phrasing will take longer in the short run but will save you insurmountable time in the long run.

I hope you’ll take this advice from my own experience.  I have had to start from scratch – from the beginning – TWICE – because of all of the bad habits I picked up and had to get rid of.  Had I know what I know now, I could have gotten where I am now in 1/4 of the time.

Here’s the trick to practicing this.

You need to really focus on what you’re playing and pay attention to how you’re playing it.  But you need to do this in an impartial way.

This means divorcing yourself from the outcome and just focusing on the moment.  The way I do this is somewhat schizophrenic in that when I practice I almost view it as if someone else is performing it.  While I realize that this may sound insane –  the point for me is to not get caught up in judging myself (“that sucked” doesn’t help you get better) but instead to focus on the process (i.e. the physical mechanics of what I’m doing. “Is it in time?  Is it in tune?  Am I playing that with minimal hand tension?)  The goal is to be as impartial an observer as you can be and just focus on the execution.

To do this, you’ll want to perform it at a level where it’s engaging (don’t make it too easy) but not so difficult that it’s overwhelming OR where you’re bringing in bad practice habits. 

When I was in high school I used to just practice everything as fast as I could and then use a metronome to try to make it faster and all that did was had me play with a lot of tension and not in a rhythmic pocket.  I could never figure out how people could play effortlessly and smoothly and it was years later that I realized that they played that way because they practiced that way.

Step 8: Correct

This is where the adjustments happen.  If my hands are tense, I adjust to play with less tension.  If my rhythm is off, I adjust to get back in time.  If other strings are ringing out, I adjust my hands to mute the strings better.

Step 9: Isolate the problem area(s) – Deconstruct Again

If I’m working on a big lick and have a problem switching position – I’ll apply this entire process to just that one problem area and correct that. Don’t spend 15 minutes playing 100 notes if you’re tripping up on 4 in the middle.  Get the problem area sorted out and then (once that’s worked out and smooth) work on playing the areas immediately before and after the problem and ultimately playing the whole thing.

Step 10: Play/perform/do it and observe it again

So I apply the correction.  When I get to the point where I can play it 5-6 times in a row perfectly, then I’ll adjust appropriately.

This Specific Lick:

Here’s how I tackle this:
32nd Note Lick Revised

  • Since it’s a repeating 5-note pattern, I start with the first 5 notes and establish a fingering and picking pattern.  I practice that with proper technique and timing and get it to where it’s smooth and effortless at a tempo.
  • I repeat this process with the 5-note pattern on the D-G-B strings and on the G-B-E strings, again getting each individual pattern smooth and effortless.  Spending more time on the first pattern gets these patterns under my fingers more rapidly.
  • Once I have the three patterns down I’ll focus stringing them together in position.16th Note Initial Picking
  • Once that position’s down I’ll do the same thing in the other positions:
    four four positional sixteenth two

and
11th Fret four four revised

  • Then I’ll focus on tying them all in together and look for trouble areas.  One issue I had with this pattern is making the switch from the high E string to the first note of the next pattern on the A string.
  • In this case, once I could play the full pattern with 16th notes at 160, I cut the tempo in half and started working on 32nd notes at 82.  I typically raise the metronome marking anywhere from 2-5 bpm when developing something like this until I get to my desired tempo.  The end tempo is typically 10-20 bpm above where I’m planning on playing it as playing it live with adrenaline kicking it in, we always play things faster so I like to be prepared (or at least more prepared).

That’s the process in a (rather large) nutshell!

My recommendation is to give it a go with something that you’re specifically trying to learn and see how it works for you.

  • You may find that it takes you longer than you expect it to
  • You may find the process uncovers a LOT of other things that need work

Those are both okay!  They come with the territory.  The good news is once you start doing this consistently, you’ll find that you make REAL progress in the things you’re working.


Here’s the big secret no one is probably telling you:

Practice requires practice!

Just like anything else, you actually have to practice practicing to get better at it (practicing).

The good news is you CAN get better at practicing and in doing so you will find that it actually takes LESS time to work on things because you get more efficient at what you’re practicing and how you’re practicing it.

As I mentioned before, I am working on a whole new pedagogical model that uses this methodology as it’s core to get better playing results in a shorter period of time.  I’m just about through the development stage – but if it’s something that interests you – please send me an email at guitar (dot) blueprint @ gmail (dot) com – and I’d be happy to send you more information once it’s ready.

Finally, consistent and steady wins the race

To get better at something isn’t any secret at all.  It’s putting in consistent focused time, day after day.

  • Be clear on what you want to do
  • Be clear on HOW you’re going to do it
  • Do it every day until it’s done

Move on to the next thing and repeat

I hope this helps and, as always, thanks for reading!

-SC

Changing One’s Perception And Removing “Should” From One’s Vocabulary

“Oh should you now?”

We all have things that we know we’re supposed to do and don’t do with frequency.  We should see the doctor regularly.  We should exercise more and eat less.  We should really write our grandma.  We should really get to practicing.

The reality is that “shoulds” are little minefields in our brain.  We plant them around everywhere and then get absent-minded about where they are.  When we finally have to confront one, the temptation is to get upset because you now know what you should have done and did not – and the onus of it falls on you.

Getting past “should” is a life long struggle and as someone who is still working on it, I can say that it’s not easy but it is possible.

This can be done by removing the phrase “I should” from your vocabulary and replacing it with “I am

(i.e.  replacing “should” with “do”)

.

Adjusting your perception.

If you meet expatriates from the US who have been living in another country for a long time and not speaking their original language, occasionally they have a real disconnect when you speak English to them.  This has happened to me on several occasions where I’ve met people who were frustrated at not remembering words in English and feel very disconnected in speaking it with people.

.

There’s a reason for this.  They’re out of practice.

If you are a native English speaker in the US – you practice speaking and writing in the language every day.

.

The difference is you probably don’t think about it as “practice“.

You just think about part of it as your day.  As something that you do naturally, you don’t think of it as work or drudgery.  You feel comfortable enough in your use of it that when you are confronted with phrases or terms you’ve never heard before – you simply listen instead of freaking out and make sense of in in context.  You pick up information and interact with it all day long.

If you doubt this, try the following: Take your current practice regimen and instead of practicing scales or chords or what have you, take out a dictionary and apply the same regimen to trying to expand your vocabulary.  Unless you’re studying for the SATs or GREs, I bet you make it a day before it gets discarded entirely or doomed to the “should” bin.

.

If you make practicing just part of your regular day instead of something that has to be carved out of your schedule it will be easier to maintain.

.

Occasionally, I read articles with guitarists who claim that they never practice.  It’s important to remember that anyone who is the topic of an article in a trade publication  is generally going to be a professional musician with a rigorous performance schedule.  If they don’t have time to practice – its only because they’re gigging too much and while they may not be “practicing” by a strict definition you can bet they’re keeping their chops up.

.

I have no idea if Scotty Anderson “practices” but based on hearing him play I imagine that he has a guitar in his hand most of the day and is either playing or working on things all of the time.  Eddie Van Halen is another guy who may not identify what he does as practicing – but every interview I’ve read with him makes it seems like he has a guitar in his hands playing for hours every day.  (It’s also worth noting that many people consider Van Halen their best album for songs and playing.)

When Jimmy Rosenberg was playing with Sinti at the ripe old age of 16 he was asked by a guitar magazine how he got that frighteningly good at that age and he said, “Well I practice/play 4-5 hours a day, and rehearse with Sinti 4-5 hours a day, and then we have concerts”.

If you have a problem committing to practicing, you could change your mindset to move past “practicing” as an event and instead concentrate on doing” as a habit.

.

Think about how easy it is to gain a bad habit.  Now think about how hard it can be to break that habit.

There are plenty of good habits that you probably have developed as well and maintaining a good habit requires very little work.

Again it’s about perception.  If practicing is something you view as a chore it will be something that you are loathe to do.  It’ll be much easier to practice if you can make it something you look forward to.

To quote Albert Ellis,

“Don’t should on yourself”.

I hope this helps!  Thanks for dropping by!

-SC

.

Some Useful Online Practice Tools

While some larger GuitArchitecture posts are in the pipeline, I wanted to post about a few online tools I use frequently when practicing that may be helpful to you as well.

In previous practice posts, I talked about keeping a practice log and using small increments of time (5-10 minutes) in multiple sessions to really focus on ideas.  (You can download a sample log here or here). The tools I mentioned to assist in this are a metronome and a stop watch.

.

Seventh String

Not to be confused with the very cool sevenstring.org forum, Seventh string is the company that produces the excellent Transcribe! software.  While Transcribe! isn’t free (nor should it be – it’s an excellent piece of software that will pay for itself many times over) they have a number of useful free apps on their utilities page that may be of interest to you.  The apps all use Java so you’ll need to have that installed if they’re not working – but the great thing about each of these apps is that they can either be run online or downloaded to your computer to run if you’re somewhere without an internet connection.

Getting in tune is the first step to any practice session.  The online tuner on seventh string is functional but I find the tuning fork to be a lot more useful.  In addition to providing tones to tune to, the tuning fork also can act as a drone.  Drones can be a great tool for developing melodic ideas in a harmonic context.

The real prize here though is the metronome.  I love the old school graphic and the click sound isn’t annoying to me.  It also has tap tempo and can move incrementally.

.

Stopwatch

Working hand in hand with the metronome for timed training is a stop watch.  I’ve plenty of hardware versions that are fine.  But I really like the  numerous variations on the online-stopwatch site.  The countdown version is perfect for setting 5-10 minute increments (or longer) and rings when it’s done.  There’s a metronome on this site as well – but it doesn’t allow incremental movement.

When practicing mid day – I tend to just open up my log, tune up, set the countdown timer turn on the metronome and work on the first thing on the log list.

.

The simpler you make a routine – the easier it is to maintain.

Anyways, nothing Earth shattering here – but I hope it helps!

Thanks for reading!

-SC

.

If you like this post you may also like:

.

PRACTICE MAKES BETTER AKA PRACTICING PART I

PROPER POSTURE IS REQUIRED FOR PROPER PERFORMANCE – PRACTICING PART II

TENSION AND THE SODA CAN OR PRACTICING PART III

DEFINITIONS AND DOCUMENTS OR PRACTICING PART IV

.

PRACTICE WHAT YOU PLAY OR PRACTICING PART V

TESTING YOUR VOCABULARY OR PRACTICING PART VI

POSSESSION IS 9/10S OF THE LAW BUT PERCEPTION IS EVERYTHING OR PRACTICING PART VII

Some Useful Online Practice Tools

.

FINDING THE DEEPER LESSON

MELVILLE, MADNESS AND PRACTICING – OR FINDING THE DEEPER LESSON PART 2

INSPIRATION VS. INTIMIDATION

What’s wrong with playing “Flight of the Bumblebee” for a world speed record?

.

I have linked two sample documents for logs below.  You could use word or excel, or any basic word processing or spreadsheet application to generate one of these.  I haven’t seen an online version of these I like – So I’ll stick with these for now.

PRACTICE LOG (PDF)

Weekly Practice Log (Word)

Surviving The Gig

I’ve been fortunate in that I’ve had the opportunity to play a lot of different styles of music in a number of bands.  In terms of gig referrals, this has pluses and minuses.  In the plus category, when someone needs Frisell-ish textural guitar on one tune, post-tonal shred on another and fretless on a third – I’m on a short list of players that people call.  On the minus side, for generic guitar needs (“We need a (rock, jazz, blues, etc) guy for this track”, other people who specialize in that type of vibe will often get the call.

If you have a stylized sound you’ll get calls for some gigs, but to keep working, you’ll also need a generic enough skill set that you can cover other things if you have to.


Each band I’ve played in has had different challenges to approaching material, but there are two general points of emphasis I’ve come across.  The situations all call for quality, but depending on the quantity, quality may be a very relative term.

How To Learn 110 Songs In 6 Days

Years ago, I had a gig opportunity open up for me when I was living in Boston.   A friend of mine on faculty at Berklee gave me a call  to see if I wanted to take over what we in Boston called a GB (General Business) gig.

GB gigs are typically weddings, corporate gigs or something similar.  The emphasis on these gigs isn’t to make a big spectacle.  Your job is to provide some background entertainment and stay out of the way of the function as much as possible.

The gig pay wasn’t great but there was a challenge that I couldn’t pass up.  I’d have to learn five one-hour sets of music (110 songs) in a week. The songs were mostly covers (60’s to top 40 in scope), and while I had heard most of them, I didn’t know any of them.  There were also at least six originals that I needed to learn as well.

I’ve always liked challenges so I said, “Sure! Let’s see how it goes.”  I got through the gig and ended up making money playing with the band for the better part of a year.  So here’s what I learned.

  • Have a game plan.  Since the gig was in 6 days time, in reality I needed to learn all of the songs in 5 days and would possibly be able to carve out some time to run trouble spots in the 6thday.  Since some of the songs were ones I had already heard a lot, I worked on the assumption that figuring them out would not take a lot of time.

    I started with a plan of getting down 20-30 songs a day (depending on how long it took to learn them.)  The gig itself was only 4 hours, but I wanted to at least have gone through all the tunes in case people called them out.

  • Start with the hardest and/or most unfamiliar tunes first.  They’ll be the longest one’s to get into your head (or your fingers) and if you start them first you’ll be able to review them each day while you work on new material.
  • Top priorities:  PRIMARY SONG elements (the key, main riffs, chord progression and song form).  Day tripperwon’t fly if no one’s playing the opening riff.  The focus here is essentials.Here’s the question to ask when determining essentials.  If the tune was being played as a duo with you and a vocalist, would someone recognize the song?
  • Secondary priorities:  Is there a signature solo?  Are there specific rhythm parts that you need to copy or will generic voicings do?  Are there specific timbral elements unique to the song?  If you’re playing Purple Rain, you better have a chorus or a flange and the right rhythm (and voicings) or it ain’t going to fly.
  • Take notes.  There’s no shame in a messy set list.  I had crib notes everywhere for the gig.  Usually this was just a reminder of what key the song was in and some short notes on progressions on song form

    (i.e  “song x” –

    G (This indicated the key)

    unison intro (just a reminder)

    3rd chorus solo.

    The point was to just have enough notes to jog my memory about the tune.  Unfamiliar tunes had some more detailed notes like chord progressions written in (like a verse or a chorus).

  • Smaller is better and stay flexible.  Tone wise you should have 2-3 primary tones (clean, dirty and lead) that you can tweak to get close to the song.  If you have patches for every single tune, it’s going to fall apart.  I did this gig with a Pod 2.0, pedal switcher and a fender amp.  I never used more than 5 settings.  Part of this is to know your sounds and get close rather than perfect.  Having said that, this rule changes if you’re in a tribute band.  If you’re playing in an Ozzy Tribute band for example, then you better plan on having every tone identical, every lick and every solo note for note.  In gigs like this, the goal is to get it close enough that it doesn’t draw attention to what it is, namely a cover band instead of the real thing.
  • Take lots of breaks.  You’re going to need to stay focused for something like this so plan on taking frequent breaks to recharge and come back to it fresh.
  • Play with good musicians because they will save you.  While the music we were playing wasn’t my favorite, the musicians were very good and had the tracks down cold.  If everyone knew the tunes at the shallow level that I did, we wouldn’t have played the gig nearly as well as we did.  Additionally, since the keyboardist/vocalist and other vocalist knew a ton of tunes, if a request came up and I didn’t know it they could generally do a stripped down version of it as a duo.
  • Be professional.  This is really right next to musicality in importance if you want to gig consistently.  People who show up late, drunk, unprepared, or not at all are people I’ve never seen on a stage more than once.  Gigs are stressful enough that people don’t want to have to worry about you.  Make sure that you’re not part of any problems that come up.
  • Finally, no one wants to work with a jerk.  I don’t care how brilliant a musician you are, it doesn’t mean much if you’re a crappy human being.   This doesn’t mean that you have to suppress your strong opinions and kowtow to everyone around you but it does mean that you’re not the only person at any gig and there’s no reason to act that way.

As general advice, what this really speaks to is the depth of which you know (or need to know) something.   I saw the movie Rock Band again recently and there’s a funny scene early on in the film where Mark Wahlburg’s character stops a band rehearsal over a small discrepancy in a performance and I laughed because I’ve been in situations where rehearsals stopped because I threw a fret hand slide in somewhere or where days were lost because I was required to match tones exactly.  I’ll save that story for another time…

In the meantime – thanks for reading.

-SC

Recycling Chords Part I or Where’s The Root?

I’d like to start this brief series off with an explanation of how I view the function of theory.

(For those of you who are interested, this is taken from, A brief thought on Music Theory.)

Theory is secondary to sound.

The history of music originates in organized sound.  Theory and jargon were developed over time as a way to replicate those organized sounds.  When a term like “C major” is used, it tells the informed person what kind of sound is going to be produced. This jargon then, is nothing more than a way for musicians to express ideas to each other without written music in a more efficient manner.

It’s much less important to be able to look at something and say, “that’s an altered dominant chord” than it is to hear an altered dominant chord in your head and be able to realize it on the guitar (or to hear someone else playing it and know what to play against it).”

This series of lessons are excerpts from the Guitarchitect’s Guide to Modes: Major Harmony book (due out in 2012).  While that book covers basic intervals and chord theory, this lesson will make the most sense if  you have some knowledge about chords, intervals and chord construction.  Having said that, even if you have a very limited knowledge of these areas you can still get something from this lesson by playing through the examples.

When I was at Berklee, one of the recommendations I got was to learn a minimum of two voicings for every chord type I came across (and more if possible).  While this is certainly a valid point – another way to approach learning new voicings is to reconceptualize what you already know. To see other ways of looking at things in this case, I’ll need to bring in a little music theory/analysis.

.

When is C, E and G something other than C Major?

In order to identify a chord, we first have to establish the root to determine the functions of the other notes in the chord.

For example, if we look at the notes C, E, and G with C in the bass we get a C Major chord.

However if E is the root of the chord – it’s possible that the chord could be analyzed as an E minor with an added flat 6th and no 5th.

While you may hear this combination of notes as come kind of E minor chord, you are more likely to hear it as a C major triad with E in the bass.  The sound of a major triad is so entrenched in the average listener ’s head that it will be very difficult to hear this specific combination of notes as anything other than C major.

This is sometimes written as C/E.  This chordal notation is commonly called a slash chord and is written in the format of chord/bass note.

The same is true for the next example.  If G is the root of the chord – the chord could be analyzed as a G sus4 add 6 (no 5).  But more likely you will hear it as C/G.

Let’s add a note outside of the triad to the chord.  By putting an A in the bass, the chord spelling is now A-C-E-G (which is an A minor 7th chord).

Just because you have 3 notes doesn’t mean that you’re limited to a specific chord type.  In other words the notes C, E, and G are sometimes more than a C Major chord.

Using the same process as above the collection of notes above could also be analyzed as:

.

Converting to C

Let’s now look at how a C Major triad can be analyzed over every other root.

A quick theory tip:  Whenever I see chord or a scale that I’m having trouble recognizing, I recommend modulating it to the key of C.  The reason for this is the lack of sharps or flats make any accidentals immediately identifiable.

Here are a couple of points regarding this:

  1. There are several ways that these chords could be interpreted and that this is merely my analysis.
  2. The Analysis column is analysis in relation to the root.  For example, the C of a C major triad is a b4 over a G# root.
  3. The resultant chord column has an implied analysis.  For example the D11 derived from a C major triad over D is more accurately a D11 (no 3rd, no 5th add 9).
  4. Some of the voicings presented are theoretical voicings and not something you find on a chord chart.  For example: C7 is a much easier voicing to conceptualize than C Major (add #13) and I have yet to see a chord chart with C Major (add #13) on it.)  Ditto for altered roots.

.

Putting the Theory into Practice

Let’s say I’m playing a song that uses a major chord and I want to spice it up.

In looking at the above chart, I see that utilizing a C major triad over a Bb could be seen as a C7 chord with the 7 in the bass (C/ Bb ) or it could be seen as a Bb chord with every upper chord tension.

Here’s a voicing in open position.

Now let’s make this a movable voicing.

Let’s begin with a 1st position C major chord

and a 1st position D major chord

Keeping the root and the 3rd of the C major, we’ll use all the rest of the notes of D major:

and we get a really rich sounding substitution for a C major chord.

.

Next steps

This chord merely scratches the surface of this approach.

In addition to making some new chords from familiar voicings (i.e. Ab maj7#5 = C major /Ab), you also get some improvisational approaches as well (for example – as a starting point for soloing over a Ab maj7#5 you could play a C major arpeggio rather than learning a maj7#5 arpeggio).

For now, I would recommend exploring these sounds both as chords and as an arpeggio approach (i.e playing a C major arpeggio over each root) to see what sounds work for you and then adapt those to other keys.

Additionally, this process can be applied to any chord.  If you feel like exploring this approach – C minor might be a good place to start.

In part II of this series, I’ll discuss a process I call triadic transformation as another way to reconceptualize chords that you already know.

.

In the meantime, just remember that there isn’t anything here to get too hung up about.  Take the sounds and approaches that work for you and discard the rest.

I hope this helps!  You’re free to download and distribute any of the lessons here but I maintain the copyright on the material. I’m always looking for feedback, so if you have any questions or comments, please feel free to e-mail me at guitar.blueprint@gmail.com.

-SC

Favored Curry Or Spicing Up Chord Scales And Triads Part 2

In Part 1 of this lesson,  I went over how to create a chord scale for improvising over a specific chord (in this case C major)  chord.  As a brief recap – here is the chord scale I chose:

.

C major chord scale with a # 2, # 4, and a b6 scale degree.

.

To start this off – here’s a sample lick using this scale:

.

Here’s how the scale sounds played slowly  (1/4 note at 90)

Here’s the scale faster (1/4 note at 180).

.

The chords you say?

Since we’ve engineered this chord scale around a C major triad – we know that any licks we come up with will work over that chord – but to see what other chords can be used with this scale – we need to harmonize it.

Let’s look at the triadic (3 note) harmony first.

.

C major chord scale with a # 2, # 4, and b6 scale harmonized in 3rds (triads)

.

**Note the first 2 chords have been moved to the back three strings to facilitate playing:

.

Here are  the chord formulas that are generated:

  1. C, E, G – Root, 3rd and 5th – C Major
  2. D#, F#, Ab – Root, 3rd and double flat 5th – non functional harmony*
  3. E, G, B – Root, flat 3rd and 5th – E minor
  4. F#, Ab, C – Root, double flat 3rd, flat 5th – non functional harmony*
  5. G, B, D# – Root, 3rd, sharp 5th – G Augmented
  6. Ab, C, E – Root, 3rd, sharp 5th – Ab Augmented
  7. B, D#, F#, – Root, 3rd, 5th – B Major

(Note:  even though these don’t have a triadic function they can serve a function enharmonically – I’ll get to that in the 7th chord section).

To recap –  any licks that we generate from this scale will work over C major, E minor and B major.

 .

Adding the spice

Since we started this approach with C major – let’s look at a lick that spices up a C Major Triad.

.

Here’s an mp3 of the lick.  This is an example of something I might play as a backup accompaniment in the pre-chorus of a song.

To my ears even playing this over a straight C major tonality, the D#–>E really triggers an E minor tonality.  Try playing this over a C major –> E minor progression.

.

Moving to E minor – here’s an approach I use a lot in rhythm playing.

.

The first step is to take a set of three strings – in this case I’ll use the high E, B and G strings.

Starting with a sample chord voicing in the low register – ascend up the neck by moving each note in the voicing up by scale degree.  In this example:

.

I’ve started with an initial voicing (Ab, C and E) and moved it through scale-wise motion.

.

(Note:  I hear this as G# instead of Ab – you may want to see the section on enharmonics below).

.

Here is an mp3 of the voicings.  In the audio example, I play a low E between each chord to establish an overall tonality.

Having done this – I see some cool dyads ( 2 note voicings) on the B and G strings that I can use to spice up an E minor vamp.  This is an example of the type of comping I might do on the verse of a song if the song chart just said E minor).

.

Here is an mp3 of the lick.  Don’t be afraid to lay into the slides or add a little vibrato to make the notes sing a little more.

With a lot of these approaches – I’m not really conscious of what the specific functions of the notes are.  Once I know that the scale will work over a chord – it’s more about focusing on the sound of the notes and how they fit into the song.  On some tunes – these notes would clash with the melody and it wouldn’t work.

This process is about building a repertoire of sounds to have at your disposal.  Knowing the theory around it just allows you to adapt those sounds and approaches to make the fit where you want them to.

.

Space is the place

Here’s a lick that takes the above approach of breaking chords up into different string sets and applies it to a melody line.  Here I’ve focused on the A, D and B strings and added in the high E string at the end.

.

Here is an mp3 of the lick.  Note the slides, vibrato and slightly rubato phrasing at the end of the lick.  These are the little nuances that help make the difference between playing music and playing notes.

This next lick combines chord forms and melody by using artificial (i.e. “harp”) harmonics.  To produce these – a chord shape is held with the fretting hand while the picking hand picks and partially frets notes 12 frets higher resulting in a chime like timbre.  If you are unfamiliar with this technique – just google Lenny Breau (an absolute master of the approach) and you’ll get an idea.

For this specific lick:  I’m holding the D# with my second finger, the C with my 3rd and the Ab with my 4th so I can reach the F# with the fret hand 1st finger.

.

Here’s an mp3.

.

One of the secrets of this method is to strategically time the release of the fret hand notes.  The longer you can leave the notes held down, the more the pitches will bleed into one another – which produces the desired effect.  Before we go to the next lick I need to make a brief enharmonic diversion.

 .

An Enharmonic Diversion

An enharmonic is when a note is spelled differently but sounds the same (for example Ab and G#).  When playing this over an E drone – I hear the pitch on the first fret of the G string as a G# (i.e the third of the chord) instead of Ab.  It’s very difficult for me to hear that note functioning as a b4.

As a case in point, here’s another lick.  (This piece makes liberal use of vibrato bar scoops – listening to the mp3 of the lick for phrasing is recommended).

.

.

I’ve notated this lick with both a G# and a G natural as those are the intervals I hear in the approach.

With this interpretation it makes the scale harmonically vague as it would then have both a major AND a minor 3rd.  If we go back over the initial triadic chord and replace the Ab with G#, F# for Gb and D# for Eb we get a couple of different chord options.

  1. C, E, G#-  C Augmented
  2. E, G#, B –  E Major
  3. G#, B, D# – G# minor
  4. C, Eb , G –  C Minor
  5. G, B, Eb – Eb Augmented
  6. Ab, C, Eb – Ab Major

To recap –  in addition to C major, E minor and B major – these licks can also be used with care over E major, Ab major, C minor  and G# minor.

.

To finish this approach out for now – let’s look at 7th chords.

 .

C major chord scale with a # 2, # 4, and b6 scale harmonized in 3rds (7th chords)

**Note:  the stretch on the second chord should be approached with caution.  If it hurts – stop playing immediately!

.

Here are the chord formulas that are generated:

  1. C, E, G, B – Root, 3rd, 5th and 7th  – C Major 7
  2. D#, F#, Ab, C – Root, 3rd and double flat 5th, double flat 7 – Enharmonically – this spells – Ab, C, Eb, Gb, – or Ab7 – but doesn’t serve a function from the D# pitch.
  3. E, G, B, D# – Root, flat 3rd, 5th and 7th – E minor (Major 7)
  4. F#, Ab, C, E – Root, double flat 3rd, flat 5th – Enharmonically – this spells – Ab, C, Eb, Gb, – or Ab7 – but doesn’t serve a function from the F# pitch.
  5. G, B, D#, F# – Root, 3rd, sharp 5th, 7th – G Augmented 7
  6. Ab, C, E, G – Root, 3rd, sharp 5th – Ab Augmented 7
  7. B, D#, F#,A  – Root, 3rd, 5th, flat 7th  – B7

This gives us a couple of new tonalities to explore – namely, C Major 7th, E minor (major 7th), B7 and Ab7.

..

The final tally:

At a minimum, this chord scale will generate licks that can be used over the following chords:

C major, C Major 7th,

C minor, C minor (major 7th)

E major, E Major 7

E minor, E minor (major 7th),

Ab major, Ab7

G# minor

B major,  B7

.

Next steps:

You will probably not like the use of this scale with all of the chords listed but, as is the case with any musical approach, the key is always to use your ears as a guide to what works and what doesn’t.

I hope this helps! 

Happy Holidays and thanks for reading!

.

The material in the lesson is adapted from the material in The GuitArchitect’s Guide To Chord Scales book. More information about that book (including an overview and jpegs of sample pages) can be found here.

.

-SC

.

PS – If you like this post you may also like:

.

MAKING MUSIC OUT OF SCALES

CREATING CHORDS AND LINES FROM ANY SCALE – A HARMONIC COMBINATORICS / SPREAD VOICINGS LESSON

.

RECYCLING SHAPES OR MODULAR ARPEGGIOS FOR FUN AND PROFIT

GLASS NOODLES – ADAPTING A PHILIP GLASS ARPEGGIO APPROACH TO GUITAR

.

MELVILLE, MADNESS AND PRACTICING – OR FINDING THE DEEPER LESSON PART 2

SOME USEFUL ONLINE PRACTICE TOOLS

POSSESSION IS 9/10S OF THE LAW BUT PERCEPTION IS EVERYTHING OR PRACTICING PART VII

TESTING YOUR VOCABULARY OR PRACTICING PART VI

PRACTICE WHAT YOU PLAY OR PRACTICING PART V

.

DEFINITIONS AND DOCUMENTS OR PRACTICING PART IV

TENSION AND THE SODA CAN OR PRACTICING PART III

PROPER POSTURE IS REQUIRED FOR PROPER PERFORMANCE – PRACTICING PART II

PRACTICE MAKES BETTER AKA PRACTICING PART I

.

MELVILLE, MADNESS AND PRACTICING – OR FINDING THE DEEPER LESSON PART 2

FINDING THE DEEPER LESSON

INSPIRATION VS. INTIMIDATION

.

WARMING UP: FINGER EXERCISES, THE 3 T’S AND THE NECESSITY OF MISTAKES

“THE LIMITS OF MY LANGUAGE ARE THE LIMITS OF MY WORLD”

A BRIEF THOUGHT ABOUT MUSIC THEORY

.

BOOKS

LESSONS

.

Favored Curry Or Spicing Up Chord Scales And Triads Part 1

[This lesson uses material from The GuitArchitect’s Guide To Chord Scales which details all unique chord scales from 3-note cells to the 12-note chromatic set.  You can find out about that book (and the other GuitArchitecture books) here.]

When improvising over a C major chord, the first thought for many beginning improvisers is to use the C major scale as a melodic resource.  For example:  here are the notes of a C Major triad (C, E, G) broken up into a sample 2 string arpeggio:

.

C Major Arpeggio

.

One related chord scale for this scale is the C Major (Ionian) scale.  The reason for this is that all of the notes in the C major triad are found in the C major scale.

.

C Major Scale

.

While there is nothing wrong with this approach, in addition to being a fairly bland melodic color to utilize, it contains the 4th scale degree (F), which is often referred to as an avoid note because of its 1/2 step relationship to E.

.

Option B:  Modal Interchange

One solution to this is to use modal interchange to find alternate scales that work over a triad.  For example, C Major is a diatonic chord in the key of G.  Playing a G major scale starting and ending on C produces a C Lydian scale.

.

C Lydian  (Parent scale: G Major)


This scale works well with the triad.  In addition to containing the C major triad, it also has a raised fourth degree (aka #11), which adds a nice tension.

But this is merely scratching the surface of what can be found from this approach.

.

Option C:  Creating your own chord scale

.

Here ‘s a process for generating any chord scale based on a chord.

Step 1:  Start with a chord and write out the notes of the chord in ascending order.

.

Note: the smaller the chord, the more scale options you will have.

Let’s now look at the C major triad as a chord formula.  Since it’s made up of the notes C, E and G  any parent scale for C major chord should contain these notes (at least for now).

.

Step 2:  Between the notes of the chord, write in all possible notes for each additional scale degree.

For example, in the Ionian and Lydian chord scale examples above, the 2nd degree was D, but it could have just as easily been Db or D#.

Expanding on this idea, the 4th could either be F natural or F#, the 6th could either be Ab, A natural or A#, and the 7th could either be Bb, B natural or B#.

If we apply this idea to the all of the other scale degrees, we end up with a chromatic scale that looks like this in list form:

  • Scale Degree 1  – C
  • Scale Degree 2 – Db, D, D#
  • Scale Degree 3 – E
  • Scale Degree 4  – F, F#
  • Scale Degree 5  -G
  • Scale Degree 6 – Ab, A, A#
  • Scale Degree 7 – Bb, B

.

or this in music notation:

.

C Major triad with chromatic scale degrees

.

Note:  If you are planning on harmonizing the scale, deriving modal arpeggios or pentatonics, I recommend you keep each scale degree unique (i.e. that you use either Db or D or D#,  but not more than one type of D pitch).

Likewise, there are several enharmonic pitches (i.e. pitches that are spelled differently but sound the same) presented in the full chromatic.   While you could use A# and Bb in a chord scale since they are the same sounding pitch the result will be a 6 note scale.

.

Step 3:  Choose the scale degrees that sound the best to you.

Based on the above parameters, there are 32 unique chord scales for the C major triad.  Let’s look at one of them.

For this example, I’m going to choose a #2 for the second scale degree, a #4, a b6 and a natural 7 scale degree for a very chromatic chord scale. Here it is in list form:

  • Scale Degree 1  – C
  • Scale Degree 2 – D#
  • Scale Degree 3 – E
  • Scale Degree 4  – F#
  • Scale Degree 5  – G
  • Scale Degree 6 – Ab
  • Scale Degree 7 – B

and in music notation:

This scale has a # 2, # 4, and a b6 scale degree.

.

Next Steps

In the next lesson – we’ll examine how the scale is harmonized and generate some licks derived from this technique.

Thanks for reading!

-SC

.

The material in the lesson is adapted from the material in The GuitArchitect’s Guide To Chord Scales book. More information about that book (including an overview and jpegs of sample pages) can be found here.


PS – If you like this post you may also like:

.

MAKING MUSIC OUT OF SCALES

CREATING CHORDS AND LINES FROM ANY SCALE – A HARMONIC COMBINATORICS / SPREAD VOICINGS LESSON

FAVORED CURRY OR SPICING UP CHORD SCALES AND TRIADS PART 2

.

RECYCLING SHAPES OR MODULAR ARPEGGIOS FOR FUN AND PROFIT

GLASS NOODLES – ADAPTING A PHILIP GLASS ARPEGGIO APPROACH TO GUITAR

.

MELVILLE, MADNESS AND PRACTICING – OR FINDING THE DEEPER LESSON PART 2

SOME USEFUL ONLINE PRACTICE TOOLS

POSSESSION IS 9/10S OF THE LAW BUT PERCEPTION IS EVERYTHING OR PRACTICING PART VII

TESTING YOUR VOCABULARY OR PRACTICING PART VI

PRACTICE WHAT YOU PLAY OR PRACTICING PART V

.

DEFINITIONS AND DOCUMENTS OR PRACTICING PART IV

TENSION AND THE SODA CAN OR PRACTICING PART III

PROPER POSTURE IS REQUIRED FOR PROPER PERFORMANCE – PRACTICING PART II

PRACTICE MAKES BETTER AKA PRACTICING PART I

.

MELVILLE, MADNESS AND PRACTICING – OR FINDING THE DEEPER LESSON PART 2

FINDING THE DEEPER LESSON

INSPIRATION VS. INTIMIDATION

.

WARMING UP: FINGER EXERCISES, THE 3 T’S AND THE NECESSITY OF MISTAKES

“THE LIMITS OF MY LANGUAGE ARE THE LIMITS OF MY WORLD”

A BRIEF THOUGHT ABOUT MUSIC THEORY

.

BOOKS

LESSONS

.

I hope this helps!  You’re free to download and distribute any of the lessons here but I maintain the copyright on the material.

.

GuitArchitecture, Sonic Visualization And A Pentatonic Approach For The Holidays

Happy Holidays!

.

I know I’ve been posting a lot of gear related items lately – and  based on the statistics for site visits – this seems to be what people are primarily interested in – so this has driven the posting content recently.

While I’m happy to blog about gear (not incidentally, my 8 string Bare Knuckle Cold Sweat pickup came in last night and I squealed like Bobby Hill); I don’t want to get too far away from playing.  With that in mind I’m putting a concentrated effort to get more lesson/performance posts up to rebalance the site a bit.

I’ll have a new  chord-scale lesson up next week but in the meantime wanted to explain my performance/pedagogical approach to navigating the fingerboard with a fleet fingered pentatonic lick (yes, it’s reposted – but just like Thanksgiving leftovers – aren’t they still good on day two?).

.

GuitArchitecture?  Sonic Visualization?

.

I wanted to take a moment and talk a little about GuitArchitecture, sonic visualization and re-examine a chestnut from the lesson page as a little – three for the price of one post.

In broad strokes, the GuitArchitecture concept is that the nature of the guitar’s fretboard and tuning lends itself to visualizing fingering patterns.

While patterns performed mindlessly can be a bad thing, they allow people to realize ideas more readily.

Through these patterns, musical structures can be realized and worked into larger sonic arrangements.  More importantly, patterns can be associated with sounds and visualizing how to realize a sound by seeing its shape on the fretboard makes performing it easier.  Hence the term Sonic Visualization.

In my forthcoming books – I have a lot of information on this topic as it applies to scales.  When approaching scales – I see them as a series of modular two-string patterns that connect the entire fingerboard.

.

The GuitArchitecture Approach

. 

Here’s an applied example of sonic visualization:

Let’s say I’m playing a solo over an E minor chord.  As mentioned in a previous post – when soloing over a minor chord you can substitute a minor chord a 5th away (in this case B minor).

So if I’m thinking of using E pentatonic minor over the chord (E, G, A, B, D) I can also use B pentatonic minor (B, D, E, F#, A).

If you look carefully – you’ll see the only difference between the two is the F# and the G.   Both notes sound good against E minor, so if we combine them we get a six- note scale (E, F#, G, A, B, D).  Here is a sample fingering of the combined scales in the 12th position.

.

If that scale were fingered as a 2-string scale instead of a six- string box pattern – the same fingering pattern can be moved in octaves – thus eliminating the need for multiple fingerings. (This is the same approach I’m using on 8 string guitar btw).

Here is an mp3 (note mp3s are a little glitchy in Safari – if it doesn’t play you may just have to reload the page) and notation/tab for the descending scale:

.

Sextuplet descending

.

.

* Fingering Note: I finger both patterns with the 1, 2 and 4 fret hand fingers on both string sets.

* Descending Picking Note: I play this with a modified sweep picking pattern

E string: up-down-up

B string: up-down-up

.

The picking pattern is the same for each string – but when I switch strings – it’s two up picks in a row.

Here it is  ascending:

Sextuplet Ascending

.

* Ascending Picking Note: I also play this with a modified sweep picking pattern

.

E string: down-up-down

A string: down-up-down

.

The picking pattern is the same for each string – but when I switch strings – its two down picks in a row.

If you’re used to alternate picking  – you can use that approach as well but I try to apply the same picking pattern to all three-note per string patterns.

.

Practicing the pattern

.

In addition to focusing on the timing of the notes – it’s very important to practice slowly and only increase speed when both the timing (are all the notes being played with rhythmic equivalence?), tone (i.e. can you hear all of the notes clearly?) and hand tension (is your hand should be as relaxed as possible?) are all working together.

I’ve written a whole series of posts on practicing  (Post 1post 2post 3post 4post 5post 6 and post 7) that I’d recommend checking out if you haven’t already done so – but the simple principle here is to pay attention to what I call the 3 T’s in Performance: Timing, Tone Production and Tension.

This particular approach is challenging – particularly if you’re not used to the stretch.  Just remember to practice in small focused increments and try to increase steadily over time.

.

The Tones:

.

For those of you who are interested, tone on this recording was the same AU Lab/Apogee/FNH combination that I detailed here:

Here’s a screen shot of the Pod Farm setting (The tone can be downloaded from line 6 here):

.

That’s all for now

.

I hope this helps!  You’re free to download and distribute any of the lessons here but I maintain the copyright on the material.

I’m always looking for feedback on what people find useful and what they don’t so if you have any questions or comments, please feel free to e-mail me at guitar.blueprint@gmail.com

Warming Up: Finger Exercises, The 3 T’s And The Necessity Of Mistakes

Pedagogical Errors Were Made

One of the first lessons that guitar students are taught is the 1 note per fret 1-2-3-4 chromatic alternate picking exercise.  While this is typically presented  as an initial exercise to gain coordination – it has a very limited long run value.  As a static exercise, it  should be discarded from your regimen immediately because

.

you play what you practice

If you want to play semi-chromatic ideas at high speeds moving in 4ths – this is a great exercise to use.  But it’s a boring sound, a boring exercise and doesn’t translate well into everyday performance.

“But Scott”, you might posit, “it’s just  a warm up exercise.  It isn’t something to play at a gig.”  Then it’s a further waste of time as

.

everything you play should be something that translates to live performance

.

The Physicality Of Practicing or How To Lose A Gig

Here is a gig nightmare story that illustrates the point of proper technique versus strength.  Since the embarrassment here is all mine, all of the names will be on the record for my moment of shame.  Years ago when I was working at Sandy’s Music, one of my co-workers “Skinny Mike” Feudale wanted to see if I could play a gig with his rockabilly/psychobilly band – The Speed Devils. Mike is a great songwriter and the songs on the Speed Devil’s cd were really strong and lot of fun to play.  The Speed Devils had a gig come up in NY and needed a lead guitarist to sub in.  If it worked out – it could be a regular gig – but there were some rules.

.

1.  I had to look the part – fortunately the drummer Judd had a vintage bowling shirt I could squeeze into

2.  I had to play a vintage amplifier.  Fortunately I had just gotten my vintage Gibson amp back from Tom at AzTech electronics (truly an amazing amp guy) – which sounded and looked great.

3.  I had to play the Speed Devils guitar.  This was a hollow body that Mike had fixed up and completely vibed out (full flames and dice for volume knobs) with heavy gauge strings and high action to push the volume a little more.

We rehearsed the set once or twice and then went to the gig a couple of days later.

On the way from Boston to NY, I didn’t have time to warm up so I was doing some finger exercises to limber up my hands.  I was experimenting with a lot of grip master type things to strengthen my hands and try to fix my pinky (which was really quiet with hammer ons).  We got to the club and  I found out that there was no mike for my amp.  The only thing going through the PA was the vocals.

This is the point of the story that I should mention that while everything was fine when we had rehearsed at low volumes; my 15 watt amplifier could not compete with the rest of the band in a club setting.  As I was inaudible I started strumming louder, and with the live adrenaline kicking it, I started fretting harder as well.   Between the heavier string gauge, the higher action, the underpowered amp and the over-tensed playing- I blew my hands out by the second tune.

My hands were so shot that chording was difficult and soloing was all but impossible.  I limped through the rest of the performance – but nothing came out the way it was supposed to.  Needless to say, I didn’t get the gig – a sound decision by the band – but I was really angry with myself because I had unknowingly sabotaged myself before I even got there and had I taken a different approach – I would have been able to play the show much better and not let the band (and myself) down.

.

The Physicality Of Practicing (slight return)

Playing an instrument is a physical endeavour.  You can push your muscles too hard and hurt yourself badly playing the same things over and over. (Trust me – performance related injuries are not fun).

Having said that, this isn’t weightlifting.  You don’t need muscular hands capable of cracking walnuts to play guitar well – you need hands that can move  fingers quickly and independently –  a fast twitch muscle versus a slow twitch muscle. This leads to a little secret that students generally don’t get exposed to in rock guitar lessons

.

hammer on volume comes from the speed the fingers strike the string not the force

In terms of volume, the most problematic finger is typically the pinky.  One habit that I had to fix (and that I continue to see in a number of players) was the improper attack of the fret hand pinky on the strings. (In case you’re wondering about proper form, I’ve reposted some of the information from the Glass Noodles arpeggio post below).

.

Here’s a good way to visualize the fret hand finger motion you’re looking for:

Put the palms of your hands on a table.  Now without lifting the palms up, tap your fingertips one at a time on the table starting from the pinky and ending on the index.  You’ll notice that the fingers stay curved and that the large knuckle of each finger is responsible for the tapping.  This motion is what you’re looking for in this process.  Notice that you don’t need to hit the fingertips very hard against the table to get a crisp attack.

The concept of building up your hands like biceps – is just ridiculous.  The goal of guitar performance is to keep your hands relaxed so you don’t blow them out in a gig or on a session.

.

How I warm up now

When I warm up now – I play scales and arpeggios, switching between chord voicings of tunes I’m working on and improvising around various patterns at low tempos and paying strict attention to

.

The 3 T’s in Performance: Timing, Tone Production and Tension

(remember these – this awareness could save you untold time and pain later!)

.

In general –  you just want to make sure that all of your fingers have had a little blood flowing in them before you begin to play for any length of time.  I do this with a timer for 5 minutes (more or less depending on how my hands feel).

External warm up devices are kind of goofy to me.  Have you ever seen a runner go into a gym and max themselves out on a legpress before they went for a long run?  Do you really think that putting mechanized unfocused tension on a finger is going to make it play a musical passage more efficiently?

.

The necessity of making mistakes

Along with the forthcoming GuitArchitecture books, I have also put substantial time into  a general book of guitar technique.  In addition to discussing specifics of practice and performance methodology – I also took the 1-2-3-4 exercise and broke it down into every possible positional variation as a way to develop technique.  The book is currently 256 pages.  The majority of which are the 864 individual graphics that had to be created and placed in the text.

Midway through this process I started to question the mistake of basing any technical study on such an exercise – or the concept of musical exercises in general.  (Again the point isn’t to have svelte waistline or huge muscles – the point is to be able to play melodic and harmonic ideas more readily.)

I came to the conclusion that if the 1-2-3-4 example could be approached as a way to develop a systematic approach to generating both melodic ideas and melodic variation it could also benefit readers as a technical study as well.

.

Mistakes are teachable moments

It’s easy to see a mistake as something to learn from in a practice room session but harder to see it at a gig. If I walked away from the Speed Devils show and just said, “That gig sucked – so I must suck as a guitarist” I would have missed a great opportunity to see there was something very wrong in what I was doing. The gig taught me in addition to making sure that I had proper preparation and the right tools for the job that tension does not equal volume – and that lesson has been more beneficial to me than any lesson I could pay for.

.

I hope this is helpful to you!

Thanks for reading.

-SC

Recycling Shapes or Modular Arpeggios for Fun and Profit

When improvising, I need to be able to access sounds immediately.  One tool that I use for this is Sonic Visualization (which is really a cornerstone of the GuitArchitetcure concept).  In Sonic Visualization – I associate shapes with sounds so that I can make changes, modify  or develop ideas in real-time.  Here’s one example of this in action and has some cool ramifications for application.

For the audio examples – I’ll be using a Line 6 variax AC 700 strung with D ‘addario .012 phosphor bronze strings – to show that this can be performed on an acoustic guitar.  I used the line 6 as I could record it direct into the laptop in AU lab and not have to use a microphone.

First:  Here’s an example of this approach played at tempo.

Now let’s start slowly and see how to get to that point.

Let’s say we were going to solo over an A5 chord.

Since there are only 2 unique notes (A and E), you could play almost any type of scale or arpeggio over it – but for a moment – let’s look at a minor tonality.

If I was playing straight up metal, I might just play an A minor arpeggio over it.  There’s nothing wrong with this sound – but I want to spice it up a little.

One thing I’ll do as a starting point is to extend the arpeggio. Instead of just playing an a minor triad (A, C and E) – I’m going to add a G and a B to the arpeggio creating an A minor 9 sound.  Here’s the form I’ll be using:


Some quick notes:

Fingering – basically I view this as a positional form so I’m using the 1st finger for notes on the 5th fret, 2nd finger for the E on the 7th fret, 3rd finger for the C on the 8th fret and the 4th finger on the B on the 9th fret.

Hand tension – As your playing through this shape – you want to keep your fretting hand as relaxed as possible.  The more tense your hand is – the more difficult this will be to play.

Picking – you could play this with alternate picking or all hammers – but I’m going to recommend a specific picking pattern for this arpeggio:

Notice that it starts on an upstroke and then uses all down strokes.  This picking pattern will become very useful as this process continues – but if you don’t have a lot of experience sweep (or rake) picking, you’ll need to keep your picking hand relaxed and work on getting the attacks all happening in time.

Timing – you’ll notice that this is a group of 5 (i.e a “Quintuplet” or “Pentuplet”) which means that you are playing 5 notes to the beat.  The  key here is to make sure that you are playing the notes in an even division – (i.e. the same length of time for each note and each space between the notes).

Here’s an audio example of just the arpeggio – first played slowly and then at tempo.

Note: in some browsers (Safari in particular)  the audio doesn’t always load properly in the new window.  If you just refresh the window it usually comes up the second time.

Obviously a metronome will help with consistency – but it you’re having trouble with hearing the division of 5 try the following.

Set up a metronome.

Set the click at a slow enough level that you can play 1 note per click.

Accent the first note and tap your foot to the first note only

Play each note of the arpeggio on a metronome click.

On the repeats – accent the first note and tap your foot to the first note only.  If you can – try to figure out the tempo of the first tones only (a tap tempo feature will help a lot here) and now try playing the arpeggio with only the first accent.  This is annoying to do for long periods of time – but can help a lot for short practicing cycles.

You may want to just start with this one arpeggio and work on synchronizing both hands – that alone could take some time if you’re unfamiliar with this technique.

From a performance perspective – you’re looking for uniformity of attack with regards to both timing and volume.


Recycling shapes

Here’s an interesting observation – If we play the same minor 9 shape we just used but this time move it to the 5th of the chord (In this case the pitch E or an E minor 9 arpeggio ), we get the notes E, G, B (which were also in the last arpeggio)but we get 2 added pitches D and F# which here act as the 11 and 13. This creates an over all A minor 13  or A Dorian sound.

Short cut #1 – when playing over a minor or minor 7th chord – you can play minor arpeggios from both the root and the 5th of the chord over it.


Short cut #2 – A minor 9 + E minor 9 = A minor 13 or an A Dorian sound.

Let’s look at this in notation and tab:

Notice that by using the same picking pattern –  the upstroke of the B in the first arpeggio leads right into an upstroke on the E of the E minor 9 arpeggio.  The fingering pattern is the same as before.  Once you get the A minor 9 form down – you may need to practice the transition between the A minor 9 and the E minor 9 forms.

Here is an mp3 of the transition played at two tempos.

Finally, we can repeat the same thing on the last A of the A5 chord (although the fingering pattern will have to be adjusted by a fret for the G-B string tuning).

Here’s the top A minor 9  arpeggio played by itself – first slowly  and then faster.

As before, the same picking pattern is utilized to add continuity between the forms.  You could end on the B or pick another pitch the end the form on depending on what chord you’re playing it over.  Here I’ve chosen E.

Here’s the full arpeggio played at tempo.

You say Tomato I say Major

So now that we’ve looked at a minor example let’s use a major example.

If I sharp the C and G notes of the A minor 9 arpeggio –I have an A Major 9 arpeggio – which also works over A5.

Here’s the A major 9  arpeggio played slowly  and then faster.

Here’s another interesting observation – If we play the same major 9 shape we just used but this time move it to the 5th of the chord (In this case the pitch E or an E major 9 arpeggio ), we get the notes E, G#, B (which were also in the last arpeggio) but we get 2 added pitches D# and F# which here act as the #11 and 13.  This creates an over all A major 13 augmented 11 or an A Lydian sound.

Short cut #1 – when playing over a major or major 7th chord – you can play major arpeggios from both the root and the 5th of the chord over it.


Short cut #2 – A major 9 + E major 9 = A major 13 (#11) or A Lydian tonality.


Since I’ve broken this process down a great deal with the A minor 9 process – I’ll just highlight the lick idea here.  You could end on the B or pick another pitch to end on depending on what chord you’re playing it over.

Here’s the full arpeggio played at tempo.

Here’s the A major 9  arpeggio played slowly  and then faster.

Taking it out

As a final idea – let’s apply this concept to extending the overall tonality.

Here’s a transcription of an improvisation working off of this idea – but using a B minor 9 for the third chord of the sequence.

First let’s look at the A5 chord again:

Now – let’s realize that instead of building these structures off of the Root – 5th – root of the chord – that we could use other tones – for example here I’m going to use the Root, the 5th and the 9th:

Here’s a transcription of an improvisation working off of this idea – but using a B minor 9 for the third chord of the sequence.

Here’s the full arpeggio played at tempo.

Here’s the  arpeggio played slowly  and then faster.

C# is obviously not part of an A minor tonality – but by sneaking it into the arpeggio sequence it gently nudges the overall tonality to me in a pleasing way.

The point is to not get too hung up on rules or shortcuts – but instead to have a series of modular sounds and approaches that you can use as the need comes up.

I’ll be posting more about these types of approaches in the weeks and (more likely) months ahead.  Just remember in general to keep your hands loose, your rhythm tight and your attention focused – but if this is your first time to the site I’ve posted a number of things on practicing in general which may be helpful to you.

I’m always looking for feed back on these posts!  If possible – please take a minute to comment or drop me a pm @ guitar.blueprint@gmail.com to let me know if these are useful to you.

Thanks for dropping by!