The Baker’s Dozen Approach To Pentatonic Scales

6 for the price of 5

While pentatonics are a great melodic and harmonic device, slipping some extra notes into the scale can add some additional spice to the  approach.  The most common way to do this is through the method used in the blues scale – which is a pentatonic minor scale with an added note (in the case of the blues scale – a tritone).

The impetus for posting on this was a post my friend Moby Pomerance put up regarding some elements of this very topic.  Originally I had devised an alternate (i.e. approximate) fingering for his idea – but ultimately I put a few twists and turns in it and came up with one lick that’s really three mini licks rolled into one.

First – The Scale

Here’s a “box” position D pentatonic minor scale as a starting point:

What I’m going to do is add in a 9th (e) for an additional flavor

If I put this in a 2 note per string pattern using the D on the D string 12th fret as a starting point, I get this fingering ascending and descending. (Use alternate picking with this lick.)

While there’s nothing wrong with fingering it this way, I like dividing it into 3 string groupings.  The 2-note-per-string approach with alternate picking is more aggressive – but the dividing the notes per string into grouping of 3-1-3 on the g-high e strings is a little more legato makes it easier for me to sequence sections.  So here is the same idea but moved to the 7th/8th position.

Pay careful attention to the picking pattern and the 4th finger.  The slide is indicated here to accent the pinky movement. While it’s picked in this example, it could also be played with only the first pick attack.

The lick

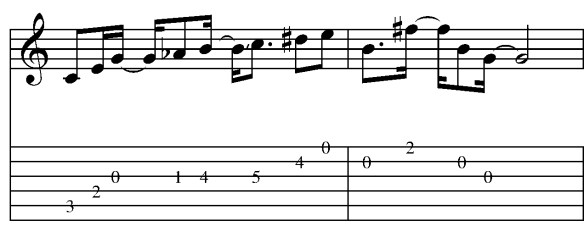
This idea is presented below in a larger lick that works over a d minor/d min7/d min9 chord.    Here’s an mp3 I recorded with the FNH Guitar  in AU Lab- first played slow (1/2 time) then faster (full speed – tempo is around 200).

** Note – the mp3 player on the site seems to be working better in Safari – but if you have trouble playing it – just refresh the page.


Notes:

  • The picking may seem idiosyncratic – but the approach is based on sweeping individual notes on multiple strings and alternate picking for notes on the same string.  You should find it consistent in that regard.
  • I see this as 3 licks.  Bar 1 is one approach.  The 1st two descending ideas in bar 2 as the second approach and the last 2 arpeggio ideas as the 3rd lick.
  • The note groupings are not all uniform.  Bar 2 has groups of 6 and 7 and splits a group of 5 up between bars 2 and three. .  Breaking out of rigid 4 note 1/16th note patterns adds an element of unpredictability .
  • There are a number of e-f slides to highlight the added note in this lick.  This is done with the idea of breaking the lick into segments rather than just using them in the lick as a whole.
  • Using patterns that have only 1 note on the B string – can make for some interesting chord ideas as well.  Here are some melodic fragments that can double as substitution chords over a d minor chord (with an mp3 here).

Lastly, examining the notes in this scale: D,E, F, G, A, C  as unique triads reveals the following:

D, F, A (d minor) + C, E, G (c major)

in other words – to get away from the full-scale approach – you could alternate D minor and C major arpeggios and get a very similar effect.  I’ll look at this more in a future lesson.

In the meantime, if this idea is interesting to you – you may also want to look at this GuitArchitecture lesson post, or look at the pdfs of the pentatonic posts in the online lesson (PDFs) tab on the top of the page.

I’m always looking for feedback.  If there’s anything in this lesson that helps, or that raises other questions – feel free to drop me a line at guitar.blueprint@gmail.com.

Thanks for reading!

-SC

.

Favored Curry Or Spicing Up Chord Scales And Triads Part 2

In Part 1 of this lesson,  I went over how to create a chord scale for improvising over a specific chord (in this case C major)  chord.  As a brief recap – here is the chord scale I chose:

.

C major chord scale with a # 2, # 4, and a b6 scale degree.

.

To start this off – here’s a sample lick using this scale:

.

Here’s how the scale sounds played slowly  (1/4 note at 90)

Here’s the scale faster (1/4 note at 180).

.

The chords you say?

Since we’ve engineered this chord scale around a C major triad – we know that any licks we come up with will work over that chord – but to see what other chords can be used with this scale – we need to harmonize it.

Let’s look at the triadic (3 note) harmony first.

.

C major chord scale with a # 2, # 4, and b6 scale harmonized in 3rds (triads)

.

**Note the first 2 chords have been moved to the back three strings to facilitate playing:

.

Here are  the chord formulas that are generated:

  1. C, E, G – Root, 3rd and 5th – C Major
  2. D#, F#, Ab – Root, 3rd and double flat 5th – non functional harmony*
  3. E, G, B – Root, flat 3rd and 5th – E minor
  4. F#, Ab, C – Root, double flat 3rd, flat 5th – non functional harmony*
  5. G, B, D# – Root, 3rd, sharp 5th – G Augmented
  6. Ab, C, E – Root, 3rd, sharp 5th – Ab Augmented
  7. B, D#, F#, – Root, 3rd, 5th – B Major

(Note:  even though these don’t have a triadic function they can serve a function enharmonically – I’ll get to that in the 7th chord section).

To recap –  any licks that we generate from this scale will work over C major, E minor and B major.

 .

Adding the spice

Since we started this approach with C major – let’s look at a lick that spices up a C Major Triad.

.

Here’s an mp3 of the lick.  This is an example of something I might play as a backup accompaniment in the pre-chorus of a song.

To my ears even playing this over a straight C major tonality, the D#–>E really triggers an E minor tonality.  Try playing this over a C major –> E minor progression.

.

Moving to E minor – here’s an approach I use a lot in rhythm playing.

.

The first step is to take a set of three strings – in this case I’ll use the high E, B and G strings.

Starting with a sample chord voicing in the low register – ascend up the neck by moving each note in the voicing up by scale degree.  In this example:

.

I’ve started with an initial voicing (Ab, C and E) and moved it through scale-wise motion.

.

(Note:  I hear this as G# instead of Ab – you may want to see the section on enharmonics below).

.

Here is an mp3 of the voicings.  In the audio example, I play a low E between each chord to establish an overall tonality.

Having done this – I see some cool dyads ( 2 note voicings) on the B and G strings that I can use to spice up an E minor vamp.  This is an example of the type of comping I might do on the verse of a song if the song chart just said E minor).

.

Here is an mp3 of the lick.  Don’t be afraid to lay into the slides or add a little vibrato to make the notes sing a little more.

With a lot of these approaches – I’m not really conscious of what the specific functions of the notes are.  Once I know that the scale will work over a chord – it’s more about focusing on the sound of the notes and how they fit into the song.  On some tunes – these notes would clash with the melody and it wouldn’t work.

This process is about building a repertoire of sounds to have at your disposal.  Knowing the theory around it just allows you to adapt those sounds and approaches to make the fit where you want them to.

.

Space is the place

Here’s a lick that takes the above approach of breaking chords up into different string sets and applies it to a melody line.  Here I’ve focused on the A, D and B strings and added in the high E string at the end.

.

Here is an mp3 of the lick.  Note the slides, vibrato and slightly rubato phrasing at the end of the lick.  These are the little nuances that help make the difference between playing music and playing notes.

This next lick combines chord forms and melody by using artificial (i.e. “harp”) harmonics.  To produce these – a chord shape is held with the fretting hand while the picking hand picks and partially frets notes 12 frets higher resulting in a chime like timbre.  If you are unfamiliar with this technique – just google Lenny Breau (an absolute master of the approach) and you’ll get an idea.

For this specific lick:  I’m holding the D# with my second finger, the C with my 3rd and the Ab with my 4th so I can reach the F# with the fret hand 1st finger.

.

Here’s an mp3.

.

One of the secrets of this method is to strategically time the release of the fret hand notes.  The longer you can leave the notes held down, the more the pitches will bleed into one another – which produces the desired effect.  Before we go to the next lick I need to make a brief enharmonic diversion.

 .

An Enharmonic Diversion

An enharmonic is when a note is spelled differently but sounds the same (for example Ab and G#).  When playing this over an E drone – I hear the pitch on the first fret of the G string as a G# (i.e the third of the chord) instead of Ab.  It’s very difficult for me to hear that note functioning as a b4.

As a case in point, here’s another lick.  (This piece makes liberal use of vibrato bar scoops – listening to the mp3 of the lick for phrasing is recommended).

.

.

I’ve notated this lick with both a G# and a G natural as those are the intervals I hear in the approach.

With this interpretation it makes the scale harmonically vague as it would then have both a major AND a minor 3rd.  If we go back over the initial triadic chord and replace the Ab with G#, F# for Gb and D# for Eb we get a couple of different chord options.

  1. C, E, G#-  C Augmented
  2. E, G#, B –  E Major
  3. G#, B, D# – G# minor
  4. C, Eb , G –  C Minor
  5. G, B, Eb – Eb Augmented
  6. Ab, C, Eb – Ab Major

To recap –  in addition to C major, E minor and B major – these licks can also be used with care over E major, Ab major, C minor  and G# minor.

.

To finish this approach out for now – let’s look at 7th chords.

 .

C major chord scale with a # 2, # 4, and b6 scale harmonized in 3rds (7th chords)

**Note:  the stretch on the second chord should be approached with caution.  If it hurts – stop playing immediately!

.

Here are the chord formulas that are generated:

  1. C, E, G, B – Root, 3rd, 5th and 7th  – C Major 7
  2. D#, F#, Ab, C – Root, 3rd and double flat 5th, double flat 7 – Enharmonically – this spells – Ab, C, Eb, Gb, – or Ab7 – but doesn’t serve a function from the D# pitch.
  3. E, G, B, D# – Root, flat 3rd, 5th and 7th – E minor (Major 7)
  4. F#, Ab, C, E – Root, double flat 3rd, flat 5th – Enharmonically – this spells – Ab, C, Eb, Gb, – or Ab7 – but doesn’t serve a function from the F# pitch.
  5. G, B, D#, F# – Root, 3rd, sharp 5th, 7th – G Augmented 7
  6. Ab, C, E, G – Root, 3rd, sharp 5th – Ab Augmented 7
  7. B, D#, F#,A  – Root, 3rd, 5th, flat 7th  – B7

This gives us a couple of new tonalities to explore – namely, C Major 7th, E minor (major 7th), B7 and Ab7.

..

The final tally:

At a minimum, this chord scale will generate licks that can be used over the following chords:

C major, C Major 7th,

C minor, C minor (major 7th)

E major, E Major 7

E minor, E minor (major 7th),

Ab major, Ab7

G# minor

B major,  B7

.

Next steps:

You will probably not like the use of this scale with all of the chords listed but, as is the case with any musical approach, the key is always to use your ears as a guide to what works and what doesn’t.

I hope this helps! 

Happy Holidays and thanks for reading!

.

The material in the lesson is adapted from the material in The GuitArchitect’s Guide To Chord Scales book. More information about that book (including an overview and jpegs of sample pages) can be found here.

.

-SC

.

PS – If you like this post you may also like:

.

MAKING MUSIC OUT OF SCALES

CREATING CHORDS AND LINES FROM ANY SCALE – A HARMONIC COMBINATORICS / SPREAD VOICINGS LESSON

.
RECYCLING SHAPES OR MODULAR ARPEGGIOS FOR FUN AND PROFIT

GLASS NOODLES – ADAPTING A PHILIP GLASS ARPEGGIO APPROACH TO GUITAR

.

MELVILLE, MADNESS AND PRACTICING – OR FINDING THE DEEPER LESSON PART 2

SOME USEFUL ONLINE PRACTICE TOOLS

POSSESSION IS 9/10S OF THE LAW BUT PERCEPTION IS EVERYTHING OR PRACTICING PART VII

TESTING YOUR VOCABULARY OR PRACTICING PART VI

PRACTICE WHAT YOU PLAY OR PRACTICING PART V

.

DEFINITIONS AND DOCUMENTS OR PRACTICING PART IV

TENSION AND THE SODA CAN OR PRACTICING PART III

PROPER POSTURE IS REQUIRED FOR PROPER PERFORMANCE – PRACTICING PART II

PRACTICE MAKES BETTER AKA PRACTICING PART I

.

MELVILLE, MADNESS AND PRACTICING – OR FINDING THE DEEPER LESSON PART 2

FINDING THE DEEPER LESSON

INSPIRATION VS. INTIMIDATION

.

WARMING UP: FINGER EXERCISES, THE 3 T’S AND THE NECESSITY OF MISTAKES

“THE LIMITS OF MY LANGUAGE ARE THE LIMITS OF MY WORLD”

A BRIEF THOUGHT ABOUT MUSIC THEORY

.

BOOKS

LESSONS

.

Apogee Duet Break Out Box Overview

The Apogee Duet is a pretty remarkable piece of gear – and it terms of A/D/A conversion – it does a great job at it’s price point.  The Duet 1/4″/XLR cables, however,  are a little hit and miss:

You’ll notice that the connecting wires are thin and a little fragile looking.  Also – because of the way that the 1/4″ cables I use pull of the breakout cable – I feel like it’s adding additional tension to the wires.  In short, it made me a little nervous in live use.  Then I found out about the Duet Break Out Box – which mounts all of the cable’s into a single metal box with a rugged high quality cable attached and decided to give it a try.

There are 2 versions of the Duet Breakout Box (both are 100% passive and line level).  I’m using the unbalanced box – as I’m not sending signal over long cables – but the price difference is $99 versus The Breakout Balanced – which will run you $215 or so.

Sonically, I don’t hear a difference between the breakout cable and the breakout box -which is a good thing – the selling point of the unit is it’s ruggedness. The box is solid, well constructed and can definitely handle a live gig.  The enclosed cable is about a foot long  – so you may want to invest in a longer cable eventually – but for my purposes this works fine.

Do you need this unit?  If you’re doing mostly studio or home work you can probably get by with your existing cable fine.  But if you are planning on using the unit live – this is a worthwhile investment.

AU LAB/POD FARM 2.0/LIVE LAPTOP RIG TUTORIAL PART 6 – Dual Rig Distorted Tones

In previous instances – I haven’t had a whole lot of success with running both A and B channels on a dual rig – but I thought I would try to steal a tone idea from Joe Bonamassa, and give it another shot – this time running a dirty and clean tone at the same time and blending the two for a more complex tone.

This post won’t be as in-depth as some of the other AU LAB posts I’ve done as I’ve detailed a lot of the process already.

As a starting point – here’s the DIST 2 rig:

The pedal configurations are very similar to what I set up here:

The wahs and volumes are both assigned to the same pedal so that 1 pedal controls both functions.  Ditto for the distortion and the reverse delays (usually off) which I can kick in for some grand psychedelia.

In the next version of this rig – I would probably set the Mix knob of the delays to the expression pedal so I could dial in the amount of reserve delay I wanted when it was on.

As another option – you could also set the volumes independently – one to the short board volume and one to an expression pedal –which would allow you to have a clean tone and dial in the amount of distortion you wanted a la Jim Thomas of the Mermen.

EQ

One of the biggest problems I’ve had when using dual rigs in the past is a weird boosting of certain EQs.  Particularly on the low E string.  In this case what I’ve done is to cut the bass in the 80 Hz by 6db on the Graphic Eq in the signal chain.    This was an idea I got from a REALLY cool acoustic post that Bob Brozman had on his site detailing his live rig and correlating specific Eq ranges to strings.  It worked pretty well and helped tame the woof on the low E string.  There’s also a 3db boost at 750Hz and a 2db cut around 3k.

Kicking on the distortion on the distorted side take out some of the extreme low-end and compresses the low E string in a pleasing way.

The Tube Screamer settings I’m using are:

Drive 24%

Gain 66%

Tone 13%

Another thing that has helped with this is splitting the Stereo send.  I’ve panned these to 27% on either side.

Here’s the mixer setting:

Another important note – this is running out mono to an amp – so that will further affect the sonic split.  I’m running the rig in stereo because I like the sounds of the effects in stereo better than mono – but ultimately this is going down to a mono signal.

Here are the Silver Marshall Model Settings:

In live use – the Atomic is really bass heavy – so I’ve cut out a lot of the bass here and typically have it at 3-5 depending on how the room sounds.

Gaining Perspective

Another problem that comes up with laptop guitar – or modeling in general is that it’s really easy to overdo it on the gain.  When I got my first distortion pedal – I remember turning all the knobs up 100%.  It took a while to get to where I started experimenting with eq and gain staging to try to get some saturation – but keep the overall definition.  The use is gig specific –  If the sound requires a lot of gain and sludge – then I go for that – but in general – I definitely try to scale it back a bit.  I can always add an overdrive or distortion pedal if I need to increase the amount of gain – .

And the clean settings:

The volume is a constant adjustment issue here. (also note the eq differences from the settings in the AU lab tutorial).  Here – I’m just trying to find some good mix of dirty with a bit of clean for clarity.

Here is a short example of the tone – this uses the clean channel from the fender and the dirty channel from the Marshall.  This was just the setting with the same AU lab settings in the AU lab posts – recorded directly in AU lab.

One thing I realized after I tracked this is that the feedback on the Tube echo is set a little too high.  I usually leave them both around 4 so it gets a little verb/slapback sound.

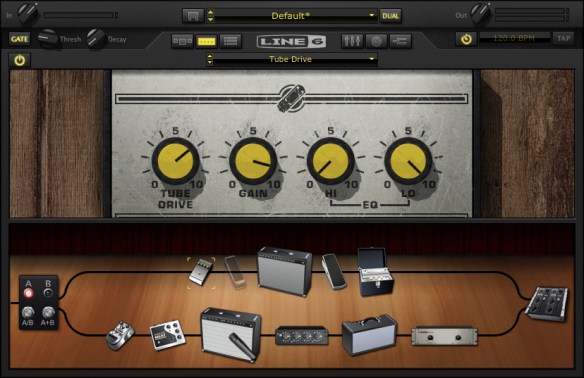
I have the tube drive on the Fender off for this example but can switch it on for extra gain if I need it.

In the meantime – you can download this tone here.

Hopefully this has been helpful.  I’ll be doing a post on using AU lab as an acoustic pre for live use soon.

Thanks for dropping by!

-SC

AU Lab/POD Farm 2.0/Live Laptop Rig Tutorial Part 4

Welcome back!  In this post, I’ll be integrating SooperLooper into the AU LAB Live rig I’ve been building.  If you haven’t read the earlier posts about this (part 1, part 2 or part 3) you may want to read those before continuing on.

An Important note about sample rates:

From here on out – if you’re going to be incorporating other audio into the session (including looping in SooperLooper) – you’re probably going to have to set the sample rate back to 44.1 (and set the Impulse responses back to 44.1).  If I’m not looping –  I try to set the rate as high as I can, but know that it’s going to have to get bounced down to 44.1 for recording, etc.

SooperLooper:

The next step is to set up Sooper Looper to be able to loop audio.  I’m going to put SooperLooper on a bus, so I can either send audio to it or bypass it as need be.

In AU LAB – – > Sends – Select BUS 1.

A new Bus Strip will open.

Under Effects – scroll down and select Sooper Looper.

When you do this, Sooper Looper will open up in 2 windows:

The first window:

And then the GUI

A Quick Tip:

When using sooperlooper, you need to increase the “main in mon” to hear any output.

You can set up multiple stereo loops in Sooper Looper by selecting them from the SooperLooper menu.

I like to have 4-5 different loops set up.

You could do more (your limits are your system resources- but since I’m on a laptop – I want to be able to see everything (and this takes up some screen space).

Another Quick Tip:

You can set SooperLooper up for midi controls but the key binding options will help you navigate the window pretty easily as well.  They’re found under SooperLooper Preferences.

For example – you need to select an audio loop in order to record to it.  If you look at the bindings above you’ll see that select_loop_1 is currently set to “1”.

So if you’re on the active SooperLooper window and hit 1 – you’ll arm track 1. (Note the new line to the far left of SooperLooper that shows which track is armed for recording)

Make sure to save your AU Lab session.

Setting up MIDI control in SooperLooper:

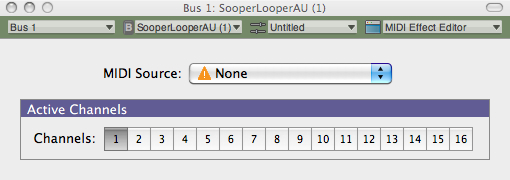
In the first SooperLooper window:

Click on the arrow next to essej.net: Sooper.

Select Midi Effect Editor

Set the MIDI Source to the controller you want to use and set the Midi Channel to the channel you want to use.

Note:

If you don’t see the controller then go to Audio-Midi Setup application (or you could find it in the Application – –  > Utilities folder) and click on the MIDI tab.

To Set up specific commands in Sooper Looper, you’ll need to go to Midi Bindings under SooperLooper Prefereces:

MIDI Binding Steps in SooperLooper:

Click “Add New”.

Select a command under “Command/Control”.

Click “Learn”.

Press the midi control you want to use to control the function.

Click “Modify”.

When you get all the functions learned  – click Save.

Also make sure you save bother you SooperLooper AND your AU LAB session.  All the midi functions should be there when you reopen it – but if they aren’t and you’ve saved them in Sooper Looper – you can just “Load” them back in.

AU Lab : Transport

Here’s something pretty cool – the Window tab in AU Lab – select Show Transport

That will bring up the following window:

The MIDI Clock Source will probably default to Disabled – If you set it to Internal – you can use to tap tempo feature to synch effects or Sooper Looper  by tempo.  Pretty cool feature!

(Also in the the Window tab in AU Lab there are some other useful options particularly –  Show CPU Load – which brings up a handy visual meter to let you see how your project is doing with it’s resources.)

Additional Resources: SooperLooper

SooperLooper is an incredibly deep plug in.  It would be easy to devote a 5 part article to just the feature set and use of it – The  Sooper Looper forum is also extremely helpful with various Sooper Looper issues, and also has a specific SooperLooper AU LAB section.

Next time – I complete the rig (for now)

You can find all of the laptop guitar rig posts on the Blueprints tab on the top of the page.  Once on the blueprints page – just scroll down to the Laptop Guitar Rig section.

Thanks for reading!


AU Lab/POD Farm 2.0/Live Laptop Rig Tutorial Part 3

Hello again.

If you haven’t read the first or the second posts about setting up POD Farm in AU Lab, you may want to review those first.

Automating Parameters with MIDI Learn:

Now let’s complete the clean guitar setup and then automate some parameters in POD Farm.

First I’m going to delete the delay and add a volume pedal.  You’ll find it under “Dynamics”.

It could just as easily go before the amp, but in this case I want to put it between the amp and the delay, so I’ve deleted the Analog delay and placed a Tube echo after the volume pedal.

Next I’ll add a wah.

And an overdrive pedal.  I’m going to have a full on distortion tone on the other channel – but this gives me another tonal option.

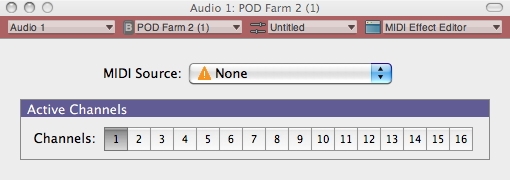
Across the Very top of the Pod Farm Window (labeled Audio 1: POD Farm 2 (1))

You’ll see 4 tabs underneath that window reading from left to right:

Audio1 –> POD Farm 2(1) –> Untitled –> Line:6 POD Farm 2

Select the arrow to the right of Line:6 POD Farm 2 and scroll down to Midi Effect Editor:

You’ll notice that the MIDI Source is None – which in this case means that the shortboard is getting power and sending midi, but it’s not being received by POD Farm/AU Lab.

I’ve selected the POD short board for the MIDI SOURCE, and will keep it on midi channel 1

POD Farm: Midi Learn – Volume

Now that the midi signal from the shortboard will get to POD Farm, I can use the Midi Learn function.

Let’s start with the volume pedal.

If I select the volume pedal in the signal chain a close up of the pedal will open up in the window above the signal chain.

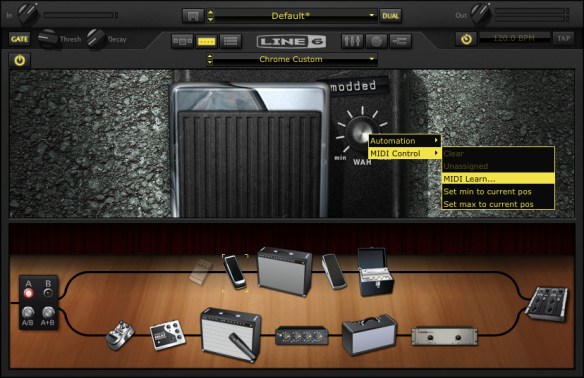
Since I want to control the volume of the pedal  – I want to cntrl – click the level knob on the pedal.

That brings up the following option:

Choose MIDI Control – – > MIDI Learn.  Now if I move the volume pedal with my foot the level on the screen will change as well.

(If you make a mistake you can choose the “Clear” option above MIDI Learn and repeat the process.)

Note:

If you wanted to do this with a distorted amp and roll off the gain, you could select the amp and cntrl – click the Gain knob.  Even better, with the “Set min to current pos/Set max to current position” you could use the volume pedal for subtle variations in gain.

POD Farm: Midi Learn – Volume

Let’s see how this works with the Wah pedal.

First, as opposed to the volume pedal, which is always on, I want to be able to turn the wah pedal on and off.

The “secret” here is to automate the On/Off button under the “Gate” Button.

By selecting the MIDI Learn function and pressing down on the toe switch, that switch now turns the pedal on and off.

Next, with the toe switch on – I’m going to set the volume pedal to control the WAH sweep.  Just cntrl-click the actual wah switch for MIDI Learn and move the pedal.  The pedal will now control the sweep.

I like the Chrome Custom pedal, but don’t like the extreme high end, so I’m going to limit the scope of the sweep.  I’m going to turn the knob to 85% or so and then cntrl- click, but this time instead of selecting MIDI Learn, I’m going to choose “Set max to current position”.

Now when I sweep the wah it only goes from 0-85%.  This is really useful if you only want to filter a specific bandwidth.

I’ll set the Overdrive to an on off setting – the same way that I did with the wah.

That is enough for a general clean tone.  Now onto…

The Dirty Channel:

I’m going to spend a lot less time on this as I’ve already shown how to set up and automate effects on the clean side.

Here’s the default set up:

A brief note on tone:

In distorted models, you can create amps with gain structures that you could never create feasibly in the real world.  One problem I hear a lot is the desire to crank the gain and cut all the mids.  That creates a particular sound – but it’s not one that cuts through very easily.  The overdrive will boost the channel a bit in general, but it’s easier to ADD distortion live than it is to take it away.  Again, louder isn’t always better.

Basically I’m using the same Volume, Wah and delay as the clean channel above.  The only differences are in the amp and overdrive pedal (and that I’ve moved the placement of the volume pedal.)

Here’s the overdrive setttings:

POD Farm: Midi Learn – A/B Switch

The next step is to set up a midi command to be able to switch from the A to B channel.

The secret here is to click on the mixer button so the A/B Box appears in the window above the rig.

All I have to do then is cntrl-click the A/B button and select a button on the shortboard and then it’s all set.

Save your Bacon:

Hopefully you’ve saved your POD Farm patch and your AU Lab settings, but if not saving them both are very self explanatory.

Let’s start with POD Farm:

Click to the left of Default and save as

In this stage, you can also make whatever notes you want as well for later reference which is a nice feature.

Another really cool thing about AU Lab is that when you save AU lab – it saves the settings on all of the effects in AU Lab.  So save OFTEN.

That’s it for this post.  In the next post, I’ll add Sooperlooper into the rig.

You can find all of the laptop guitar rig posts on the Blueprints tab on the top of the page.  Once on the blueprints page – just scroll down to the Laptop Guitar Rig section.

Thanks for reading!

AU Lab/POD Farm 2.0/Live Laptop Rig Tutorial Part 2

In the previous post, an AU Lab session (or document) was established and an A/B POD Farm patch was created.  In this post, I’m going to start modifying the patch to make it more useable.

Building the rig:

Okay first I’m going to swap out the amp. I like the Double Verb instead.

You can drag and drop amps into the signal chain, but if I click on the down arrow to the right of the AMP field – I can just scroll down to the Double Verb amp.

Here are the settings I’m using.

If you look in the left hand corner underneath the input knob on POD Farm, you’ll notice the global gate is on.  I tend to use the global gate at a low setting.  This came from a ruined session where I switched to a distorted sound that DIDN’T have a gate on it and squealed between each phrase.  Now I keep the master gate on to not worry about that scenario.

Compression:

Louder isn’t always better.

Compression has it’s place – but I try to play dynamically, so the compression is the first thing to leave the POD farm signal chain.

If you click on the compressor in the signal chain and then ctrl-click on the compressor you’ll get the following options.

Just select Delete.  If you change your mind you can drag and drop another compressor from the menu into the signal chain.

Another point to bring up, is that when I use an amp and effects – I try to use the same signal chain for all of them.  (This comes from years of playing gigs and having a bunch of effects pedals going through the same amp and reverb).

Looking at this set up, the mic pre (currently between the amp and the reverb) would be something that I would want in the channel signal chain in AU LAB instead of POD Farm – so that it was the same mic pre for any amp I’m using.

The first step is to delete the mic-pre from the POD Farm signal chain (using the same method as the compressor above).

Next (in AU LAB) in the Audio 1 channel – click on the arrow in the next available Effects field below PODfarm .

If you scroll down to Line 6, you’ll see that in addition to PODFarm, that each individual component of a PODfarm rig has been broken down into components (aka POD Elements).  This is so you can use individual effects or amps as an AU plug in which much less of a CPU hit than loading in another instance of POD Farm.

In this case choose: POD Farm Element – Preamp.  I’ve chosen Vintage UK.

Reverb:

The reverb would also be something that I would want in the channel signal chain – so that it was the same reverb for any amp I’m using.  (The other advantage is that by placing the reverb outside of POD Farm, when I change amp settings the reverb doesn’t cut off with the amp change.)

Delete the Reverb from the signal chain in POD Farm (using the same method as the compressor and the mic-pre above).

Next, (in AU LAB) in the Audio 1 channel – click on the arrow in the next available Effects field below POD Farm Element – Preamp.

If you scroll down to Line 6, choose: POD Farm Elements – Reverbs.  I’ve chosen Standard Spring.  Here are the settings I’m using.

Impulse Responses:

I use impulse responses rather than the speaker sims in Pod farm.  So the next thing I’m going to do is get rid of the speaker cabinet/microphone on Podfarm.  If I click on the CAB button – I’ll get a list of speaker cabinets and microphones used.  If I scroll to the top of the list – I’ll get “No Cabinet” which deactivates both the cabinet and the microphone.

Next, (in AU LAB) in the Audio 1 channel – click on the arrow in the next available Effects field belowPOD Farm Element – Reverbs.

Scroll down to Lernvall Audio and select LA Convolver.

Now I’m going to select to impulse responses to act as a speaker simulator.  I’ve experimented with putting multiple instances of LAConvolver  on buses and running multiple cabs, but since I want to run SooperLooper in the bus (Where I can loop guitar and any other incoming audio source), I’m going to just stick with a stereo set.

Select a channel and hit “choose” under file. In this case I’m using the free RedWirez cabinet I got as part of their birthday giveaway.

I want to use a high sample rate to get better definition so I’ve chosen 88.2 K. (or 2 times 44.1k)

I’ve chosen an SM57 on the grill and a KM84 about 3 inches behind the back of the amp.  I tend to start with the Wet gain in the center position and adjust as necessary.

A brief note:

I’ve mentioned this in other posts, but since I want to use the same speaker cab for all the amplifiers, I’m going with a 4×12 for familiarity.  Normally,  I wouldn’t match a double verb up with a 4×12, but since I’m going to be running a Marshall on the other channel, I’m going to just have to adjust the clean amp signals accordingly.

Fixing the Sample Rate:

If you notice, the plug in sample rate and the Impulse response sample rates are different.  It will work like this – but I want to use the highest sample rate I can for the most clarity.  There is a delicate balancing act that comes between high sample rates, stability and useable latency, so everything here is a compromise.

I’ll fix this with Audio Midi Set up :

First: click on AU Lab and look under Preferences.

When the preferences window opens, click on the tab marked Devices.

If you click on the expert setting arrow you’ll see something like the following:

Another  brief note:

I’ve set the CPU to 100% to avoid glitches.  I’ve also set the latency really high to attempt to keep the system stable.  Depending on the system and interface that you’re using, you’ll probably have to lower the setting to the point that you get glitching (or max out the memory) and then bring it up a little bit from there.  With the headphone out of the Duet – even with these settings the latency is suprisingly tolerable.

If I click Edit Device – that opens up the Audio-Midi Setup application (or you could find it in the Application – –  > Utilities folder)

Note:  I’ve changed the output format to 88.2.

Going back to the Audio-midi sample rate window – it shows:

An Important note about sample rates:

I’ll mention this again – but if you’re going to be incorporating other audio into the session (including looping in SooperLooper) – you’re probably going to have to set the sample rate back to 44.1 (and set the Impulse responses back to 44.1).  If I’m not looping –  I try to set the rate as high as I can, but know that it’s going to have to get bounced down to 44.1 for recording, etc.

While I’m on the preferences Tab I might as well set up recording to the external drive.  Click on the tab marked “Recording”.

Now if I click on the “Rec” button at the bottom of OUTPUT 1 in AU LAB, it will record whatever I do to the Lacie as the default location, in a 24 Bit AIFF format.

With the changes in this part of the tutorial, the AU Lab Input looks like this with some sample input:

You’ll notice that the output is a little off balance.

If you pan it to the left you’ll balance the signal out a little more. Here’s the setting with all the global FX so far.

You may want to save the AU LAB session now, if you haven’t done so already.

In the next session, I’m going to complete the clean channel effects and automate some parameters with the Midi Learn function to be able to make changes to the sounds with the Line 6 Shortboard.

You can find all of the laptop guitar rig posts on the Blueprints tab on the top of the page.  Once on the blueprints page – just scroll down to the Laptop Guitar Rig section.

Thanks for reading!

AU Lab/POD Farm 2.0/Live Laptop Rig Tutorial part 1

I’ve received a couple of pm’s regarding AU lab and setting it up for live use (largely from this post).  With an upcoming film accompaniment and a need to re-tool the setup a little I thought I would build a rig from scratch and explain how I’m doing everything.

About this tutorial:

What I am doing here is documenting the specific process for building a working rig for myself.  If you don’t have this specific hardware/software set up, you could adapt the process to whatever you’re using.

AU LAB

First a bit about AU Lab.  If you have a Mac Laptop with an OSX operating system, you have access to one of the greatest FREE music applications imaginable.  AU Lab is a program that was designed for AU (Audio Unit – The Mac proprietary plug in standard – much in concept like a VST) developers to test plug ins – but since it can accept audio and midi, has buses and can record audio – this makes it a great tool.  The fact that it does it with a fraction of the CPU of something like Logic makes it essential.

AU Lab can be installed as part of the SDK package that is on your OSX install discs.  If for whatever reason you can’t find your discs – you can go to the Apple Developer site and sign up for a free account.  You can then download the SDK package.  Once it’s installed it should be in folder called “Developer” but if you just search for “AU Lab” on your computer it will come up.

3/10/11 NOTE:

The UA LAB Version used in all of these examples is AU LAB Version 2.1.  Version 2.2 has not been stable on my system with the Apogee Duet.  You can read about the current version here – but in the meantime – you may want to download X code 3.2.2 Developer’s Tools – which has version 2.1 of AU Lab, if it isn’t installed on your system already.

Before getting into the setup – here are the tools I’m using for this particular rig:

Hardware:

FNH custom guitar:  You can find a full review of this guitar here.

Macbook Pro- 2.4 Ghz Intel Core 2 Duo.  This is actually a 2008 version I got with a killer educational discount.  15” with firewire 400 and 800.  This Macbook has had 4 gigs of memory that I got from OWC (although the first slot can take 6 gigs so I’ll probably upgrade that before the end of the year) and a  Seagate 500 gig 7200 rpm drive.  I underestimated just how important the internal drive was to performance but it made a very big difference.

Lacie Rugged Drive – This is the 320 gig bus powered version.  Also 7200 rpm.  I run it on the firewire 800 port and use it to record to.  It’s a little overkill – but I can use it for larger sessions as well.

Apogee Duet – Firewire interface.  No other A/D converter near this quality in this price range –  No question about it.

Line 6 FBV shortboard Mark II – Line 6 got it 100% right with this product.  Smaller than the old shortboard, but can be USB powered.

Ilok key – This is required for the Ilok version of POD Farm.

Korg nanokey – The keyboard for this is a little toylike – but I’m not a keybaordist.  It is velocity sensitive and kits in a laptop bag – and I can use it to trigger patches, samples, etc.  I think all the Korg nano products are really cool.  Very useful item.

Apiotek USB 2.0 Quad – This is an express card adaptor that opens up 4 usb slots on the computer.  Since the Macbook only has 2 USB ports and I have at least 3 usb devices – this is REALLY helpful.

Software:

I’m not going to go into any real depth on the software – As I’ve already covered it in other posts.  (Look under LAPTOP GUITAR RIG)

AU Lab

POD Farm 2 Platinum (And POD Farm Elements)

La Convolver

RedWirez

SooperLooper

Absynth

Optional Software:

If using this hardware you will probably have to use one or all of these at some point.

Audio Midi Setup (Mac application – part of the OS install)

Apogee Maestro (Comes with the Duet)

Line 6 FBV Control (Free download from Line 6)

This will be a VERY indepth tutorial – but I want to make sure I cover everything I can.

AU LAB Set up

Go ahead and launch AU Lab

You’ll come to a screen that looks like this:

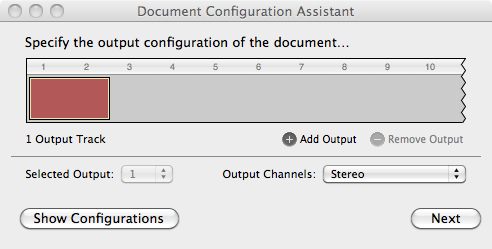
I want to run a stereo channel out so this is fine.

Click Next.

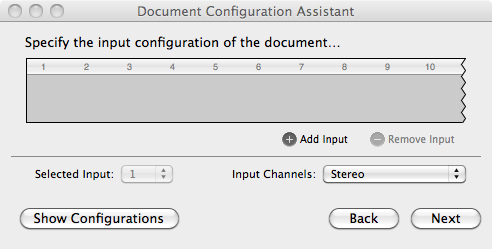
Notice that the default setting has no input – you can change this later – but it helps to set it up now.

Click Add Input.

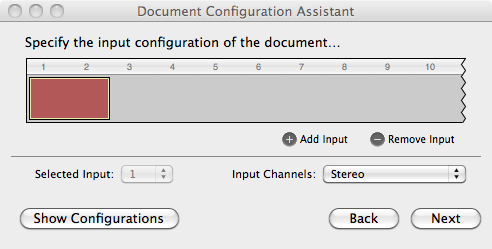
Now you have an input source.

Click Next

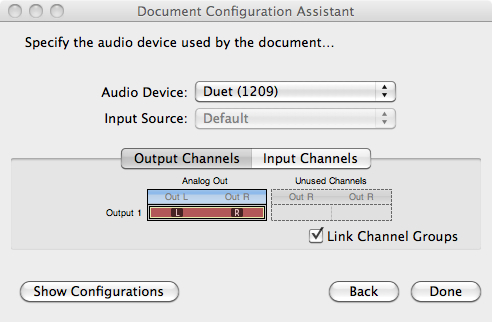
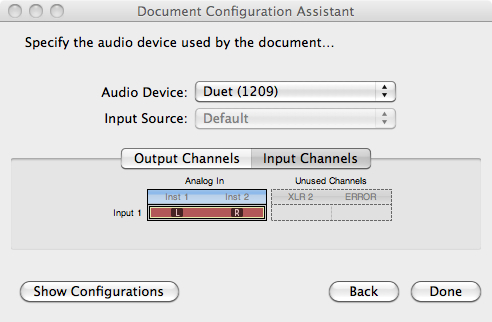
In this case I’m using the Duet – so it came up as the default in the Audio Device field.  If you’re not seeing the audio device you want to use open Audio Midi Setup (in the Applications – –  > Utilities folder) and make sure you see it there.

You can check the input channels if you’d like:

This shows that the Left/Right 1/4” ins are both available.  I’ll only be using Instrument 1 for the guitar – but I could run another instrument if I wanted to.

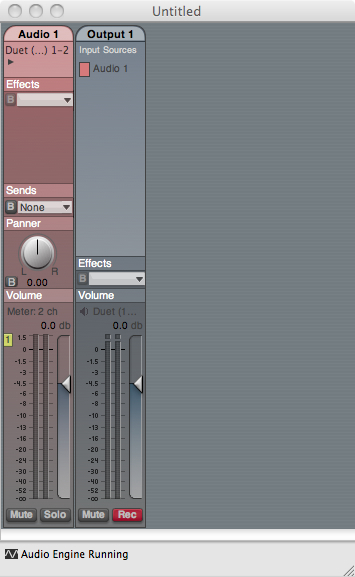
Click Done:

Here’s the screen that you’ll get.  If you have your guitar plugged in and strum a chord – you should hear it.  But this is going to get a lot better.

POD Farm set up

The first step is to set up PodFarm:  Click on The Effects tab in Audio 1 and scroll down until you get to Podfarm 2.

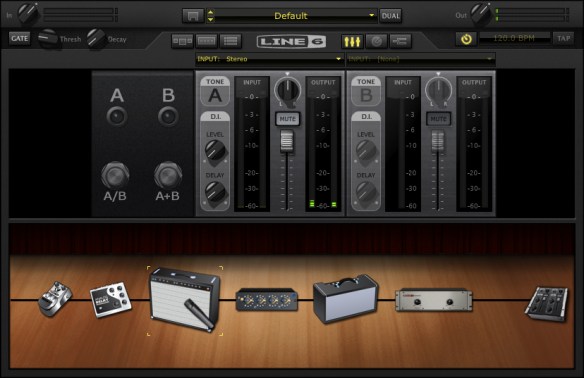
Here is the default screen in Pod Farm:

What I’m going to do here is set up a clean and distorted channel that I can switch back and forth between and automate some of the parameters so I can change them with my shortboard.

The First thing to do is get the input sorted out – since I’ve selected a stereo input in AUlab – the default in Pod farm will be a stereo in.

I only need  the left channel in as I’m only using 1 guitar for right now.

If I click on the arrow to the right of input: Stereo and scroll down to left – I now have the Instrument 1 Input on the Duet (left) as the input for this channel.

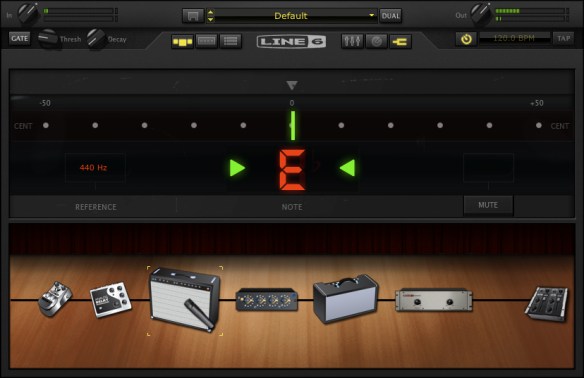
Before setting everything up – I’ll take a second to get in tune:

If I click on the tuning fork to the right of the Line 6 logo – that opens the Tuner.

If I click on the tuning fork to the right of the Line 6 logo – that opens the Tuner.

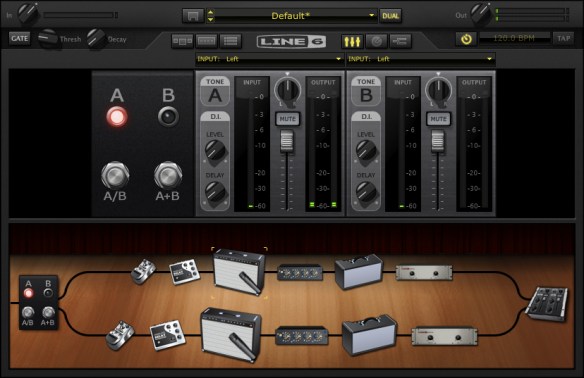
The next step is to create a Dual Tone.   In this case I’ll just copy the current tone.

Click the dual button and select Copy Tone.

And you’ll get this:

Note that the input has stayed the same as well.  Now my single guitar input can be used on both channels.

In general, I haven’t had a lot of success with 2 channel sounds – particularly distortion – which tends to overload in unpredictable ways.  I’ve clicked on the A+B Switch to turn it off.

A brief note:

The first time I did this – the guitar tone was digitally distorting (unpleasantly) so I brought the output of PodFarm down and it was still an issue.  Once I opened Apogee Maestro – the utility that came with the Apogee Duet – I realized that the signal coming out of the Duet was too hot.

It’s important to realize that the more items you add, the more things you’ll have to check when it goes wrong.

You may want to save the AU LAB session and save the POD Farm patch as well.    AU Lab saves all the settings of all the effects in the session, but you need to save the patch in POD Farm to load it again.

In future sessions, I’m going to create an A/B rig with a dirty and clean guitar amps and use the midi learn functions to change effects with the Line 6 Shortboard.

You can find all of the laptop guitar rig posts on the Blueprints tab on the top of the page.  Once on the blueprints page – just scroll down to the Laptop Guitar Rig section. 

Thanks for reading!