Hello everyone!!
Here’s part 2 of the diagonal pentatonic lesson..Hopefully you’ve checked out the posts on two string patterns and part one of the diagonal forms post and have gotten the shapes and visualizations down and under your fingers. (if not – just take a moment and check out the other two posts).
.
In this lesson, I’m going to continue the process of combining the two approaches into 5-note diagonal shapes.
.
5 Note Diagonal Pentatonics
.
Perviously, I took a look at one 5 note pattern on two strings. This can be done by either putting 2 notes on one string and 3 on another (1.e. a 2-3 pattern):

..
or by putting 3 notes on one string and 2 on another (1.e. a 3-2 pattern):
.
 .
.
..
Note:
Those of you looking at the picking pattern closely may notice that I play the 3-2 pattern with a partial sweep instead of strict alternate picking. While the 2-3 pattern can be swept as well, you’d have to start it on an upstroke:
.

.
From a picking perspective – I find the 3-2 typically works best when ascending and the 2-3 works best when descending – but from a fingering standpoint – sometimes the reverse of this will be true. A little experimentation goes a long ways here.
.
Working with these forms:
I’ve documented every 2-3 and 3-2 combination here – but in general I don’t recommend spending a lot of time practicing forms that you’re not going to use.
.
Instead, try the following:
.
- Take the shapes that you like (or shape if only one works for you)
- Practice it with a time keeping device like a loop or a metronome
- Practice it with consistent picking or legato (i.e. using hammer-ons and pull offs) played over a chord to supply a harmonic context.
.
You may want to start with an E minor or Em 7 and then try other chords like C Maj 7, G Maj 7, F Maj 7, D min 7 or A min 7.
.
- Practice the pattern in different rhythms
.
“Ceci n’est pas une pipe” or when is 5 – 4?
.
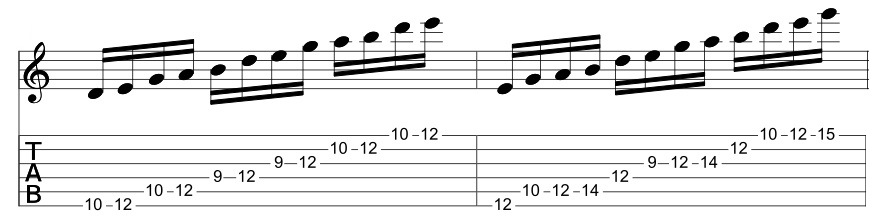
In the previous lesson, I talked a little about altering the rhythms of any sequences that you’re playing. Dividing the beat with a different number of notes than the notes in your phrases can add some rhythmic tension and goose the melodic line a little. For example, here’s the initial 3-2 pattern from above moved in scale wise motion through each note of the E pentatonic minor scale. I’m playing the phrase below as quintuplets (i.e. 5 notes to the beat).
(If you have trouble counting the phrase try saying (“here’s a group of five”). If you do it over and over again in a shopping mall someone will probably call security – so you may want to use your internal voice for this)
.
On a more serious note – I’ve notated the phrase as 5/4 to make the rhythmic division clear. In the mp3 below – I’m playing the phrase over a 4/4 drum groove so there are 3 beats of space (5 beats + 3 beats = 8 beats or 2 bars of 4/4) before the descending line starts. Here’s the ascending line:
.

.
and here’s the descending line:
.

.
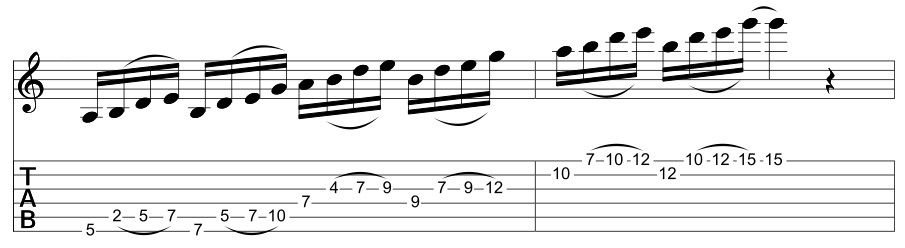
Now I’m going to take the same sequence but play it as 1/16th notes which does a very cool thing over the drum beat. Where the previous phrase has the first note of each pattern start on a down beat, here the starting note keeps getting displaced.
.
Note :
I’ve notated the phrase as 7/4 to make the rhythmic division clear (just like the groups of 5). In the mp3 below – I’m playing the phrase over the same 4/4 drum groove so there is 1 beats of space (creating a 2-bar phrase of 4/4) before the descending line starts. Here’s the ascending line:
.

.
And the descending line….
.

.
and here they are back to back
.
The Shapes of things….
Now I’m going to go through each of the individual shapes and make some notes. At the end of the shapes, I’ve included an mp3 of my preferred shapes in groups of 5 and then groups of 4.
.
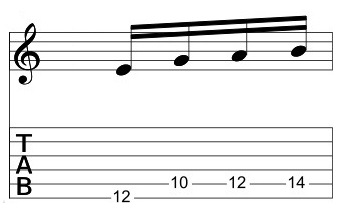
Pattern 1
(Starting on the Root)
.
Here’s the 2-3 shape on the bottom 2 strings:
.

.
And played in octaves:
.
Note:
The stretch on the D and G strings isn’t very comfortable – so I’d most likely use this fingering only when descending.
.

.
Here it is in a 3-2 shape. I’m playing the notes on the 3rd fret with the second finger, 2nd fret with the first finger and 5th fret with the pinky.
.

..
Here is the 3-2 shape in octaves. The same fingering pattern applies just add the 1st finger for the “e”.
.

.
Pattern 2
(Starting on the b3)
.
Here’s the 2-3 shape. It’s not very positional ascending – so again I use it primarily for descending ideas.
..

.
Here is the 2-3 shape in octaves:

.
Here’s the 3-2 shape. The symmetrical fingering of the 2nd and 4th finger in this pattern is interesting to me. I’m not a big finger exercise guy anymore, but if you’re looking for a fingering pattern to clean up your 2nd and 4th finger, smoothing out the octave runs on this shape will help with synchronization if you’re practicing it correctly. (You can check out the practice posts on my blog for some helpful practice tips – just look on the blueprint page).
.

.
Here’s the 3-2 shape in octaves:
.

.
Pattern 3
(Starting on the 4th)
.
Here it is in a 2-3 shape. I actually prefer this pattern to the 3-2 shape as I find that by using my first and second fingers on the 5th and 7th frets, the pattern is more comfortable to me.
.

.
Here it is 2-3 in octaves. I play this version primarily with alternate picking, but play two down strokes in a row to get from the G to the A to start every two string pattern on a down stroke.
.

.
Here’s the 3-2 shape. If the 2nd pattern 3-2 shape is comfortable to you – you may like this one as well.
.

.
Here is the 3-2 shape in octaves:

.
Pattern 4
(Starting on the 5th)
.
Here’s the 2-3 shape. I use fingers 1-3-4 for this one.
.

.
Here is the 2-3 shape in octaves. I use the same picking pattern I described in pattern 3 for this pattern as well.
.

.
Here’s the 3-2 shape. The focus here is the 3-4 finger shift.
.

Here it is in octaves.
.
Pattern 5
(Starting on the b7 th)
.
Here’s the 2-3 shape. This sits under the fingers very comfortably.
.

.
Here it is in octaves. This is a great shape to repeat a few times before moving to the next octave.
.

.
Here’s the 3-2 shape. This is a form I abandoned almost instantly – especially because the 2-3 form is so much easier.
.
.
Here it is in octaves. On the high B and E strings – this form can be useful when descending. I use 3-1-4-2-1 for the fingering pattern. On the ascending 5s and 4s phrase, I played all the patterns in the 3-2 shapes to keep the picking consistent – so if you’re going to be playing the patterns on just 2-strings, you may want to familiarize your self with both divisions.
.

.
Finally here’s an mp3 of each group in order. I recorded the patterns that I marked out as preferred patterns. Typically I wouldn’t switch between phrases (and picking patterns) like this. The same rhythmic idea as above (i.e. patterns notated for clarity but played over 2 bar 4/4 phrases).
.
.
Note:
These shapes are all adaptable to the blues scale as well by just adding an A#/Bb to the patterns.
.
“Ceci n’est pas une pipe” II or when is five six?
.
So here’s another way to manipulate the patterns into something more fluid. Both pattern 3 and pattern 4 have symmetrical fingerings. In pattern 3 for example, if I double the d between the 2 shapes I get a 6 note pattern with the same fingering. This works best as a descending line to my ears:
.

.
.
Here’s the same idea with pattern 4 using a doubled E.
.
( 8/7/11 -Note: the wrong graphic was posted here previously but this has now been fixed – SC)
.
.
By understanding patterns, it becomes possible to manipulate them and make them work for you. The key is to take one idea or approach and put it through the paces and try to get something out of it that works for you.
.
I hope this helps! In the meantime, if you like this approach, I have a book that includes this material you may be interested in
My Pentatonic Visualization Book

is 100 + pages of licks and instruction and includes demonstrations and breakdowns of two-string fingerings, diagonal pentatonics, sweep picking pentatonics, pentatonic harmony and much more! It’s available here.
.
Thanks for reading!
-SC


")


