Case Study
In part one of this series I laid a some ground work for the idea that improvisation can be utilized for a practice and compositional tool. In part two, I showed how I used that approach to write a song and develop a lick for the solo .
Here in Part III of this series, I’m going to use the lick I came up with to show how I approach practicing. While I’m demonstrating this to show how to get a specific lick under your fingers, this approach can be used for more rapid skill acquisition in any area.
Step 1: Separate A Specific Goal From A Desire
A lot of times, people will say they have a general goal like, “I want to get better at guitar” and then buy a book that they read a bit of any perhaps play something for a minute or two in an unorganized session and then play the same licks they were playing before and never open the book again.
“I don’t know why I don’t get any better. I practice all the time and have dozens of books but I keep playing the same things.”
It’s because you have a desire but you don’t have a specific goal.
Desire is important. It’s a motivator. It’s the why behind the things that you do. But desire doesn’t get things done.
“I want to be a jazz guitarist” is a desire.
“I’ve adopted a daily practice of learning a new standard in every key and transcribing my favorite artists soloing on those tunes.” is a more actionable goal that works in the service of the desire of becoming a Jazz guitarist.
Goals address what what and the how of the things that you do. The specific mentioned above is important as:
Specific Goals Get Specific Things Done.
Depending on the thing you’re working on, a setting a realistic time frame for the goal might be make it easier to achieve as well.
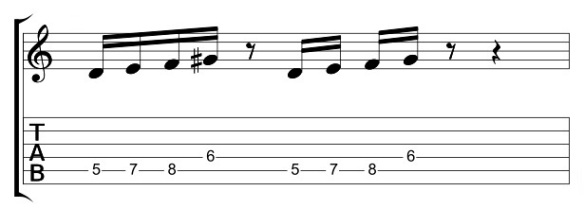
In this case, my goal is to try to get this lick:
up to the tempo of the song I want to use it in.
Step 2: Identifying The Thing(s) To Work On
In my example above, my goal is very specific so in this instance that’s the thing I’m going to work on.
It’s important to note that in going through this process you will very likely realize that what you’re working on uncovers all sorts of other areas that need to be developed to achieve that goal.
For a non-musical example, if you made a New Year’s resolution to loose 50 pounds by summer you might have identified working out at a gym as one of the things to work on but actually getting to the gym consistently might be a bigger problem in realizing that goal. So you’d have to address things like willpower / motivation or other issues in addition to the initial area identified (the need for more exercise).
In the lick above, there might be a whole host of technical issues (sweep picking, string muting, etc.) that needs to be addressed in order to be able to play on the lick. That aspect of it can become very frustrating if you didn’t anticipate it. Just be aware that working on one thing will often mean working on multiple things.
Step 3: Contextualize And Analyze
One common mistake that I see people make is learning a lot of licks and then not knowing how to use them. By understanding what you’re playing and how it works in a harmonic context, you can then take that information and re-contextualize it – (i.e. use it for soloing in other songs).
I already did a lengthy contextualization and analysis of this in part two of this lesson. But here’s a cliff’s note version.
In this case:

The lick is a diminished lick that I’m using as a solo over an ostinato.
Step 4: Deconstruct
So when faced with a lick like this:

many players will just set a metronome and just start whacking away at it to try to get it up to speed.
This is NOT the best way to address something like this.
I recommend breaking it down into components. So if I look at the first two beats and slow them down – essentially I see:

Which is just the same fingering repeated at the 8th fret:

and the 11th fret:

So if I look at that first lick again:

I can see that it’s the same basic idea on three strings in terms of picking and fingering – a minor 3rd on the same string, a single note on the next string and a minor third on the third string.
Or isolated further essentially this.
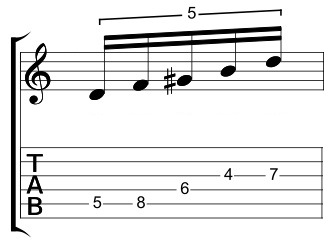
While the fingering might be adjusted slightly for the note on the middle string, the first thing to do is address this initial shape. Because if I don’t have this down then the rest of the lick won’t come together.
Step 5: Refine
If the lick features something really unfamiliar to me – I’ll break it down even further.
- My initial focus is to just make sure I get the right notes. Rather than even looking at 1/16th or 1/8th notes I might break it down to this:
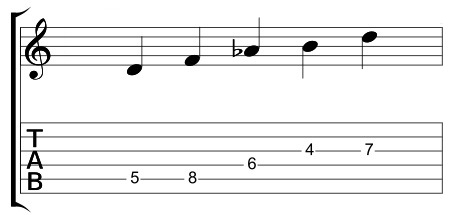
or even this:
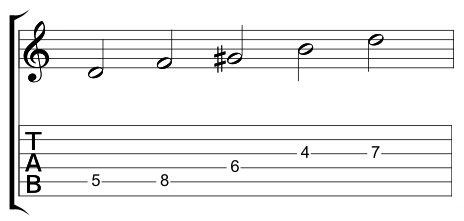
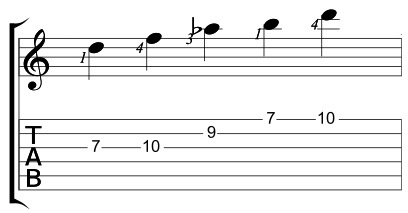
- The first thing to address is the fingering. I’ll use the 1st and 4th fingers for the notes on the outer strings and the 2nd finger on the inner string.
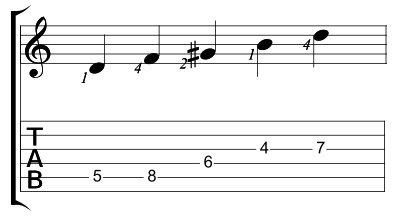
This will keep the fingering the same on the D-G-B strings:
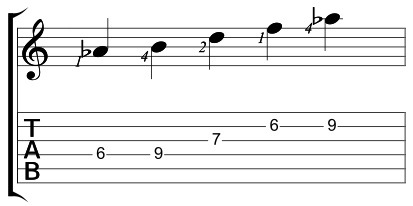
And when I get to the G-B-E strings the only finger I’m changing is the note on the B string:
- The next thing I’ll address is the picking. Note that I’m going to pick the form in a semi-sweep pick that might seem unusual:
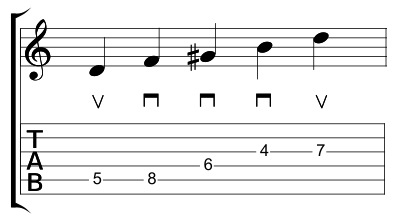
The reason for this can be seen better when you look at the lick in full position:

The reason I start the lick on an up-stroke is to create a small sweep going between patterns:
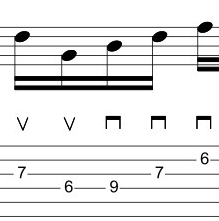
But this solution is just what works for me. You could use hammer-ons to play the whole lick as downstrokes and that would work as well:

The point here is to find what makes the most sense to you to play the lick to make sure that you’re playing it properly.
Step 6: Measure
Tim Ferriss has frequently thrown out this quote (proper citing needed)
“That which gets measured gets managed.”
When I go on a trip, my sense of direction is typically terrible. If the sun is out I can work out “the Sun rises in the East and sets in the West” to at least get my general bearings but at night – left to my own devices without a GPS of some kind – I will typically go in the wrong direction.
I mention this because past experiences have shown me that using perception without any kind of concrete markings is a terrible measure for how I’m progressing on something.
In my case, I do several things to help measure how I’m doing.
- I use a stop watch. I’ve been practicing for a while so I can sit for longer periods of time and generally stay on task, but for the beginner I’d recommend a 5-15 minute block. If I only have an hour to work on a few things, I’ll take 4 15-minute blocks and really focus on only one thing for that interval. That’s why the stop watch is so important because it allows you to focus on the task at hand without spending any mental bandwidth on how long you’re working on something. (Bonus tip – 4 FOCUSED 15 minute sessions over the course of a day will get you infinitely further than one unfocused 1 hour practice session at a time).
- I use a metronome or a time keeping device. If I can play the lick at the beginning of the session at 100 and end at 105 I’ve made progress.
- I write it down and by that I mean I (generally) keep a daily log of whatever I’ve practiced for whatever length of time I practiced it for and make any notes of things I addressed.
Example:
“3/13/16: 5-Note Diminished run- 15 mins @160. Work on articulating middle notes.”
That’s really important. So many of my students who say that they’ve never made progress before become VERY surprised when they have to write something down and REALLY see exactly how much (or in most cases how little) time they’ve actually put into something.
Step 7: Play it (or perform it, or do it) and observe it
Okay – we’ve covered a LOT of preliminary groundwork but the reason for that is because practicing something wrong will only make you better at playing it wrong and you will plateau at a much lower performance level. Playing it correctly (i.e. with no tension, proper form, timing and phrasing will take longer in the short run but will save you insurmountable time in the long run.
I hope you’ll take this advice from my own experience. I have had to start from scratch – from the beginning – TWICE – because of all of the bad habits I picked up and had to get rid of. Had I know what I know now, I could have gotten where I am now in 1/4 of the time.
Here’s the trick to practicing this.
You need to really focus on what you’re playing and pay attention to how you’re playing it. But you need to do this in an impartial way.
This means divorcing yourself from the outcome and just focusing on the moment. The way I do this is somewhat schizophrenic in that when I practice I almost view it as if someone else is performing it. While I realize that this may sound insane – the point for me is to not get caught up in judging myself (“that sucked” doesn’t help you get better) but instead to focus on the process (i.e. the physical mechanics of what I’m doing. “Is it in time? Is it in tune? Am I playing that with minimal hand tension?) The goal is to be as impartial an observer as you can be and just focus on the execution.
To do this, you’ll want to perform it at a level where it’s engaging (don’t make it too easy) but not so difficult that it’s overwhelming OR where you’re bringing in bad practice habits.
When I was in high school I used to just practice everything as fast as I could and then use a metronome to try to make it faster and all that did was had me play with a lot of tension and not in a rhythmic pocket. I could never figure out how people could play effortlessly and smoothly and it was years later that I realized that they played that way because they practiced that way.
Step 8: Correct
This is where the adjustments happen. If my hands are tense, I adjust to play with less tension. If my rhythm is off, I adjust to get back in time. If other strings are ringing out, I adjust my hands to mute the strings better.
Step 9: Isolate the problem area(s) – Deconstruct Again
If I’m working on a big lick and have a problem switching position – I’ll apply this entire process to just that one problem area and correct that. Don’t spend 15 minutes playing 100 notes if you’re tripping up on 4 in the middle. Get the problem area sorted out and then (once that’s worked out and smooth) work on playing the areas immediately before and after the problem and ultimately playing the whole thing.
Step 10: Play/perform/do it and observe it again
So I apply the correction. When I get to the point where I can play it 5-6 times in a row perfectly, then I’ll adjust appropriately.
This Specific Lick:
Here’s how I tackle this:

- Since it’s a repeating 5-note pattern, I start with the first 5 notes and establish a fingering and picking pattern. I practice that with proper technique and timing and get it to where it’s smooth and effortless at a tempo.
- I repeat this process with the 5-note pattern on the D-G-B strings and on the G-B-E strings, again getting each individual pattern smooth and effortless. Spending more time on the first pattern gets these patterns under my fingers more rapidly.
- Once I have the three patterns down I’ll focus stringing them together in position.

- Once that position’s down I’ll do the same thing in the other positions:

and

- Then I’ll focus on tying them all in together and look for trouble areas. One issue I had with this pattern is making the switch from the high E string to the first note of the next pattern on the A string.
- In this case, once I could play the full pattern with 16th notes at 160, I cut the tempo in half and started working on 32nd notes at 82. I typically raise the metronome marking anywhere from 2-5 bpm when developing something like this until I get to my desired tempo. The end tempo is typically 10-20 bpm above where I’m planning on playing it as playing it live with adrenaline kicking it in, we always play things faster so I like to be prepared (or at least more prepared).
That’s the process in a (rather large) nutshell!
My recommendation is to give it a go with something that you’re specifically trying to learn and see how it works for you.
- You may find that it takes you longer than you expect it to
- You may find the process uncovers a LOT of other things that need work
Those are both okay! They come with the territory. The good news is once you start doing this consistently, you’ll find that you make REAL progress in the things you’re working.
Here’s the big secret no one is probably telling you:
Practice requires practice!
Just like anything else, you actually have to practice practicing to get better at it (practicing).
The good news is you CAN get better at practicing and in doing so you will find that it actually takes LESS time to work on things because you get more efficient at what you’re practicing and how you’re practicing it.
As I mentioned before, I am working on a whole new pedagogical model that uses this methodology as it’s core to get better playing results in a shorter period of time. I’m just about through the development stage – but if it’s something that interests you – please send me an email at guitar (dot) blueprint @ gmail (dot) com – and I’d be happy to send you more information once it’s ready.
Finally, consistent and steady wins the race
To get better at something isn’t any secret at all. It’s putting in consistent focused time, day after day.
- Be clear on what you want to do
- Be clear on HOW you’re going to do it
- Do it every day until it’s done
Move on to the next thing and repeat
I hope this helps and, as always, thanks for reading!
-SC
