Rough Hewn Trio – Some Live Excerpts

The Rough Hewn Trio –  an instrumental trio consisting of Chris Lavender on Warr guitar, Craig Bunch on drums and myself on guitar are getting back into the rehearsal cycle and gearing up for some shows this spring.  To get a feel for what the shows will be like here are some live excerpts from some improvisations we did this fall.  The live sets – will include a combination of pre-composed and improvised material.

For those of you who are interested – this session is all drums and laptops.  I’m running Pod Farm and Sooperlooper and Chris is using Guitar Rig. (an amp was used to re-amp the guitar in 1C – which had some gnarly digital distortion tho…)

Note:

mp3 playback is sometimes a little glitchy in Safari.  If it doesn’t play in your web browser – you may just have to reload/refresh the playback page.

Enjoy!

-SC

Improv 2b

Improv 2a

Improv 1c

POD HD vs Pod Farm: A Cost Comparison

One thing that occasionally drives me crazy is trying to find out about a piece of gear – finding a googled link – reading through a multi page posting involving specific gear only to get to a final point of, “Oh I don’t have the unit and I’ve never tried it – but I’ve read the specs.”

Having prefaced this – with any luck this post won’t make you crazy.

I have been taking a good look at the POD HD 500.  One thing I like about the laptop rig is being able to set things up quickly – but as a friend of mine once quipped about another unit, “…you can’t check your e-mail on dedicated hardware – but it’s also much less likely to break down on stage.”

Another nice thing about dedicated hardware is the fact that it’s self contained.  There’s something about being able to plug something in and be up and running in no time at all.  Even as compact as my laptop rig is – it would still be faster to run through the HD than setting everything up on my laptop.

The price tag – Part I

The POD HD 500 will run about $500.  For that you get the same ins and outs that you got with the POD X3 – 16 amp and cab models (apparently the modeling is built from the ground up in a completely different way than the previous pods – hence the “HD”), about 100 effects and an onboard looper that can loop audio up to 48 seconds (in 1/2 time mode – 24 in regular speed).

If you’re running POD Farm 2.0 on a laptop consider this for a moment:

A second generation Macbook will run you at least a grand.  You really need a 7200 rpm drive – and that isn’t standard on most computers so you’re looking $50-$100 or more (assuming you’re installing it yourself) and 4 gigs of memory or more (if not already installed – again let’s say $50-100 depending on memory and model) – so let’s just average $150 ($75+75) for memory and drive costs.

You’ll need an audio interface.  If you use line 6 gear – you can get a cheaper rate on Pod farm but it’s usb… Let’s assume for a moment you’re going to go whole hog and go with a high quality audio interface.  An RME Fireface will run you at least a grand – so let’s also assume you’re going to go “budget” and get an Apogee Duet for $499.  If you upgrade to a break out box – it’s a minimum of $95 more for the unbalanced version.

You can get Pod Farm Platinum for $149 on Amazon (and for $184.99 get the Ilok key as well) – This is opposed to the $299 you’ll be charged from Line 6 for Platinum alone.

From a software standpoint I use AU Lab (which comes free on the OSX installer disc) and Sooper Looper (which is shareware – but you should pay Jesse something for the product – it’s one of the best software investments you can make).

If you don’t want to have to click on a mouse for a set – you would need a midi controller.  I like the shortboard mk II (approximately $199 – but it you may want to spend the $7-10 bucks for a 10-15 foot USB cable if running it live).  It’s usb powered, well constructed and works really well (except for the fact that Line 6 currently doesn’t support displaying patch names on the controller – only midi values – this is a big minus for live use – because you have to stare at the screen to see what patch you’re playing.

So for a live laptop rig (from scratch) or The price tag – Part II

Computer:  1000 + 150 (average memory and drive cost) + $599 (Duet + breakout box)+  $184.99 (Pod Farm + Ilok key) + $199 shortboard = $2133!!!!

That $1995 for an Axe-FX ultra is starting to look like a steal (although the Axe-FX midi controller is $799 – which makes the shortboard look better and better all the time)!  Comparatively, an Eleven Rack Mount will run you about $760 or so.

This doesn’t include a laptop bag, external drives (for looping/recording to), IRs  (impulse responses), conditioned power supply, USB hubs, breakout boxes or other expenses.  To put it in perspective however, you probably already have a computer and an audio interface of some kind so many of these other expenses are not critical.

From a cost perspective – there is no comparison between a POD HD and a laptop rig running POD farm.

But here’s my thought on it.

I can’t imagine Line 6 not issuing a POD farm version of the HD models.  The code for the models is already written and they already have a wrapper (Pod Farm).  My guess is that they’ll wait a while for hardware orders to fill up and then release a POD farm version.

I have no idea what the hardware is in the POD HD unit (it runs up to 96k internally) – but I have to think that:

1.  My laptop has more memory, hard drive space and a faster processor than what’s on the HD (or the Axe-FX or the Eleven for that matter)

2.  Related to this – that I can run more than 8 effects if need be on my laptop – which it the limit on the HD

3. The Apogee has to have better A/D/A conversion than the POD HD.

4.  While the built-in looper is a great addition – that it doesn’t hold a candle to Sooperlooper for features or loop time.

Does this mean that I’m dissing the HD series?  Not at all.  As you can see from the economic breakdown above – I think the HD is an amazing deal.

The Pod X3 was already useable – and even not having tried the HD (cough, cough) – I have to think it’s sonically a step forward. Heck if I could clear out some money – I might be willing to pick one up for sheer convenience alone.

But in going the laptop route – I’m making an investment in the future.

I’m putting my money on better software and better plugins and knowing that if the POD HD sounds that much better than the POD X3, that the Pod Farm version may even blow it out of the water.

There’s always cheaper ways to do things.  For a long time I ran a POD 2.0 into a Fender DeVille and always had people asking what I was using to get my tones.  As a general rule, I would suggest to get the best gear you can afford and make the most of it.

One final thought

If you own a car – you will always be sinking money into it – insurance, gas, oil, tires, breaks, maintenance, etc, etc.  It’s expensive – but it beats walking.

When I was at Berklee –  there was a shred guitarist whose pedal board had about 30-40 pedals on it and needed to be carried by two people.   This was before the signal hit the full rack space unit.  All of this gear was for 3 tones – clean, metal rhythm and lead.  Additionally, he had 2-3 Rocktron hush units in the rig.  When he stopped playing there would be a literal sound of locusts trying to break through the speaker before the gate kicked in (here’s an approximation of the sound: wheedley-wheedley-wheedley-wheedley-SCHHHHHKKKKKKK – silence).

A laptop guitar rig is kind of like a car.  If you own a guitar, you will always be sinking money into it (and the gear used with it) as well – but it beats walking with a pedal board with 30 pedals on it to a gig.

Thanks for reading!

-SC

.

POD HD Flash Memory Update, POD HD500 In Live Use And More Thoughts About Gear

SOME THOUGHTS ON MODELING, GEAR ACQUISITION AND THE POD HD500

LINE 6 POD FARM 2.5 UPDATE AND POD FARM FREE ANNOUNCED

APOGEE DUET 2 ANNOUNCED

New SooperLooper Update 1.6.16

OCTAVE4PLUS A4 – .007 STRING REVIEW

BKP (BARE KNUCKLE PICKUPS) 8 STRING COLD SWEAT PICKUP

.

LAPTOP GUITAR MUST BUY – GATOR VIPER ELECTRIC GIGBAG W. LAPTOP COMPARTMENT REVIEW

HOME FOR THE HOLIDAYS – GATOR VIPER GIG BAG REVIEW

SCHECTER OMEN 8 STRING REVIEW PART 2 – STRING OBSERVATIONS AND SOUND CLIPS

SCHECTER OMEN 8 STRING REVIEW

APOGEE DUET BREAK OUT BOX OVERVIEW

LINE 6 FBV EXPRESS MK II REVIEW

MONO PRODUCER BAG (LAPTOP BAG REVIEW)

.

POD HD500 AND POD FARM CONJECTURES

STEINBERGER GEARLESS TUNERS – REVIEW

TOOTHPICKS AND THEIR PROPER PLACE IN GUITAR MAINTENANCE

WHERE TO GET YOUR GUITAR REPAIRED IN LA OR LESSONS FOR THE SELF EMPLOYED MUSICIAN

GUITAR STREET IN HO CHI MINH CITY VIETNAM

RIG AROUND THE ROSIE OR MEDIATIONS AND MEDITATIONS ON GEAR

LINE 6 POD FARM 2.0 OVERVIEW

VARIAX AC700 REVIEW/WORKBENCH OVERVIEW

FNH ULTRASONIC GUITAR REVIEW

GEAR

.

AU LAB/POD FARM 2.0/LIVE LAPTOP RIG TUTORIAL PART 6 – Dual Rig Distorted Tones

In previous instances – I haven’t had a whole lot of success with running both A and B channels on a dual rig – but I thought I would try to steal a tone idea from Joe Bonamassa, and give it another shot – this time running a dirty and clean tone at the same time and blending the two for a more complex tone.

This post won’t be as in-depth as some of the other AU LAB posts I’ve done as I’ve detailed a lot of the process already.

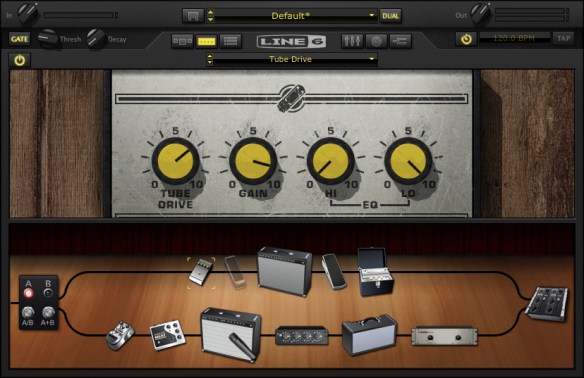
As a starting point – here’s the DIST 2 rig:

The pedal configurations are very similar to what I set up here:

The wahs and volumes are both assigned to the same pedal so that 1 pedal controls both functions.  Ditto for the distortion and the reverse delays (usually off) which I can kick in for some grand psychedelia.

In the next version of this rig – I would probably set the Mix knob of the delays to the expression pedal so I could dial in the amount of reserve delay I wanted when it was on.

As another option – you could also set the volumes independently – one to the short board volume and one to an expression pedal –which would allow you to have a clean tone and dial in the amount of distortion you wanted a la Jim Thomas of the Mermen.

EQ

One of the biggest problems I’ve had when using dual rigs in the past is a weird boosting of certain EQs.  Particularly on the low E string.  In this case what I’ve done is to cut the bass in the 80 Hz by 6db on the Graphic Eq in the signal chain.    This was an idea I got from a REALLY cool acoustic post that Bob Brozman had on his site detailing his live rig and correlating specific Eq ranges to strings.  It worked pretty well and helped tame the woof on the low E string.  There’s also a 3db boost at 750Hz and a 2db cut around 3k.

Kicking on the distortion on the distorted side take out some of the extreme low-end and compresses the low E string in a pleasing way.

The Tube Screamer settings I’m using are:

Drive 24%

Gain 66%

Tone 13%

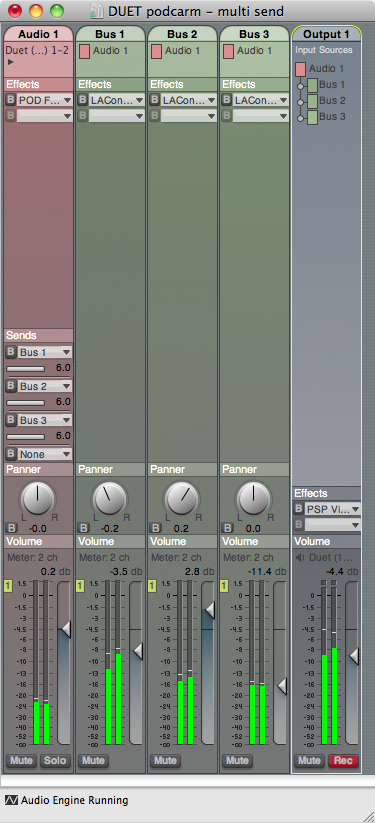
Another thing that has helped with this is splitting the Stereo send.  I’ve panned these to 27% on either side.

Here’s the mixer setting:

Another important note – this is running out mono to an amp – so that will further affect the sonic split.  I’m running the rig in stereo because I like the sounds of the effects in stereo better than mono – but ultimately this is going down to a mono signal.

Here are the Silver Marshall Model Settings:

In live use – the Atomic is really bass heavy – so I’ve cut out a lot of the bass here and typically have it at 3-5 depending on how the room sounds.

Gaining Perspective

Another problem that comes up with laptop guitar – or modeling in general is that it’s really easy to overdo it on the gain.  When I got my first distortion pedal – I remember turning all the knobs up 100%.  It took a while to get to where I started experimenting with eq and gain staging to try to get some saturation – but keep the overall definition.  The use is gig specific –  If the sound requires a lot of gain and sludge – then I go for that – but in general – I definitely try to scale it back a bit.  I can always add an overdrive or distortion pedal if I need to increase the amount of gain – .

And the clean settings:

The volume is a constant adjustment issue here. (also note the eq differences from the settings in the AU lab tutorial).  Here – I’m just trying to find some good mix of dirty with a bit of clean for clarity.

Here is a short example of the tone – this uses the clean channel from the fender and the dirty channel from the Marshall.  This was just the setting with the same AU lab settings in the AU lab posts – recorded directly in AU lab.

One thing I realized after I tracked this is that the feedback on the Tube echo is set a little too high.  I usually leave them both around 4 so it gets a little verb/slapback sound.

I have the tube drive on the Fender off for this example but can switch it on for extra gain if I need it.

In the meantime – you can download this tone here.

Hopefully this has been helpful.  I’ll be doing a post on using AU lab as an acoustic pre for live use soon.

Thanks for dropping by!

-SC

Laptop Guitar Setup Or Notes From A Live Show

For the Onibaba show last night, I decided to use only the laptop rig that I’ve been working with and not use the typical Atomic/Pod X3 rig that I use.  The short of it is that from a technical standpoint – it worked without a hitch.  I don’t think that anyone noticed that there weren’t “real amps” there and tonally it fit the bill.  There were, however,  a few little quirks that needed to be sussed out.

1 The room we were playing in had very high ceilings and was really boomy.  Sounded great on acoustic instruments – but I had to be really careful of not getting washed out tone wise.

2 The midi assignments for Sooper Looper stopped working when I used the FBV express board.  The board worked fine – but I’ll probably just return it and get a breakout box instead.  The FBV Express can control about 6 functions – but ultimately I’d like to control about 10-12 functions – so I think it makes more sense to just trigger it manually.

.

No one size fits all

.

As I’ve mentioned here, there are a number of variances that occur with modeling:

“I’m in the process of working on sounds on the X3 Live for the show – and tweak PA vs. amp sounds.  One thing I’ve noticed with modeling is that there are at least 4 different scenarios for setting up sounds:

1.  Headphone patches – i.e. practicing or recording

2.  Playing through an amp at low volumes

3.  Playing through an amp at high volumes

4.  Playing through a PA.

You might think that there wasn’t a lot of variance – but the differences between these parameters are huge.  I have patches that sound mediocre at low volumes and sound really good when the volume gets goosed a bit.  Headphone patches that work well at home and fall apart live – and vice versa.”

So along this line  I knew I’d have to tweak some patches I’d been using  and make some new ones for the show.  I decided to pull some patches I liked and demo them at low volumes in my apartment and then try to fix anything glaringly wrong at the show.

.

Reverse Engineering or Start with the output

.

A while ago I mentioned I bought a back up Atomic amp from Guitar Center for $149.  The listing was for an Atomic Reactor 1×12 – but both the 50 watt and the 18 Watt are 1×12 – so what I got in the mail was the 18 watt.  Initially, I was a little disappointed – but given that you can run it on 115V OR 240V – I figured it was a good investment and that in a worse case scenario I could sell it and make my money back.

When I set up my sounds – I set them up on the 18w.  There’s no master volume knob – it just runs at 18 watts – but I could control the output with my duet and set things up at a low volume.

The Atomics in general are very bass heavy so I knew from the get go I’d have to roll a lot of the bass down and tweak other mid and high levels.

AfterI got a tone set up on a lark I decided to try to run it stereo.  I pulled out the 50 watt Atomic and there were some weird grounding issues.  While I was trying to suss that out I decided to A/B the amps – and see if there was a difference.  Suprisingly  the 18 Watt sounded MUCH better than the 50 watt.  The 18 watt does use different tubes (2 EL34’s and 1 12ax7a as opposed to the 6l6GCs and the 12AX7 in the 50 watt) – but I think that just having the amp full bore made a big difference.  The more I cranked the output volume on the Duet – the more the tone sagged in a very pleasing way.  Also the 18 watt is DEAD quiet so that solved the issue of the loud fan on the 50 watt version.  I knew the 18 Watt was loud but I wasn’t sure if it was fully going to be able to hang with drums, bass, amplified trombone and the awesome sonic terror of Vinny Golia – but it did.

.

IMPORTANT DUET NOTE: 

When setting output volume on the unit – if you choose “Instrument amp” – you get a flat volume that you are unable to control – by setting it to “Line Level” you can adjust the output with the knob on the Duet.

.

I think the Duet output went to ten – I never went higher than 5 – and at one point turned down to 3.  18 Watts was more than enough for the gig.  The drag now is I like the amp enough to sink more money into it and have I have the desire to get the amp re-tolexed.  Maybe with like a fender tweed or something.  In the meantime I used the 18 watter as a low volume template and could then tweak it further in the space as I needed to.

.

Organization is key

.

One reason to go digital is the rigs themselves they take up so little disk space you could save hundreds of them and have individual configurations for almost any situation.  This is also one reason NOT to go digital as it’s easy to get overwhelmed with options instead of narrowing it down to a few.

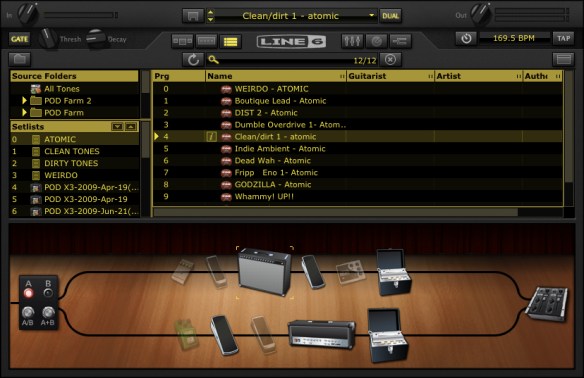
A great feature about POD Farm 2  is that you can create and organize folders with drag and drop ease.

For example let’s begin by looking at how I built my live setup:

First – here’s a sample patch:

.

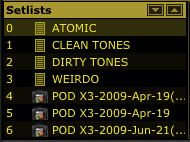
Now if you look over to Setlists:

.

You’ll see I created a folder marked ATOMIC.

.

Tip:

If you want to control changing setlists from a Midi Controller – Just control click on the up or down arrow, in the Setlist window and then press the midi controller feature you want to use to control it

.

Within that setlist, I have a series of patches – I name them all Atomic – so I can find them easily if I have to.

.

Another Tip:

If you want to control changing Programs (i.e different patches) within a setlist  from a Midi Controller –  Go to the top of the screen – where the patch name is:

Just control click on the up or down arrow to the right of the Patch name, in the and then press the midi controller feature you want to use to control it.

I’ve set it up to be used withthe up and down arrows on the right of the shortboard.  I decided to have one  folder marked Atomic and then just scroll up and down through the folder to get to patches. You could just as easily set up multiple folders and organize patches (and if you have only 4 tones per Setlist – you could just A/B/C/D them with the shortboard and use the up and down arrows to go between setlists – just like the setup on the PODs).

When I used the pod X3 with the docking station in the Atomic – one feature I would use a lot was the dual rig feature with one rig with a speaker sim – and one with none – It gave the sound a lift in a pleasing way.  At the gig I just ran them all through the 4×12 IRs I’ve been using and it sounded fine – I may put the IRs on a bus and mix the two to see how it sounds – but this is the rig I’m using as of this post.

Clarity wise – I felt it had a noticeable advantage over the X3 – but I’ll have to do more experimenting.  In a future post – I’ll detail a Dual distortion tone I’ve been developing and discuss some more specifics with using a laptop as a guitar processor live.
.
Thanks for reading!
.
-SC

AU Lab/POD Farm 2.0/Live Laptop Rig Tutorial Part 4

Welcome back!  In this post, I’ll be integrating SooperLooper into the AU LAB Live rig I’ve been building.  If you haven’t read the earlier posts about this (part 1, part 2 or part 3) you may want to read those before continuing on.

An Important note about sample rates:

From here on out – if you’re going to be incorporating other audio into the session (including looping in SooperLooper) – you’re probably going to have to set the sample rate back to 44.1 (and set the Impulse responses back to 44.1).  If I’m not looping –  I try to set the rate as high as I can, but know that it’s going to have to get bounced down to 44.1 for recording, etc.

SooperLooper:

The next step is to set up Sooper Looper to be able to loop audio.  I’m going to put SooperLooper on a bus, so I can either send audio to it or bypass it as need be.

In AU LAB – – > Sends – Select BUS 1.

A new Bus Strip will open.

Under Effects – scroll down and select Sooper Looper.

When you do this, Sooper Looper will open up in 2 windows:

The first window:

And then the GUI

A Quick Tip:

When using sooperlooper, you need to increase the “main in mon” to hear any output.

You can set up multiple stereo loops in Sooper Looper by selecting them from the SooperLooper menu.

I like to have 4-5 different loops set up.

You could do more (your limits are your system resources- but since I’m on a laptop – I want to be able to see everything (and this takes up some screen space).

Another Quick Tip:

You can set SooperLooper up for midi controls but the key binding options will help you navigate the window pretty easily as well.  They’re found under SooperLooper Preferences.

For example – you need to select an audio loop in order to record to it.  If you look at the bindings above you’ll see that select_loop_1 is currently set to “1”.

So if you’re on the active SooperLooper window and hit 1 – you’ll arm track 1. (Note the new line to the far left of SooperLooper that shows which track is armed for recording)

Make sure to save your AU Lab session.

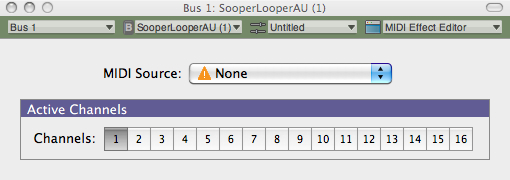
Setting up MIDI control in SooperLooper:

In the first SooperLooper window:

Click on the arrow next to essej.net: Sooper.

Select Midi Effect Editor

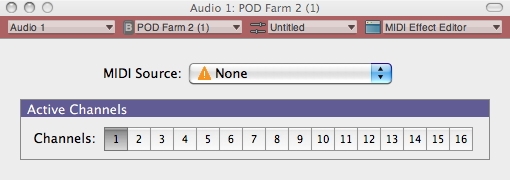
Set the MIDI Source to the controller you want to use and set the Midi Channel to the channel you want to use.

Note:

If you don’t see the controller then go to Audio-Midi Setup application (or you could find it in the Application – –  > Utilities folder) and click on the MIDI tab.

To Set up specific commands in Sooper Looper, you’ll need to go to Midi Bindings under SooperLooper Prefereces:

MIDI Binding Steps in SooperLooper:

Click “Add New”.

Select a command under “Command/Control”.

Click “Learn”.

Press the midi control you want to use to control the function.

Click “Modify”.

When you get all the functions learned  – click Save.

Also make sure you save bother you SooperLooper AND your AU LAB session.  All the midi functions should be there when you reopen it – but if they aren’t and you’ve saved them in Sooper Looper – you can just “Load” them back in.

AU Lab : Transport

Here’s something pretty cool – the Window tab in AU Lab – select Show Transport

That will bring up the following window:

The MIDI Clock Source will probably default to Disabled – If you set it to Internal – you can use to tap tempo feature to synch effects or Sooper Looper  by tempo.  Pretty cool feature!

(Also in the the Window tab in AU Lab there are some other useful options particularly –  Show CPU Load – which brings up a handy visual meter to let you see how your project is doing with it’s resources.)

Additional Resources: SooperLooper

SooperLooper is an incredibly deep plug in.  It would be easy to devote a 5 part article to just the feature set and use of it – The  Sooper Looper forum is also extremely helpful with various Sooper Looper issues, and also has a specific SooperLooper AU LAB section.

Next time – I complete the rig (for now)

You can find all of the laptop guitar rig posts on the Blueprints tab on the top of the page.  Once on the blueprints page – just scroll down to the Laptop Guitar Rig section.

Thanks for reading!


AU Lab/POD Farm 2.0/Live Laptop Rig Tutorial Part 3

Hello again.

If you haven’t read the first or the second posts about setting up POD Farm in AU Lab, you may want to review those first.

Automating Parameters with MIDI Learn:

Now let’s complete the clean guitar setup and then automate some parameters in POD Farm.

First I’m going to delete the delay and add a volume pedal.  You’ll find it under “Dynamics”.

It could just as easily go before the amp, but in this case I want to put it between the amp and the delay, so I’ve deleted the Analog delay and placed a Tube echo after the volume pedal.

Next I’ll add a wah.

And an overdrive pedal.  I’m going to have a full on distortion tone on the other channel – but this gives me another tonal option.

Across the Very top of the Pod Farm Window (labeled Audio 1: POD Farm 2 (1))

You’ll see 4 tabs underneath that window reading from left to right:

Audio1 –> POD Farm 2(1) –> Untitled –> Line:6 POD Farm 2

Select the arrow to the right of Line:6 POD Farm 2 and scroll down to Midi Effect Editor:

You’ll notice that the MIDI Source is None – which in this case means that the shortboard is getting power and sending midi, but it’s not being received by POD Farm/AU Lab.

I’ve selected the POD short board for the MIDI SOURCE, and will keep it on midi channel 1

POD Farm: Midi Learn – Volume

Now that the midi signal from the shortboard will get to POD Farm, I can use the Midi Learn function.

Let’s start with the volume pedal.

If I select the volume pedal in the signal chain a close up of the pedal will open up in the window above the signal chain.

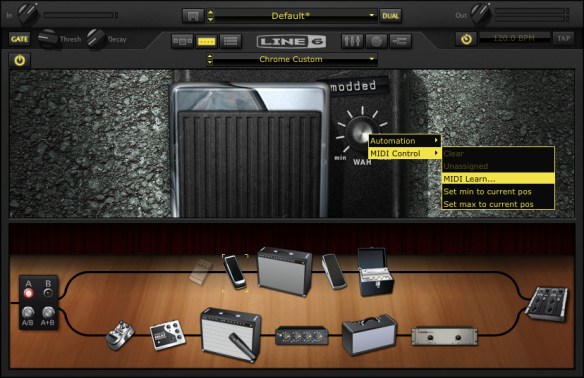
Since I want to control the volume of the pedal  – I want to cntrl – click the level knob on the pedal.

That brings up the following option:

Choose MIDI Control – – > MIDI Learn.  Now if I move the volume pedal with my foot the level on the screen will change as well.

(If you make a mistake you can choose the “Clear” option above MIDI Learn and repeat the process.)

Note:

If you wanted to do this with a distorted amp and roll off the gain, you could select the amp and cntrl – click the Gain knob.  Even better, with the “Set min to current pos/Set max to current position” you could use the volume pedal for subtle variations in gain.

POD Farm: Midi Learn – Volume

Let’s see how this works with the Wah pedal.

First, as opposed to the volume pedal, which is always on, I want to be able to turn the wah pedal on and off.

The “secret” here is to automate the On/Off button under the “Gate” Button.

By selecting the MIDI Learn function and pressing down on the toe switch, that switch now turns the pedal on and off.

Next, with the toe switch on – I’m going to set the volume pedal to control the WAH sweep.  Just cntrl-click the actual wah switch for MIDI Learn and move the pedal.  The pedal will now control the sweep.

I like the Chrome Custom pedal, but don’t like the extreme high end, so I’m going to limit the scope of the sweep.  I’m going to turn the knob to 85% or so and then cntrl- click, but this time instead of selecting MIDI Learn, I’m going to choose “Set max to current position”.

Now when I sweep the wah it only goes from 0-85%.  This is really useful if you only want to filter a specific bandwidth.

I’ll set the Overdrive to an on off setting – the same way that I did with the wah.

That is enough for a general clean tone.  Now onto…

The Dirty Channel:

I’m going to spend a lot less time on this as I’ve already shown how to set up and automate effects on the clean side.

Here’s the default set up:

A brief note on tone:

In distorted models, you can create amps with gain structures that you could never create feasibly in the real world.  One problem I hear a lot is the desire to crank the gain and cut all the mids.  That creates a particular sound – but it’s not one that cuts through very easily.  The overdrive will boost the channel a bit in general, but it’s easier to ADD distortion live than it is to take it away.  Again, louder isn’t always better.

Basically I’m using the same Volume, Wah and delay as the clean channel above.  The only differences are in the amp and overdrive pedal (and that I’ve moved the placement of the volume pedal.)

Here’s the overdrive setttings:

POD Farm: Midi Learn – A/B Switch

The next step is to set up a midi command to be able to switch from the A to B channel.

The secret here is to click on the mixer button so the A/B Box appears in the window above the rig.

All I have to do then is cntrl-click the A/B button and select a button on the shortboard and then it’s all set.

Save your Bacon:

Hopefully you’ve saved your POD Farm patch and your AU Lab settings, but if not saving them both are very self explanatory.

Let’s start with POD Farm:

Click to the left of Default and save as

In this stage, you can also make whatever notes you want as well for later reference which is a nice feature.

Another really cool thing about AU Lab is that when you save AU lab – it saves the settings on all of the effects in AU Lab.  So save OFTEN.

That’s it for this post.  In the next post, I’ll add Sooperlooper into the rig.

You can find all of the laptop guitar rig posts on the Blueprints tab on the top of the page.  Once on the blueprints page – just scroll down to the Laptop Guitar Rig section.

Thanks for reading!

AU Lab/POD Farm 2.0/Live Laptop Rig Tutorial Part 2

In the previous post, an AU Lab session (or document) was established and an A/B POD Farm patch was created.  In this post, I’m going to start modifying the patch to make it more useable.

Building the rig:

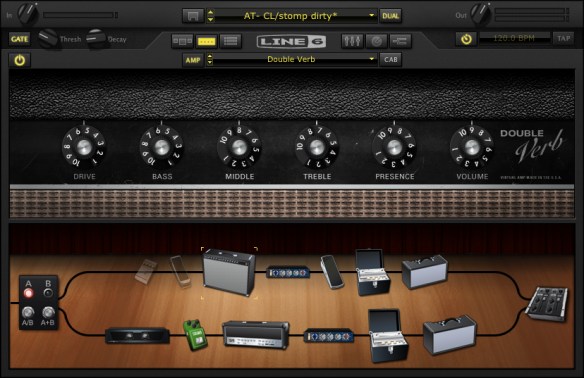
Okay first I’m going to swap out the amp. I like the Double Verb instead.

You can drag and drop amps into the signal chain, but if I click on the down arrow to the right of the AMP field – I can just scroll down to the Double Verb amp.

Here are the settings I’m using.

If you look in the left hand corner underneath the input knob on POD Farm, you’ll notice the global gate is on.  I tend to use the global gate at a low setting.  This came from a ruined session where I switched to a distorted sound that DIDN’T have a gate on it and squealed between each phrase.  Now I keep the master gate on to not worry about that scenario.

Compression:

Louder isn’t always better.

Compression has it’s place – but I try to play dynamically, so the compression is the first thing to leave the POD farm signal chain.

If you click on the compressor in the signal chain and then ctrl-click on the compressor you’ll get the following options.

Just select Delete.  If you change your mind you can drag and drop another compressor from the menu into the signal chain.

Another point to bring up, is that when I use an amp and effects – I try to use the same signal chain for all of them.  (This comes from years of playing gigs and having a bunch of effects pedals going through the same amp and reverb).

Looking at this set up, the mic pre (currently between the amp and the reverb) would be something that I would want in the channel signal chain in AU LAB instead of POD Farm – so that it was the same mic pre for any amp I’m using.

The first step is to delete the mic-pre from the POD Farm signal chain (using the same method as the compressor above).

Next (in AU LAB) in the Audio 1 channel – click on the arrow in the next available Effects field below PODfarm .

If you scroll down to Line 6, you’ll see that in addition to PODFarm, that each individual component of a PODfarm rig has been broken down into components (aka POD Elements).  This is so you can use individual effects or amps as an AU plug in which much less of a CPU hit than loading in another instance of POD Farm.

In this case choose: POD Farm Element – Preamp.  I’ve chosen Vintage UK.

Reverb:

The reverb would also be something that I would want in the channel signal chain – so that it was the same reverb for any amp I’m using.  (The other advantage is that by placing the reverb outside of POD Farm, when I change amp settings the reverb doesn’t cut off with the amp change.)

Delete the Reverb from the signal chain in POD Farm (using the same method as the compressor and the mic-pre above).

Next, (in AU LAB) in the Audio 1 channel – click on the arrow in the next available Effects field below POD Farm Element – Preamp.

If you scroll down to Line 6, choose: POD Farm Elements – Reverbs.  I’ve chosen Standard Spring.  Here are the settings I’m using.

Impulse Responses:

I use impulse responses rather than the speaker sims in Pod farm.  So the next thing I’m going to do is get rid of the speaker cabinet/microphone on Podfarm.  If I click on the CAB button – I’ll get a list of speaker cabinets and microphones used.  If I scroll to the top of the list – I’ll get “No Cabinet” which deactivates both the cabinet and the microphone.

Next, (in AU LAB) in the Audio 1 channel – click on the arrow in the next available Effects field belowPOD Farm Element – Reverbs.

Scroll down to Lernvall Audio and select LA Convolver.

Now I’m going to select to impulse responses to act as a speaker simulator.  I’ve experimented with putting multiple instances of LAConvolver  on buses and running multiple cabs, but since I want to run SooperLooper in the bus (Where I can loop guitar and any other incoming audio source), I’m going to just stick with a stereo set.

Select a channel and hit “choose” under file. In this case I’m using the free RedWirez cabinet I got as part of their birthday giveaway.

I want to use a high sample rate to get better definition so I’ve chosen 88.2 K. (or 2 times 44.1k)

I’ve chosen an SM57 on the grill and a KM84 about 3 inches behind the back of the amp.  I tend to start with the Wet gain in the center position and adjust as necessary.

A brief note:

I’ve mentioned this in other posts, but since I want to use the same speaker cab for all the amplifiers, I’m going with a 4×12 for familiarity.  Normally,  I wouldn’t match a double verb up with a 4×12, but since I’m going to be running a Marshall on the other channel, I’m going to just have to adjust the clean amp signals accordingly.

Fixing the Sample Rate:

If you notice, the plug in sample rate and the Impulse response sample rates are different.  It will work like this – but I want to use the highest sample rate I can for the most clarity.  There is a delicate balancing act that comes between high sample rates, stability and useable latency, so everything here is a compromise.

I’ll fix this with Audio Midi Set up :

First: click on AU Lab and look under Preferences.

When the preferences window opens, click on the tab marked Devices.

If you click on the expert setting arrow you’ll see something like the following:

Another  brief note:

I’ve set the CPU to 100% to avoid glitches.  I’ve also set the latency really high to attempt to keep the system stable.  Depending on the system and interface that you’re using, you’ll probably have to lower the setting to the point that you get glitching (or max out the memory) and then bring it up a little bit from there.  With the headphone out of the Duet – even with these settings the latency is suprisingly tolerable.

If I click Edit Device – that opens up the Audio-Midi Setup application (or you could find it in the Application – –  > Utilities folder)

Note:  I’ve changed the output format to 88.2.

Going back to the Audio-midi sample rate window – it shows:

An Important note about sample rates:

I’ll mention this again – but if you’re going to be incorporating other audio into the session (including looping in SooperLooper) – you’re probably going to have to set the sample rate back to 44.1 (and set the Impulse responses back to 44.1).  If I’m not looping –  I try to set the rate as high as I can, but know that it’s going to have to get bounced down to 44.1 for recording, etc.

While I’m on the preferences Tab I might as well set up recording to the external drive.  Click on the tab marked “Recording”.

Now if I click on the “Rec” button at the bottom of OUTPUT 1 in AU LAB, it will record whatever I do to the Lacie as the default location, in a 24 Bit AIFF format.

With the changes in this part of the tutorial, the AU Lab Input looks like this with some sample input:

You’ll notice that the output is a little off balance.

If you pan it to the left you’ll balance the signal out a little more. Here’s the setting with all the global FX so far.

You may want to save the AU LAB session now, if you haven’t done so already.

In the next session, I’m going to complete the clean channel effects and automate some parameters with the Midi Learn function to be able to make changes to the sounds with the Line 6 Shortboard.

You can find all of the laptop guitar rig posts on the Blueprints tab on the top of the page.  Once on the blueprints page – just scroll down to the Laptop Guitar Rig section.

Thanks for reading!

Setting Up “Testing Environments” Or Multi Layered Tones In AU Lab

One site that I always forget to link to and need to do so now is the Guitar Amp Modeling Blog,  which is just a really tremendous resource.  It’s really inspiring to me to see so many people working on pushing more and more into alternate live and studio approaches to guitar.

A couple of days ago I went to the Speaker Cabinet Impulse section of the forum and found that RedWirez, a company that sells a high end collection of speaker impulses is giving away their impulses from a Marshall 1960A with Celestion G12M 25-watt Greenbacks to celebrate their birthday!  The folder is about 107 MB of impulses that go from 44.1 KhZ – 16 bit to 96 KhZ – 24 bit.

There are 17 different types of mikes used for each IR set AND there are ambient mics to capture the back of the cab at various distances, room and wall mics as well. You can go to the link for that here.

I still have the recabinet set – which at $15 for something like 2000 irs is an amazing bargain as well.

But one thing that comes up in something like this is how do you sort through all those speaker sounds?

My solution is to set up a bunch of instances of LA convolver on multiple busses in AU LAB.

In this way I can set up one bus at a time and mute the other channels to be able to a/b/c everything.

Additionally, you can set up more complex sounds by combining different IR’s.

For example here are the IR’s used in bus 1:

and bus1 is the tone.

Here are the IR’s used in bus 2:

and bus2 is the tone.

Here are the IR’s used in bus 3:

and bus3 is the tone.

And the final tone of all 3 together:

To my ears, this creates a more full bodied sound than any one channel.  Each plug in takes up more processing power – so it may be a balancing act based on resources – but since AU LAB uses so much less CPU than something like Logic, it’s easier to pull off here.

In case you’re interested – here’s the patch the sound is based on:

Thanks for dropping by!

Building Blocks – or more examinations of a laptop guitar setup.

If you’ve ever seen the American dubbed version of Mad Max (the whole movie plays very differently with the original voices – I’m just so used to the original American release’s versions of Night Rider, Toecutter and the Goose –  that that’s the only one I can watch), there’s a moment where The Goose realizes that the person they’re about to arrest is an associate of ToeCutter, and the camera closes in on his face as he says,

“Well well well…”


I wanted to go a little more in depth with the laptop guitar rig I’ve been toying around with.  I’ve posted a couple of things about this but I realized that it may be more beneficial to examine each component and see how it fits in the puzzle.  I tend to focus these on distorted sounds as those to me are the most difficult to replicate.  Even Logic has some decent sounding clean amps built in – getting a useable dirty sound is still the challenge at least for me.

So what I did was improvise a little idea in a C# minor tonality and then played a series of versions of it through different versions of the laptop set up – to show the evolution of where I have things now.

There’s still a great deal more work to do in this area, but at least these are some starting points and may at least shed a light on the process I’m using.

As a starting point you may want to look at the gear page or my previous entries on this topic here or here.

The (salt) lick


To begin with, here’s an mp3 of the first thing I improvised:  C# min improv .

* Note:

occasionally mp3’s don’t load properly when I check them in Safari.  When I refesh the page they come up.  If you have this problem – it may work for you.  If you still can’t hear the mp3 just leave a comment and I’ll re-post it.

And here’s the notation

The first part of the lick is somewhere between a scale passage and an arpeggio which makes it a little interesting to me.  This approach is something I use a lot in my soloing to get away from the temptation to go on autopilot and just run scales up and down the whole time.

Visually, I’m initially thinking “G#min arpeggio”, and then dropping the lowest notes by alternating 3rds to extend the tonality.  This is an arpeggio trick I use all the time to get new sounds out of old shapes.  I’ll detail this process here:

Here’s a G# minor arpeggio:

When I look at the distance between the G# and the B – that’s a minor 3rd.  By alternating 3rds ( either major-minor or minor-major) I can extend the tonality.  A major 3rd down from G# would be E.

If I drop the lowest note to the “E” on the A string – I’d have an E maj 7 arpeggio. (E G#, B, D#).

If I drop the lowest note to the “C#” on the E string – I’d have a C# minor 9 arpeggio. (C#, E, G#, B, D#).

(If you wanted to go further you could continue the process to A, F#, etc.)

The next thing I do is to add the F# on the A and G string.

This makes G# min7 / E maj 9 / C# min 11 depending on the chord it’s being played over or how you’re visualizing it.

Now that I have the larger shape – I fill in some 3 note per string patterns on the G and high E strings.

There’s a slight 2 string variation on the A string that’s hammered instead of picked, but otherwise the picking pattern discussed on the swept pentatonic lesson is the same approach that’s used here.

This is very similar to the 3 note per string / 1 note per string pentatonic patterns that I’ve been exploring in the online lessons area of the blog (you can see a pdf here).

The process that I’m detailing is how I began to practice these things and then develop them into more complex ideas.  I tend to see sounds like this as one large pattern now ( note:  the GuitArchitecture process is all about sonic visualization – i.e. associating shapes with sounds so that sounds can be created and manipulated in real time) .  So when I improvise, I’m not really too conscious of exactly what’s happening theoretically – only sonically.

This ends in a pretty pedestrian B major (C# Phrygian) scale run.  In soloing I would typically try to develop it into something else – but for the purposes of a sound demo – it makes sense to have a short lick with a definitive ending.

The sounds

First I’ll play the lick with the sound used at the ending point of the process.  Here are some screen shots of the set up.

The FNH guitar on the neck pickup goes into the Apogee duet into AU LAB:
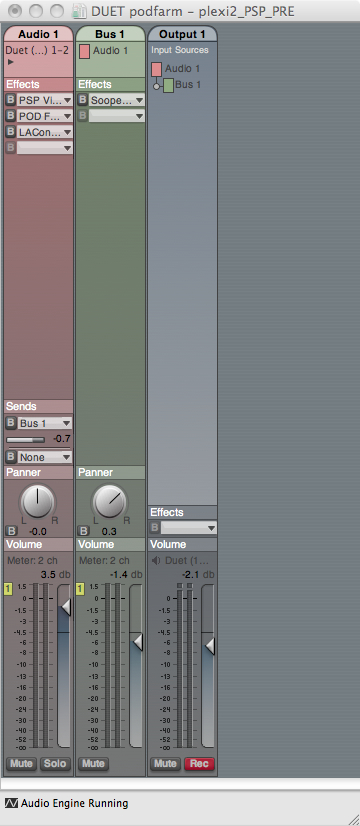
I run PSP Vintage Warmer

into Pod farm 2.01 Ilok version

I’m using the Marshall side of this rather than the Soldano – so I’ll show the signal chain there (it’s the same for both setups shown).

I’m going to start with the mixer and then go from there:

Since I’m only running a single line in- I’ve set both inputs to left.

There’s a little tonal secret hiding in plain sight here as well.  If you look carefully – you’ll see that the DI is set to about 18%.  This allows some of the dry guitar signal to come through as well.  This give the tone a little body and clarity that’s lacking from just the straight signal.

You might find that to completely not be the case – and again – this is just one person’s process detailed here.

Here’s the gate.  I tend to keep the levels low so it doesn’t kick in when I’m playing – but kills the noise when the volume is off.

The gain on the Marshall is set around 22%.  I tend to crank the mids a little to help make sure the sound cuts through in a live mix (note the use of the term “help”.  In reality – sound at any live gig is only as good as the sound person.  I just do what I can on my end to make sure I can hear myself on stage.).

Before the Marshall for the “lead” sound I’ve put in a tube screamer.  Here are the settings for that:
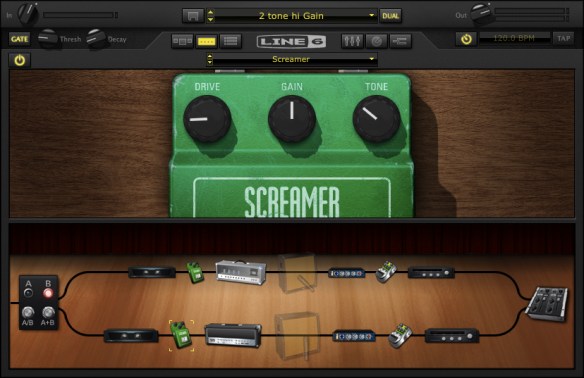
Here’s the lick with the tube screamer (same as above): with tube screamer

Here’s the lick without the tube screamer:  without tube screamer .

To give you a sense of how important the amp gain is to the overall sound – here’s a variation of the lick above with the amp gain set around half:

Here’s the lick with the tube screamer (same as above): TS_ON_50%_gain .

Here’s the lick without the tube screamer:  NO_TS_50%_gain .

I actually like this amount of saturation for lead lines – but the reason I’ve gone with the lower gain is that chords (outside or Root-5th diads) – tends to just crap out and turn to sonic mush with higher gain settings.  So to balance the 2 I’ve been working on lower tweaks.


WHY THE CABINET IS TRANSLUCENT.

Oh that’s easy.  It’s because I’m not using it.

Instead I’m using Impulse Responses from Recabinet in LA Convolver (See the links above for more info).

Here are the settings:

The IR’s are from the Recabinet Modern 2.02 Mac and PC-> 1960 4×12 cabinet settings.  You’ll notice that I don’t have anything fancy in terms of mikes set up on the cabinet,

Here is a major component of this process.  Recabinet comes with something like 2000 IRs.  I could spend weeks doing nothing but checking tonal variations on all the different cabs mikes.  Someday when I need to get really deep into this – I will.

In the meantime – to cut down on the number of parameters and just get to a tone – I went with the KISS (keep it simple stupid) approach.  I thought about what cabinet could be a constant for all my sounds clean and dirty – and the 4 x 12 came to me.  I’ve heard a DeVille through one and it sounded good so I decided to use that as the standard and tweak the amp around the cabinet.  Live, a 57 on the grill sounds good to me.  I tried 2 different variations of the same thing and went from there.

To contrast this:  here is the sound of just PodFarm – with the PodFarm cabinets but with the PSP and post preamp off.

Here’s the lick with the tube screamer (same as above): NO_IR_YES_TS .

Here’s the lick without the tube screamer:  NO_IR_NO_TS .

Some of you may prefer these sounds.  I happen to think that “initial” mp3 – has a bit more character than these.

Here’s the rest of the signal chain:

Here’s the pre-amp (post amp! – this is a very useful tweak!):

Here’s the delay:

Here’s the reverb:

So to quote the Goose, “Well well well…”

It’s still a work in progress.  I’d like to work on tweaking the preamp after the cab to carve the tone a bit more and experiment with using an outside delay later in the AULAB signal chain – but for now this is where it is.

I hope this helps!  If you have any questions or comments please fell free to leave them on the blog – or e-mail me at guitar.blueprint@gmail.com .

Thanks for dropping by.

-SC

A quick lick – and a rig du jour update from Ho Chi Minh City

Greetings from the former/current Saigon. (Technically Ho Chi Minh City but many of the locals call it Saigon).  I had hoped to post a couple of blog updates up before I left, but instead was running around checking things for the trip. Now a jet lagged – iced coffee and soon to be bahn mi –  fueled post:

.

1 lick or 2?

So first – here is a lick that works off of the swept pentatonic idea (alternating 3 and 1 note per string ideas) that I explored in the last online lesson (you can find a pdf of that lesson here).  While the online lessons have focused a lot on pentatonics – I wanted to add the tritone to make “the blues scale” and show how this approach could be adapted.  Here is the idea ascending:

.

It’s very scalar – but I added  a couple of points of interest:

1. the little descending turn around allows you to play the basic ascending idea starting on both up and down strokes.

2.  I started on the tritone (if played over E minor) or the b3 (if played over G major) instead of the root.  If you’re playing this over G – think Bluegrass metal ; )

3.  The motion is more diagonally oriented than the strict pentatonic example but is the same basic approach.  I start the lick with my first finger and then shift positions for the D on the 12th fret of the D string and the D on the HighE.

.

Here is an mp3: Lick1

As variation – I took the same concept and applied it in a more positional approach.  Be careful with this stretch!  If it hurts stop immediately!!!

.

.

Here is an mp3: Lick 2

And finally here are the 2 licks played back to back:  backtoback 1

.

Laptop Rig

So I bit the bullet and got an apogee duet.  WOW!  It really has made a stunning difference in resolution and I suspect will help a lot with future mixes I’m working on. With that in mind I wanted to share with the rig I used for the mp3s above.

Here was the basic amp setting I used in Pod Farm 2.0.  This was based on a customtone forum patch called Electric Gypsy.  I just swapped in a tube screamer and bypassed the cab (using the Recabinet impulse responses instead).  One of the big revelations that I found in pod farm is that I could put preamps AFTER the power amp.  Adding that in to the signal chain opened it up a lot.

.

.

I blogged about using impulse responses over the cabs before.  The lie 6 cabs sound good – but to my ears the IR’s add a whole other area of depth.  Here are the IR’s I used – these were from the Modern 1960 4×12 set.  The screen shot is from LA convolver.

.

.

Finally – a screenshot of how it all lays out in AULab.  I just hit the record button in au lab and edited out the noise before and after the take in fission.

.

.

FNH Guitar –> Apogee Duet–>AULAB–>PSP Vintage Warmer–>Pod Farm 2.0–>La Convolver (w. Recabinet IRs)–>Sooperlooper

.

I’m still tweaking things – but I think that soundwise everything is improving a lot from where it was even a month ago.  Once I get an A/B set with the floorboard – I think that the laptop is going to be the rig du jour.

One last note – the macbook has is using 4 gigs of ram and was updated with a 7200 rpm Seagte internal drive. (500 gig from OWC).  My computer accepts a 4gig chip in 1 slot – so I may go up to 6 gigs – but the faster internal drive made a big performance difference in the machine. I’d say you’d really need to have that if you’re going to try to go this route.

* Note – I’ve recently posted more on this topic here which may be of interest to you.