The GuitArchitect’s Guide To Modes Part 3a – Seeing The Six-String Major Scale

Welcome to Part 3 of the GuitArcitecture Mode visualization lesson series!

.

In this lesson, I’m going to show how to utilize the 2-string patterns from part two of this series in a positional way.  Since this post was pretty lengthy,  I’ve split it in half:

.

If you want to get right into the patterns – just click here!

If you want to see how these patterns work – just keep reading!!

(Either way, if you go back and forth between the two posts the concept will become clearer for you)

.

If you see anything unfamiliar here, you may want to check out part one or part two of the series, but in the meantime, here’s a quick recap:

.

To Review:

  • Any major scale can be broken down into seven 2-string modal shapes that are derived from their scale degree (i.e. position in the scale)
  1. Ionian
  2. Dorian
  3. Phrygian
  4. Lydian
  5. Mixolydian
  6. Aeolian
  7. Locrian
  • The order of the modes is always the same.
  • The fact that the 7th note of each mode is missing from the initial fingering pattern is irrelevant because it will be played in the pattern that follows it.
  • A logical fingering pattern can be established by playing the modal fingerings up and down the fingerboard, because they move in an ascending modal order.

.

A Pedagogical note:

I’ve had extensive debate with myself on the best sequence to present this information.  Conveying it effectively is something that’s much easier to suss out with an individual student, and much harder to get across in the digital version of a one room schoolhouse.

Since the initial emphasis of this lesson series is on sonic visualization and making sense out of 2-string and positional fingerings, I am only dealing with visualizing the parent major scale as a whole here.

While modes are always associated with a chord or a chord progression, I’m limiting harmonic options only to C Major/A minor for now.

Extremely important elements in this process, such as harmony, modal interchange, arpeggios, individual modes and actual music making will all be dealt with in future posts.  Having said that, it is important to state again, that modes (or any scale), in and of themselves, are not music but are only a tool in making music.   Anything I post here should always be filtered through your own aesthetic and utilized, adapted or even ignored accordingly (i.e. take what works for you).

.

Establishing A Logical Positional Modal Fingering

.

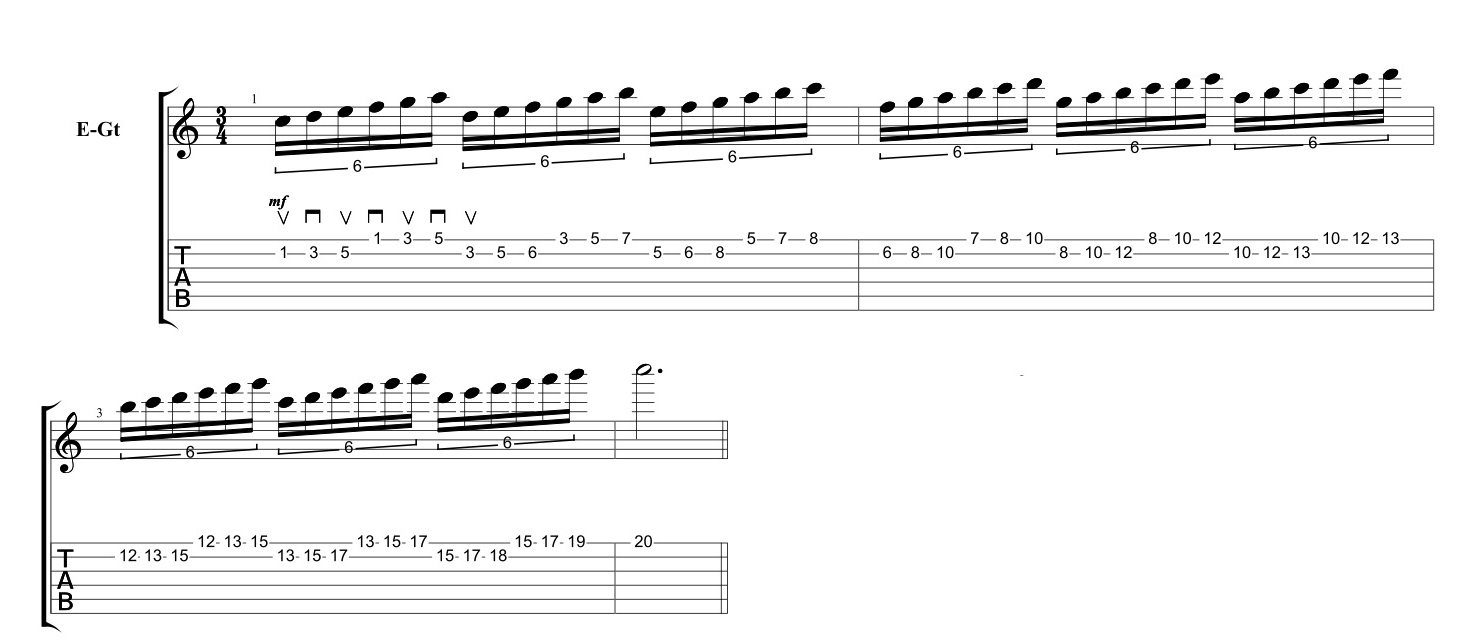
Let’s look at a sample scale shape.  In this case I’ll use an 8th position C Ionian 3-note-per-string scale:

.

A Picking note:

On 3-note-per-string scale shapes, I often use the semi-sweep picking approach detailed below as it allows me to use a single picking pattern for each string.  If I’m using this as part of a pattern, I’ll often alternate pick it.  The picking patterns below then, should be viewed as a suggestion.

.

Broken down into the six-note shapes discussed earlier, this C Ionian fingering can be seen as containing three distinct patterns:

.

 Two-string sets of C Ionian

.

As the fingering pattern ascends across the strings, the six note modal fingerings descend to the next modal pattern.   This is true of any modal pattern.

.

HOW THIS WORKS:

By using an initial six-note pattern on two strings, the continuation of the mode will always require starting the next pattern on the 7th note of the mode.

.

Six-note C Ionian Pattern On The E and A Strings

.

The next note in the scale is B.  In the key of C, this implies a Locrian pattern.

.

Six-note B Locrian Pattern On The D and G Strings

.

Now that we have a way to connect these two string patterns across the finger board, the next questions you might have are probably:

.

  •  What fret on the fingerboard do the patterns on the D and G strings start?  and
  •  What fret on the fingerboard do the patterns on the B and high E  strings start?

.

Let’s start with the D and G Strings.

.

Determining The Fret Position On The D And G Strings

.

The good news is there are only three rules:

.

Rule 1: 

When starting from the Ionian mode on the E and A strings, the Locrian mode on the D and G string set will start one fret higher.

.

C Ionian To B Locrian

.

Rule 2: 

If Lydian is the pattern played on the E and A strings, the Phrygian pattern on the D and G Strings will start on the same fret as the first note on the A string not the E string.

.

F Lydian To E Phrygian

.

Rule 3: 

Aside from the two exceptions above, the first note of the mode on the D string set always starts on the same fret as first note of the mode on the E string.

.
.

Determining The Fret Position On The B And E Strings

.

Rule 1: 

The  strings of the guitar are tuned in 4ths except between the G and B strings.  Since the distance between the G and B String is a 3rd apart instead of a 4th, patterns on the B and E strings will start 1 fret higher.

.

.

Rule 2: 

The only exception to the above rule occurs when Ionian is the pattern on the D and G strings.  In that case, since Locrian would move up 1 fret anyway, and the G/B 3rd tuning would require moving any pattern up 1 fret, the first note of the Locrian pattern would start 2 frets higher.

.

C Ionian To B Locrian

..

If you made it this far, you might be ready for the second 1/2 of this post!  

You can find all the examples, technical notes and overview here:.

.

If you’re ending it here for now, I recommend you just go through the lesson at your own pace and return as you need to.  Please feel free to post any questions you might have (or pm me at guitar.blueprint@gmail.com).

.

I hope this helps.   As always, thanks for reading!

.

-SC

P.S. If you like this post – you may also like:

.

THE GUITARCHITECT’S GUIDE TO MODES PART 2 – SEEING THE TWO STRING MAJOR SCALE

The GuitArchitecture Guide To Modes Part 1 – Seeing The Single String Major Scale

MAKING MUSIC OUT OF SCALES

A BRIEF THOUGHT ABOUT MUSIC THEORY

PRACTICE MAKES BETTER AKA PRACTICING PART I

PROPER POSTURE IS REQUIRED FOR PROPER PERFORMANCE – PRACTICING PART II

TENSION AND THE SODA CAN OR PRACTICING PART III

DEFINITIONS AND DOCUMENTS OR PRACTICING PART IV

PRACTICE WHAT YOU PLAY OR PRACTICING PART V

TESTING YOUR VOCABULARY OR PRACTICING PART VI

POSSESSION IS 9/10S OF THE LAW BUT PERCEPTION IS EVERYTHING OR PRACTICING PART VII

SOME USEFUL ONLINE PRACTICE TOOLS

WARMING UP: FINGER EXERCISES, THE 3 T’S AND THE NECESSITY OF MISTAKES

.

The GuitArchitect’s Guide To Modes Part 2 – Seeing The Two String Major Scale

Welcome to part two of modal/parent major scale lesson series that’s been adapted from the forthcoming, GuitArchitect’s Guide To Modes book.  In the last post, I showed how to visualize a major scale on a single string using seven connecting patterns. (Note: you can see that lesson here).  In this lesson, I’m going to expand on those fingerings to include 2-string patterns and start to get into the actual modes themselves.

.

The power of 2 (strings)

.

In the first lesson, I discussed how to visualize a pattern on a single string.  The advantage to this type of visualization is that it’s applicable to any fretted string instrument.  Whether its a bass or a banjo or a mandolin – the fingering pattern applies to a single string scale.  If you ever see guys at a music store pick up 3-4 different stringed instruments and be able to get around on them, this is the type of visualization that they’re typically using.

Now it’s time to expand on that visualization process.  Let’s look at the standard guitar tuning.  Here’s a blank fingerboard with the string numbers on the top and the tuning below.

.

.

You may have missed an important observation; namely that the open strings are tuned in 4ths except for the second string, B, which is tuned a 3rd above the G string.

.

This means that the six-string guitar can be viewed as three sets of two strings that are tuned in 4ths

(i.e. the E and A strings, D and G strings and B and high E strings).

.

.

This also means that any fingering pattern contained on those two strings will be the same fingering pattern on the other two-string sets.

.

First Steps

In a future lesson post, I’m going to show how these modular patterns connect, but the first step is visualizing the initial 2 string patterns and then associating them with a related mode.

So if, for example, we combine the C major scale on the B string:

.

.

with the C major scale on the E string:

.

We get a series of interconnecting patterns that can played as a melodic sequence like this:

.

.

Note:  

Don’t worry about the odd time signature.  It’s included here to show all seven 2-string patterns, but this can easily be adapted to any time signature.

.

I’m going to talk about each pattern – but first I need to talk about modes.

.

Modes

mode is a type a scale that starts from a note in a parent scale and is tied to a specific chord type.

For example:  C major has seven unique notes.  The scale degree of each note in the parent scale determines the name of the associated mode.  Here are the modes in sequential order.

.

Note:

While this has been applied to the key of C major, the modal order is the same for any parent major scale.

.


.

Each mode then, can be viewed as just playing the parent major scale starting from a different note and played over a related chord.

.

Modes = notes + chords 

While these modes all share the same notes of the parent major scale, they all have different sounds based on the harmony that they are played against – provided that harmony is not the first chord of the parent major scale.  

For example:  if I play any of the modes above over a C major or a C major 7 chord, it’s all going to sound like C major.  I’ll get into the associated chords for each mode in next week’s lesson, for now understand that a mode is:

  • derived from a parent scale
  • always follows a specific order and
  • is associated with a specific chord.

.

The two-string/6 note modal fingerings

.

As a first step, let’s go back and visit that initial 2-string pattern:

.

Here the same pattern broken down into seven individual shapes.

.

Note:

while the fingering pattern only includes 6 of the seven notes of the scale, since the patterns are interconnecting, you’ll pick the missing up note in the next pattern in the sequence.

.

I – Ionian

.

II – Dorian

.

III – Phrygian

.

IV – Lydian

.

V – Mixolydian

.

VI – Aeolian

.

VII – Locrian

.

Don’t worry about how these fingerings relate yet or how to use them outside the initial 2 string patterns – that will all be covered in the next lessons.

.

Here are the important things to focus on for now:

(It may seem like a long list – but really it’s only a few key points presented in multiple ways)

.

1. Theoretical:

  • The guitar fingerboard can be divided into 3 sets of two strings.
  • Any 2 string – fingering pattern that starts on the B string can be moved to the same starting pitch on the D or the low E string and keep the same fingering.
  • The major scale can be broken down into 7 two-string modes that follow a specific order based on its scale degree from the parent scale (Ionian, Dorian, Phrygian, Lydian, Mixolydian, Aeolian, Locrian).  While the fingering pattern only includes 6 of the seven notes of the scale, since the patterns are interconnecting, you’ll pick the missing up note in the next pattern in the sequence.
  • Combining these 2 ideas:

The 2 string modal fingerings on the B and High E strings

(C Ionian, D Dorian, E Phrygian, F Lydian, G Mixolydian, A Aeolian, B Locrian then back to the C Ionian and D Dorian).

.
A technical note and a tech note:

I played the examples as 16ths then sextuplets.  I changed the ending a bit for the sextuplets on this example to fit the 4/4 phrase better (it’s just the last sextuplet descending and ascending on the B and high E strings).

The drums are the same raga drum file I’ve used before – but I sped the drums up with an AU plug in – AU Varispeed:

.

It’s a cool plug in to use for sonic mangling – or in this case when I needed to track something quickly.

.

.

Follow the same fingering pattern and order on the other string sets, but start from a different mode.

.

D and G Strings

(E Phrygian, F Lydian, G Mixolydian, A Aeolian, B Locrian, C Ionian and D Dorian)

.

.

.

and the Low E and A strings:

(F Lydian, G Mixolydian, A Aeolian, B Locrian, C Ionian, and D Dorian)

 .

Sorry!!  

I thought I recorded at least versions of this but the one I tracked was recorded too hot and in distorted (in a very unpleasant way).  

.

  • The sound of the mode is based as much on the notes of the mode as it’s related chord.

.

2.  Technical:

  • While it’s natural to want to progress quickly, trying to play too quickly too soon results in excess hand tension which will increase the difficulty of what you’re trying to play.  Fluidity comes from focused, relaxed repetition.  
  • Fretting hand: When playing these patterns on 2 strings, practice using just the fingertip to fret the notes and use the minimum amount of tension needed for the note to sound cleanly.  Additionally, try to keep the fingers down on the strings when playing and remove them from the string only when necessary.
  • Picking Hand:  Try using the following picking pattern on the top two strings.  By starting on an upstroke and using alternate picking, the pattern ends on a downstroke on the E string and sets you up to start on an upstroke again.

  • Practice the scale ascending and descending and really focus on clarity of notes, hand tension and timing.  Even many intermediate to advanced players can gain something by really focusing on making clean transitions between the fingering shapes.
  • Isolate problem areas and work out.  You’re not going to be able to play the sequence cleanly if any of the individual components aren’t 100%.  This isn’t a bad thing.  Things you develop over time are more likely to stay with you (and thus be accessible when you’re improvising).
  • In addition to using a time keeping device of some kind (like a metronome, drum loop, etc) playing along to a chord or a bass note will help establish tonality and help associate each pattern with a sound).  For now try playing the patterns over the related major chord (C Major / C Major 7) or the relative minor chord (A minor/A minor 7 chord).
  • For those of you looking to skip ahead, try playing the root of each 6 note pattern as a bass note and then playing the pattern over it. (i.e. D Dorian over D, E Phrygian over E etc.) one you get the initial patterns in your ears as C Major.

.

3.  Musical:

  • Making music from the patterns is a whole other skill set, but you need to know where to put your fingers on the strings while you  bend, slide and phrase your way into making music.  Having said that, since the visualization process doesn’t take that long,  as soon as you get the patterns down I’d recommend to start manipulating the patterns to try to make them more musical to your ear.   There are a number of different ways to do this:
  1. Try changing up the ascending note order.  While the example here is presented as 1-2-3-4-5-6 (C, D, E, F, G and A) , you can try other note orders such as: 1-3-2-4-5-6 (C, E, D, F, G and A), 2-1-3-4-5-6 (D, E, C, F, G and A) or 2-3-1-4-5-6 (D, E, C, F, G and A) as starting variations.
  2. Try using different rhythms (16th notes, etc).
  3. Try integrating rests in the patterns.
  4. Try sliding between pitches instead of using different fingers.  Like-wise try bending to notes (Example play C, D and then bend it up to E )

..

Obligatory book plug:

The GuitArchitect’s Guide to Modes: Melodic Patterns takes all possible permutations and variations of 1, 2, 3, 4, 5 and 6 note groups of these 2 string shapes and then shows how to build them up into extended melodic sequences.   As a 300+ page book, it is a substantial reference/informational text, and goes into further depth than any other known book on the subject.  You can find out more about it here.

.

In the next lesson, I’m going to cover how to make positional sense of these forms and start to move towards making modes (and music) out of them.

The next posts in the series will be substantially shorter (and have more examples) but in the meantime, I recommend that you just go through the lesson at your own pace and return as you need to.  Please feel free to post any questions you might have (or pm me at guitar.blueprint@gmail.com).

.

I hope this helps and as always, thanks for reading!

.

-SC

P.S. If you like this post – you may also like:

.

THE GUITARCHITECT’S GUIDE TO MODES PART 3B – SEEING THE SIX-STRING MAJOR SCALE

THE GUITARCHITECT’S GUIDE TO MODES PART 3A – SEEING THE SIX-STRING MAJOR SCALE

THE GUITARCHITECTURE GUIDE TO MODES PART 1 – SEEING THE SINGLE STRING MAJOR SCALE

MAKING MUSIC OUT OF SCALES

MAKING SENSE OF THE PENTATONIC SCALE – DIAGONAL FORMS – PART TWO

MAKING SENSE OF THE PENTATONIC SCALE – DIAGONAL FORMS – PART ONE

A BRIEF THOUGHT ABOUT MUSIC THEORY

PRACTICE MAKES BETTER AKA PRACTICING PART I

PROPER POSTURE IS REQUIRED FOR PROPER PERFORMANCE – PRACTICING PART II

TENSION AND THE SODA CAN OR PRACTICING PART III

DEFINITIONS AND DOCUMENTS OR PRACTICING PART IV

PRACTICE WHAT YOU PLAY OR PRACTICING PART V

TESTING YOUR VOCABULARY OR PRACTICING PART VI

POSSESSION IS 9/10S OF THE LAW BUT PERCEPTION IS EVERYTHING OR PRACTICING PART VII

SOME USEFUL ONLINE PRACTICE TOOLS

WARMING UP: FINGER EXERCISES, THE 3 T’S AND THE NECESSITY OF MISTAKES

The GuitArchitect’s Guide To Modes Part 1 – Seeing The Single String Major Scale

Welcome to part one of a lesson series that’s been adapted from the forthcoming, GuitArchitect’s Guide To Modes book!  Over the next several months, I’m going to post related lessons on modes, scales, chords and 12-tone guitar from my GuitArchitecture book series.

This first posting is an entry-level post for the beginning or intermediate guitarist who may have heard some music theory terms but weren’t really clear about what they meant.

If you’re already familiar with basic musical terminology and single string scales, you may still find some useful tips and observations below and use this post as a useful primer and/or review.

Note:

If you’re new to this, there’s a lot of initial ground work to cover, but once we get past it the applications are really useful (read: cool) !

.

So you want to know about Modes?

.

I have some good news and some bad news about learning modes.

.

I’ll start with the good news. 

The Major, Melodic Minor and Harmonic Minor scales (and their associated modes) make up a lot of the melodic and harmonic material used in western pop and jazz music in the 20th (and 21st century).

If you’re an intermediate player with a basic understanding of intervals, chords and scales, I can show you a way to adapt a positional fingering pattern for all of the above scales or mode that can be modulated to any key in about 10 minutes – 20 minutes depending on your skill level.

Given a 1/2 hour or more, I can show you an integrated way do the same thing anywhere on the fingerboard using seven core fingerings and a simple visualization method that can be applied to any scale.

.

The Bad News:

Making music from those fingerings will take a lot longer.

To paraphrase W.A. Mathieu, “There are only a few notes and learning them takes forever.”

I can’t teach you to be musical in an hour-long lesson – but I can certainly try to guide you towards being more musical when you leave the lesson than when you walked in.  One way to do that is to bring your attention to some benefits associated with sonic visualization.

.

Sonic Visualization?

Here are a few notes to clarify what I’m talking about:

.

  • The GuitArchitecture concept, in broad strokes, is that the nature of the guitar’s fretboard and tuning lends itself to visualizing fingering patterns.
  • While patterns performed mindlessly can be a bad thing, they can allow people to realize ideas more readily.
  • More importantly, patterns can be associated with sounds and visualizing how to realize a sound by seeing its shape on the fretboard makes performing it easier.  Hence the term Sonic Visualization.

.

If I hear a sound in my head, and know how to finger it on the fretboard before I play it, that not only allows me to create the sound but also offers me more flexibility when improvising.

.

Likewise, if I stumble across a sound I’ve never heard before, and understand the fingering behind it – it makes it easier for me to remember that sound for future use.

.

The GuitArchitecture Process

While GuitArchitecture utilizes sonic visualization as it’s core foundation, the process behind developing and utilizing that process can be adapted to any musical context.  The process itself is fairly straightforward:

.

Understand the approach (harmonic or melodic)

Develop a fingering pattern to use with that approach

Associate the pattern with a sound

Manipulate the patterns to make music

.

Now let’s start to apply this to Major Scale Modes.  In order to understand modes, we need to have a grasp of the Parent Major scale.

..

Understand the Approach or

Parent Scales and Painless Theory

A parent scale is a sequential collection of notes within an octave that define a tonality. An example of a parent scale would be the C Major scale which has no sharps or flats and is spelled, C, D, E, F, G, A, B and C.  The easiest way to visualize this on the fingerboard initially is on a single string.

Played on the B string it looks like this in standard notation.

Note:

Instead of speaking about notes (which are tied to specific scales), when speaking about scales in general, musicians sometimes refer to their location in the scale as scale degrees and use numbering based on the Roman numeral system to indicate their position (this will come much more into play when we get to chords).   In this specific case:

.

C=I : D=II : E=III : F=IV : G=V : A=VI and : B=VII

.

Building Blocks:

The smallest unit of measurements on the fingerboard are the 1/2 step (1 fret) or the whole step (2 frets).

If you look at the tablature above, you’ll see that the Major Scale is made up of a series of whole steps with 1/2 steps between the IIIrd and IVth degrees (E and F in this case) and the VIIth and VIIIth degrees (B and C).

.

This general formula applies to any Major Scale.

.

All major scales are made up of whole steps 7 scale degrees with a 1/2 step between the 3rd and 4th scale degree and the 7th and 8th.  The distances between these notes are constant.  If we move the C major scale to the E string:

.

.

Since C is still the root of the scale (also refered to as the tonic), the 1/2 steps still occur between the IIIrd/IVth and the VIIth/VIIIth degrees.  Since this is true of any major scale, any major scale can be visualized this way, but the number of components makes it cumbersome to get around.  So let’s look at positional shapes.

.

Positional Playing

Or developing a fingering pattern to use with that approach

A position is usually defined as a four-fret section of the fingerboard.  If the scale is broken down into positional components, we end up with a series of three-note shapes.  We’ll number each one from the scale degree for now:

.

A Brief Interruption

When practicing anything on the guitar, you should pay attention to what I call the 3 T’s (Tension, Timing and Tone).   If you are unfamiliar with practicing methodology, you may want to read through my practicing posts (you can find them under the lessons heading on the Blueprints page).

.

I

First here’s the tab:

.

.

And a generic 3 note shape.  The numbers indicate recommended fret hand fingers to use.

.

.

II

.

.

.

III

.

.

.

IV

.

.

.

V

.

.

.

VI

.

.

.

VII

.

.

.

Putting it all together

.

If you combine all of the patterns together.  You’ll get something that looks like this:

.

.

Notice that the fingering patterns move in sequential  order (I, II, III… etc) up the B string.  If we play the C Major scale on the E string:

.

The fingering pattern now starts with pattern #3, but continues in sequential order.

.

Next steps:

I’ve covered a lot of groundwork here, so this is a good place to stop for now.  In the meantime, here are some things to consider:

1. Theoretical:

  • The important things here are learning the initial pattern fingering sequence, and associating each of them with a sound.
  • In addition to using a time keeping device of some kind (like a metronome, drum loop, etc) playing along to a chord or a bass note will help establish tonality and help associate each pattern with a sound).  For now try playing the patterns over the related major chord (C Major / C Major 7) or the relative minor chord (A minor/A minor 7 chord).
  • Sing.  The most tried and true method to attach the sounds made with your hands to your ears is to sing what you’re playing.  This isn’t an American Idol audition, so you don’t have to worry about how good you are as a vocalist.  Instead, just work paying attention to the tuning and timing between your voice and your guitar (and check out some George Benson guitar solos to hear at least one place where this approach can take you.)

2.  Technical:

  • While it’s natural to want to progress quickly, trying to play too quickly too soon results in excess hand tension which will increase the difficulty of what you’re trying to play.
  • Fluidity comes from focused, relaxed repetition.  From a technical standpoint, this observation is really important.  (As in: you may want to write that down on a piece of paper and tape it to your guitar level of important).
  • Even many intermediate to advanced players can gain something by really focusing on making clean transitions between the fingering shapes.

3.  Musical:

  • Making music from the patterns is a whole other skill set, but you need to know where to put your fingers on the strings while you  bend, slide and phrase your way into making music.  Having said that, since the visualization process doesn’t take that long,  as soon as you get the patterns down I’d recommend to start manipulating the patterns to try to make them more musical to your ear.   There are a number of different ways to do this:
  1. Try changing up the ascending note order.  While the example here is presented as 1-2-3 (C, D, E) , you can try other note orders such as: 1-3-2 (C, E, D), 2-1-3 (D, E, C), 2-3-1 (D, E, C), 3-1-2 (E, C, D) or 3-2-1 (E, D, C) as variations.
  2. Try using different rhythms (16th notes, etc).
  3. Try integrating rests in the patterns.
  4. Try sliding between pitches instead of using different fingers.  Like-wise try bending to notes (Example play C, D and then bend it up to E )

.

In the next lesson, I’m going to cover how to exploit standard tuning in visualization, expand on the single string fingerings for these forms and continue to move towards making modes (and music) out of them.


The next posts in the series will hopefully be a little shorter (and have more examples) but in the meantime, I recommend that you just go through the lesson at your own pace and return as you need to.  Please feel free to post any questions you might have (or pm me at guitar.blueprint@gmail.com).

.

I hope this helps and as always, thanks for reading!

.

-SC

P.S. If you like this post – you may also like:

.

A BRIEF THOUGHT ABOUT MUSIC THEORY

PRACTICE MAKES BETTER AKA PRACTICING PART I

PROPER POSTURE IS REQUIRED FOR PROPER PERFORMANCE – PRACTICING PART II

TENSION AND THE SODA CAN OR PRACTICING PART III

DEFINITIONS AND DOCUMENTS OR PRACTICING PART IV

PRACTICE WHAT YOU PLAY OR PRACTICING PART V

TESTING YOUR VOCABULARY OR PRACTICING PART VI

POSSESSION IS 9/10S OF THE LAW BUT PERCEPTION IS EVERYTHING OR PRACTICING PART VII

SOME USEFUL ONLINE PRACTICE TOOLS

WARMING UP: FINGER EXERCISES, THE 3 T’S AND THE NECESSITY OF MISTAKES

MAKING MUSIC OUT OF SCALES

Making Music Out Of Scales

Hello everyone, and welcome to the largest GuitArchitecture lesson I’ve ever put up online!

.

In this lesson (an excerpt of some ideas from my forthcoming GuitArchitect’s Guide to Modes book), I’m going to talk about the difference between scales and music and show some concrete ways to adapt scales into unique phrases.

 .

When I first started playing guitar, I listened to a lot of metal and the players I was into were fond of working ascending and descending scales into their solos.   (I also listened to a lot of Al DiMeola on Friday Night in San Francisco as well).  So I initially focused a great deal on scales and got to the point where I could play them quickly (but not really cleanly).  The flash of this got me noticed by other players in my area, but I always felt like something was missing.

 .

At best, scales are only ½ of the equation

 .

Seeing where my fingers needed to go was important but phrasing is where the real music is happening.

.

Note:

There’s a lot of information below.  Just take your time and go at your own pace.  It’ll still be there later.

.

Here’s another way to think of it.  Scales are like basic vocabulary.  They’re your nouns and verbs and no matter how you speak (with arpeggios, intervals or chords), they all have a basis in scales.

Your phrases are your sentences.  Guys with great phrasing can play a scale and make sentence out of it.  But a scale is, in and of itself, largely just a tool in making music and not music itself.

First Steps: Music is a language.  

So approach it the way you approach your native language

.

The way we learn language is by listening to other people speak and then emulating their speech.  Initially it’s nonsensical.  Then some disjointed vocabulary emerges which eventually gives way to sentences.  There is typically a period of formal study where reading is taught, and students are required to write ideas down.  Eventually, we take on unique characteristics that make our voices distinct.  With daily exposure language, and our understanding of it is constantly evolving.

Learning music is the same thing.  It first requires active listening.  You need to find music that you’re passionate about and really work on learning it by ear.  Music theory is also important, because it can help you make shortcuts to understanding a sound (for example, “that Phrygian pattern” gives the informed listener an idea of what a sound is before he or she even hears it), but really getting into phrasing requires an aural understanding.   Initially, this will take a long time and you probably won’t have all of the technical skills that you’ll need to get it at 100% accuracy.  That’s fine.  Get what you can – but really pay attention to phrasing details like pitch (vibrato, slides, bends, etc) and rhythm.  If at all possible – try to sing along with what you’re trying to learn.   If you get to the point that you’re not enjoying it – move on and come back to it.  The more you actively enjoy what you’re doing, then more you will get out of it.

.

Step 2 involves listening out of your comfort zone.

.

Try checking out music from other (non-guitar playing) musicians and cultures as well.  A lot of my pointillist rhythm ideas were copped directly from Japanese Koto approaches.  I stole a lot of things from Arabic music (specifically Turkish folk and classical music, the Iranian Radif and various maqams), Hindustani music, and vocal music from around the world.  I copped gypsy violin and accordion licks and Klezmer clarinet lines.   Lately I’ve been super into the insanely wide vibrato and pitch bends in Vietnamese Dan Bau music.   The important thing is searching out for other sounds, getting inspired by them and taking something from them.

For me a lot of this has been the nonsense portion of trying to speak other musical languages.   Not everything I do translates in multiple musical situations.  It’s not always correct or accurate, and sometimes that’s even better because then it’s my own spin on it.

Really importantly  – not all of it sticks.  I spent a lot of time learning things that didn’t directly work its way into my playing.  That’s fine.  The important things are the things that will ultimately stick with you.  What it’s given me are some things that are distinctly mine now.  A distinct accent if you will, that immediately identifies a handful of things that I say as me.

 .

Next Steps:

 .

In addition to learning things by ear, having a few different approaches to using scales in your bag can help give you the flexibility to express some really musical things.  I’ve already posted on the area of limiting options, and with that in mind I think it’s more important to go deep with a few ideas, rather than just scatter-shot a number of approaches and deal with them all superficially.  So I’ll cover some of them here

 .

Starting point: The Scale

 .

For an initial starting point, I’m going to look at a 3-note-per-string C Aeolian scale.  Try running this scale a few times with the fingering and picking patterns I’ve provided to make sure it’s under your fingers.

 .

.

 .

In the mp3 above, I’ve played the scale in 16th’s, a C minor 7 chord (to hear a harmonic context) and then as sextuplets.

.

Note:

In some textbooks you’ll see the b6 as an avoid tone against a minor 7 chord (i.e. the Ab as an avoid tone for C minor 7).  You can always just play a minor triad or a 5th for a similar effect.  I’ve included the minor 7th here because – aesthetically – it doesn’t bother me and I like the sound of a minor 7th better than the triad.

Picking this as I have above results in a smoother (almost legato) sound than I could get using alternate picking, even though I’m still picking every note.  For the initial fingering, I’m playing the first 2 notes of each grouping with my 1st and 2nd fingers to facilitate the slight positional shift on the B and E strings.

.

Note:  When practicing any musical idea, it helps to have a melodic and rhythmic context.  A time keeping device can certainly help, but I’ve included a short C note for a drone and a drum loop for your convenience below:

.

.

 .

Approach #1:  Skipping notes and using patterns

 .

The only time I use straight ascending/descending scales is if I have a target note that I’m specifically trying to get to.  In those cases, having some velocity to get there can build tension and make it exciting to hear.  Otherwise when you hear one note after another in straight ascending or descending scalar patters, it gets very predictable pretty quickly.

Here’s a sample phrase I improvised based on the scale above.  I’ve added some notes below.

 .

.

.

  1. On the first part of the phrase on the A and G strings, I’m only playing the notes C, D and Eb.  Adding a string skip and doubling the C at the octave creates more excitement in the phrase.  I’ve provided an optional notation indicating picking the octave C with the pick hand middle finger to give it a little snap – but you can certainly flatpick it as well.
  2. Starting on the Bb on the G string,  I’ve rhythmically copied the same phrase as on the A and G strings.  By playing it as a pattern, it creates some consistency in the phrase.  While the rhythm is sextuplets – the phrasing is alternating groups of 4 and 6.
  3. The last 6 notes break out of the pattern by just playing a straight ascending scale.

 ..

Here’s another track variation.  I’m picking every note on this one:

.

.

Approach #1a:  Skipping notes part 2 (Pentatonics)

Another way to work scalar ideas into a musical context is to reduce scales to pentatonics.  For example:  Here is my initial scale again:

.

And now I’m going to remove the F and the Bb from the scale.   This leaves a five-note pentatonic (C, D, Eb, G, Ab) – sometimes called Hirajoshi.

 .

.

.

The term, “Hirajoshi”,  actually refers to a Koto tuning.  In the Japanese scale system, this collection of intervals would be recognized as belonging to the In scale.  But since so many guitarists refer to this as Hirajoshi, I’ll use that nomenclature here.

Regardless of what you call it, sonically it’s a very cool scale.  The skips between the Eb/G and Ab/C really open the scale up sonically.

.

Here’s a variation on the lick above using this pentatonic idea in the second ½ of the phrase.

.

.

.

Technically, in addition to some of the challenges of the first lick, another tricky thing here is the skip from the C to the Eb on the G and B strings because the D, C, Bb pull off wants to go back up to D.  Sonically though it adds a really nice contour to the phrase.

 .

Approach #2:  Sequences

 .

Sequences are a cool way to use scales in a way that generate melodic momentum but contain an internal logic.  Here’s an example of using the pentatonic in descending groups of 3s.

 .

.

.

This is a very Marty Friedman-esque idea.  A little goes a long ways with this type of approach, but these sequences are great devices to work into phrases as a way to get more mileage out of a scale.

. .

Approach #3:  Octave displacement

 .

Playing notes in order can be boring, but as we saw with the octave C jump in the first lick, alternating scale notes in different registers can be much more interesting melodically.  Since the A and B string are a 9th apart, playing an ascending melody between the strings works well positionally.

The first step in this process involves being able to visualize the scale on each individual string:

 .

 .

Here’s a melodic idea that works off of this ascending/descending idea.  It works without a trem as well, but adding the trem gives it more of a slidish feel.  The important thing is to let it all ring together in a controlled way.  I’ve recorded this at full tempo and then in 1/2 time and I think it works a lot better at 1/2 speed .

 .

.

.

If you look at the notes in the phrases (C, D, Eb), (D, Eb, G), (Ab, Bb, Ab), (G, F, Eb).  They’re all based on short simple melodic ideas that sound more complex when broken up over octaves.

.

Approach #4:  Modal Arpeggios

 .

Previously, I removed two notes to create a pentatonic scale but if I play every other note of a mode, I can create an extended arpeggio called a modal arpeggio.

For example, here’s the scale again:

 .

Taking every other note:

 .

.

And putting it into a phase gives me this:

 .

.

.

Note#1:

It’s interesting because while the scale and tonality is rooted in C, sliding the last note of the arpeggio up to D gave it a whole other texture.

.

Note #2:

A lot of phrasing is really about minute details.  Here’s the same arpeggio but I sit on the first note just a little longer.  It makes the phrase more musical to me:

.

.

Here’s another arpeggio idea with a repeated phrase in the middle.

.

.

.

Playing arpeggios on smaller string sets allows me to sequence ideas more easily (Like the first 5 notes).  The jump to the Eb is probably the biggest surprise in the phrase.  Short but sweet.

This modal arpeggio approach can be applied to any mode or scale and offers a great way to add some additional textures into your soloing.

 .

Some Concluding Thoughts

 .

Normally, I would have broken this up into multiple posts, but I though it was important to get the aural learning component and the melodic variations on the same page.I didn’t even get into rhythmic variations, double stops, chromatics, chordal applications, superimpositions or any of the literally dozens of other approaches that can be used to extract music from scales.  It really all comes back to how much music you’ve absorbed because the most used tools in your melodic toolbelt are going to be your ears and your aesthetic and those are both guided by what you’ve been exposed to.

For those of you using GuitarPro, you can download the .gpx file of this lesson (with an extra arpeggio thrown in for good measure) here.

 .

The GuitArchitect’s Guide To Chord Scales

 .

Chord Scales Cover Front And Back

I’ve mentioned before, that (for me) the biggest advantage of investigating harmony and theory is to expose people to sounds that they didn’t know where there.  This is the entire purpose behind the  GuitArchitecture series.  One of the GuitArchitecture books in that series, The GuitArchitect’s Guide To Chord Scales utilizes and expands on this idea by exploring all unique scales from 3-12 notes!!!   The above material is expanded on substantially in that book so if you like this lessons you’ll really like the book.

More info on the book here.

Lulu Link

Amazon link

If you like this book you might want to check out the other books in this series here.

As always, thanks for reading!

.

-SC

Making Sense Of The Pentatonic Scale – Diagonal Forms – Part Two

Hello everyone!!

Here’s part 2 of the diagonal pentatonic lesson..Hopefully you’ve checked out the posts on two string patterns and part one of the diagonal forms post  and have gotten the shapes and  visualizations down and under your fingers.  (if not – just take a moment and check out the other two posts).

.

In this lesson, I’m going to continue the process of combining the two approaches into 5-note diagonal shapes.

.

 5 Note Diagonal Pentatonics

.

Perviously, I took a look at one 5 note pattern on two strings.  This can be done by either putting 2 notes on one string and 3 on another (1.e. a 2-3 pattern):


..
or by putting 3 notes on one string and 2 on another (1.e. a 3-2 pattern):

.

.

..
Note:

Those of you looking at the picking pattern closely may notice that I play the 3-2 pattern with a partial sweep instead of strict alternate picking.  While the 2-3 pattern can be swept as well, you’d have to start it on an upstroke:

.

.

From a picking perspective – I find the 3-2 typically works best when ascending and the 2-3 works best when descending – but from a fingering standpoint – sometimes the reverse of this will be true.  A little experimentation goes a long ways here.

.

Working with these forms:

I’ve documented every 2-3 and 3-2 combination here – but in general I don’t recommend spending a lot of time practicing forms that you’re not going to use.

.

Instead, try the following:

.

  • Take the shapes that you like (or shape if only one works for you)
  • Practice it with a time keeping device like a loop or a metronome
  • Practice it with consistent picking or legato (i.e. using hammer-ons and pull offs) played over a chord to supply a harmonic context.

.

You may want to start with an E minor or Em 7 and then try other chords like C Maj 7, G Maj 7,  F Maj 7, D min 7 or A min 7.

.

  • Practice the pattern in different rhythms

.

“Ceci n’est pas une pipe” or when is  5 – 4?

.

In the previous lesson, I talked a little about altering the rhythms of any sequences that you’re playing. Dividing the beat with a different number of notes than the notes in your phrases can add some rhythmic tension and goose the melodic line a little.  For example, here’s the initial 3-2 pattern from above moved in scale wise motion through each note of the E pentatonic minor scale.  I’m playing the phrase below as quintuplets (i.e. 5 notes to the beat). 

(If you have trouble counting the phrase try saying (“here’s a group of five”).  If you do it over and over again in a shopping mall someone will probably call security – so you may want to use your internal voice for this)

.

On a more serious note – I’ve notated the phrase as 5/4 to make the rhythmic division clear.  In the mp3 below – I’m playing the phrase over a 4/4 drum groove so there are 3 beats of space (5 beats + 3 beats = 8 beats or 2 bars of 4/4) before the descending line starts.  Here’s the ascending line:

.

.

and here’s the descending line:

.

.

Now I’m going to take the same sequence but play it as 1/16th notes which does a very cool thing over the drum beat.  Where the previous phrase has the first note of each pattern start on a down beat, here the starting note keeps getting displaced.

.

Note :

I’ve notated the phrase as 7/4 to make the rhythmic division clear (just like the groups of 5).  In the mp3 below – I’m playing the phrase over the same  4/4 drum groove so there is 1 beats of space (creating a 2-bar phrase of 4/4) before the descending line starts.  Here’s the ascending line:

.

.

And the descending line….

.

.

and here they are back to back


.

The Shapes of things….


Now I’m going to go through each of the individual shapes and make some notes.  At the end of the shapes, I’ve included an mp3 of my preferred shapes in groups of 5 and then groups of 4.

.

Pattern 1

(Starting on the Root)

.

Here’s the 2-3 shape on the bottom 2 strings:

.

.

And played in octaves:

.

Note:

The stretch on the D and G strings isn’t very comfortable – so I’d most likely use this fingering only when descending.

.

.

Here it is in a 3-2 shape.  I’m playing the notes on the 3rd fret with the second finger, 2nd fret with the first finger and 5th fret with the pinky.

.

..

Here is the 3-2 shape in octaves.  The same fingering pattern applies just add the 1st finger for the “e”.

.


.

Pattern 2

(Starting on the b3)

.

Here’s the 2-3 shape.  It’s not very positional ascending – so again I use it primarily for descending ideas.

..

.

Here is the 2-3 shape in octaves:

.

Here’s the 3-2 shape.  The symmetrical fingering of the 2nd and 4th finger in this pattern is interesting to me.  I’m not a big finger exercise guy anymore, but if you’re looking for a fingering pattern to clean up your 2nd and 4th finger, smoothing out the octave runs on this shape will help with synchronization if you’re practicing it correctly. (You can check out the practice posts on my blog for some helpful practice tips – just look on the blueprint page).

.

.

Here’s the 3-2 shape in octaves:

.

.

Pattern 3

(Starting on the 4th)

.

Here it is in a 2-3 shape.  I actually prefer this pattern to the 3-2 shape as I find that by using my first and second fingers on the 5th and 7th frets, the pattern is more comfortable to me.

.

.

Here it is 2-3 in octaves.  I play this version primarily with alternate picking, but play two down strokes in a row to get from the G to the A to start every two string pattern on a down stroke.

.

.

Here’s the 3-2 shape.  If the 2nd pattern 3-2 shape is comfortable to you – you may like this one as well.

.

.

Here is the 3-2 shape in octaves:

.

Pattern 4

(Starting on the 5th)

.

Here’s the  2-3 shape.  I use fingers 1-3-4 for this one.

.

.

Here is the 2-3 shape in octaves.  I use the same picking pattern I described in pattern 3 for this pattern as well.

.

Here’s the 3-2 shape.  The focus here is the 3-4 finger shift.

.  

Here it is in octaves.

.

Pattern 5

(Starting on the b7 th)

.

Here’s the 2-3 shape.  This sits under the fingers very comfortably.

.

.

Here it is in octaves.  This is a great shape to repeat a few times before moving to the next octave.

.

.

Here’s the 3-2 shape.  This is a form I abandoned almost instantly – especially because the 2-3 form is so much easier.

.  

.

Here it is in octaves.  On the high B and E strings – this form can be useful when descending.  I use 3-1-4-2-1 for the fingering pattern. On the ascending 5s and 4s phrase, I played all the patterns in the 3-2 shapes to keep the picking consistent – so if you’re going to be playing the patterns on just  2-strings, you may want to familiarize your self with both divisions.

.

.

Finally here’s an mp3 of each group in order.  I recorded the patterns that I marked out as preferred patterns.  Typically I wouldn’t switch between phrases (and picking patterns) like this.   The same rhythmic idea as above (i.e. patterns notated for clarity but played over  2 bar 4/4 phrases).

.

.

Note:

These shapes are all adaptable to the blues scale as well by just adding an A#/Bb to the patterns.

.

“Ceci n’est pas une pipe” II or when is  five  six?

.

So here’s another way to manipulate the patterns into something more fluid.  Both pattern 3 and pattern 4 have symmetrical fingerings.  In pattern 3 for example, if I double the d between the 2 shapes I get a 6 note pattern with the same fingering.  This works best as a descending line to my ears:

.

.

.

Here’s the same idea with pattern 4 using a doubled E.

.

( 8/7/11 -Note:  the wrong graphic was posted here previously but this has now been fixed – SC)

.

.


By understanding patterns, it becomes possible to manipulate them and make them work for you.  The key is to take one idea or approach and put it through the paces and try to get something out of it that works for you.

.

I hope this helps!  In the meantime, if you like this approach, I have a book that includes this material you may be interested in

My Pentatonic Visualization Book

Minor Pent Front

is 100 + pages of licks and instruction and includes demonstrations and breakdowns of two-string fingerings, diagonal pentatonics, sweep picking pentatonics, pentatonic harmony and much more!  It’s available here.

.

Thanks for reading!

-SC

Making Sense Of The Pentatonic Scale – Diagonal Forms – Part One

Hello everyone!! After a lengthy delay – I’m posting this pentatonic lesson.  The amount of information over the next few posts will keep some of you busy for a while.

.

A general online lesson note:

.

The lessons I post here typically go into quite a bit of detail with the rationale that the reader (i.e. you) can take bite sized pieces of information and return to the material as needed.  If this more information than you will probably be able to process in a single setting, simply take one or two things that sound cool to you and apply them to what you’re currently playing (songs, solos, etc).

.

One idea applied well is worth more than a dozen ideas applied poorly.

.

In this lesson I’m going to combine 2-string pentatonic patterns into a diagonal approach.

.

Note: For those of you who want to adapt these ideas to the blues scale just add in the A#/Bb to the patterns listed below.

.

..

Diagonal Pentatonics

.

Playing two-string patterns in octaves moves the fretboard shape both horizontally and vertically (i.e. diagonally). Two-string diagonal playing can help with visualization as the same pattern is simply moved to the octave of the starting pitch.

.

To illustrate this – I’ll start with the following four-note shapes.  Use alternate picking for all of the following exercises.  With the exception of the first four notes which use open position, the rest of the patterns use the same fingering.

.

All of the following examples should be practiced with strict alternate picking or legato (i.e. using hammer-ons and pull offs) and (ideally) played over a chord to supply a harmonic context.

.

Some chords to try:

.

  • E minor or Em 7 chord 
  • C Major 7
  • G Major 7
  • F Major 7 
  • D minor 7 
  • A minor 7 or
  • whatever sounds good to you!

.

Here’s the 1st pattern moved in octaves.

.

.

Pattern # 2

.

.

Pattern # 3

.

.

Pattern # 4

.

.

Pattern # 5

.

.

Working with patterns

.

Note:

Pentatonic scales, or any kind of scale in general, are simply a tool in making music, but are not music in and of themselves.  The goal of this process is to use these shapes as a way to visualize sounds and then to be able to manipulate them in real-time.

.

Let’s generate a musical line using this approach. Here’s an idea in the style of Paul Gilbert.  I’m picking every note in the example – but you could use hammer-ons or pull offs for a more legato feel.  It’s played first with sextuplets and then slower at 16th notes to make the notes easier easier to hear.

.

.

.

The drums on this track are just a simple loop I pulled together for a song I was working on called Raga Jam.

.

.

While recorded at 105 bpm – the  mp3 can be downloaded and then slowed down or sped up to accommodate your tempo needs.  A number of applications will do this but if you’re looking for a recommendation –  I recommend Transcribe! by Seventh String Software.

.

There are several ideas here worth exploiting.

.

  • The initial pattern consisting of four notes, is played as sextuplets (groups of six).  Rhythmically, this adds a sense of tension that is absent in phrasing the group of four notes into a 1/16 note pattern.  This idea will be covered more in part two of this lesson.

.

In general, practice playing patterns in a variety of rhythms as you may find ideas you can use later.


  • The B on beat three breaks up the predictable note order a little.  It’s a small variation on the pattern that makes it sound a little less “patternish”.
  • The last five notes of the sextuplet break the four note melodic pattern.  This idea will be explored more in part 2. But in the meantime, here’s an initial fingering to get you going.  I’ve notated it as a group of 5 – But rhythmically it’s part of the sextuplet pattern above.

.

.

The use of the open E and A strings changes the overall fingering shape on the bottom, middle and top two strings which may make the lick more challenging to play.  

.

If you are having difficulty playing something melodically, take a close look at the fingering you’re using and see if it’s the most efficient one.

.

In the example below, I’ve taken the same notes and broken them up into melodic shapes that use the G, A and B pitches on the same string.  You will probably find this much easier to play.

.

Here’s a fingering variation of the above idea (watch the skip from G to B on the D string!)

..

.

.

Going a little further:

.

Sometimes patterns can lead us to unexpected melodic places.  Here,  in this approximation of an improvisation for example,

.

.

.

  • I’ve taken the initial E, G, A and B pattern shape and instead of moving it up a 1/2 step, (to accommodate the B/G string 3rds tuning), I kept the fingering shape the same.  This produces a whole tone shape on the B string that adds a melodic surprise.
  • I’ve then continued the whole tone idea to the high E string  – bringing in a C and then resolving it to B (The 7th fret B is missing in the tab but is on the notation line). The whole steps in the F#, G# and A# passage and the C, D and E passage have the same intervals as the G, A, B of the pentatonic scale.  Even though the G# clashes with the G in E minor – the line has enough of a melodic drive that it can work (as long as you resolve the idea  – in this case to a chord tone).

.

By understanding patterns, it becomes possible to  manipulate them and make them work for you.  In the next lesson we’ll play full pentatonic patterns on 2 string sets and bring in a few other ideas that will spice up your approaches

.

Tones:

.

Finally, for  those of you interested in the technical side of what I’m doing here are some screen shots of my set up. First the AU Lab rig:

.

.

Something that may be of  interest to you – I set Audio MIDI Setup to 88.2k for the DUET  – but run the LA Convolver speaker cabs at 44.1.  That way the audio conversion rate for the guitar signal stays higher but I can use things that run at 44.1 (like the audio player on the Generator 1 strip).

.

.

I’ve mentioned the AUAUDIO File Player on my AU lab posts – but it’s a cool plug-in.  Using it, I can bring in all kinds of samples or tracks and run them live with the guitar signal and record them with the click of the record button.  (It’s how all of these tracks are recorded btw – live into AU Lab).

There are two dirty sounds (I didn’t like my first tones so I re-recorded everything.  When I couldn’t find the first 5 audio files while typing this – I just went with the initial recordings since I didn’t have access to my guitar.)

.

Here’s the dirty side of the main tone (Tube screamer is set at 9%, 53% and 9% – BTW)

.

.

and the clean side:

.

.

Tracks 1-4 are just my standard Marshall Who? settings

.

.

Part two will be up soon!! In the meantime,  if you like this approach, I have a book that includes this material you may be interested in that features this material and much more!

Minor Pent Front

is 100 + pages of licks and instruction and includes demonstrations and breakdowns of two-string fingerings, diagonal pentatonics, sweep picking pentatonics, pentatonic harmony and much more!  It’s available here.

.

Thanks for reading!

-SC

Getting hipness from a major triad or more chord recycling part 3

In part one of this post, I looked at generating different major chord variations based on flatting the root and the 5th.  In part 2, I sharped those pitches and then combined the two approaches to create additional chords and textures.  In this post, I’m going to look at applying these chord tones to  melodic (or lead) ideas.  But first…

.

The Relative Minor Explanation:

The second post of this series ended on a cliffhanger when I said that all of the A major upper extensions would work as substitutions for F# minor chords.   You can read the rest of this Relative Minor explanation if you want to understand why this works – otherwise you can just skip ahead to the next section for some melodic ideas.

Here’s the explanation for this.

In a major chord, the 4th is sometimes known as an avoid note.  In the key of C, this means that the note F is usually viewed as a note to avoid either melodically or harmonically.  If we look at a major scale:

C D E F G A B C

the only 1/2 steps in the scale are between E/F and B/C.

Chromatics are powerful things in music.  They tend to act as tonal anchors to where the tonal center is.  If you play a simple ascending C major scale and stop on the note B, most listeners will want you to resolve to C.   In the major scale the 1/2 step between the 3rd and 4th makes the ear think that F major is the tonal center.

(For those of you familiar with ear training, if you sing a c major scale from C to F – it sounds like you’re singing so la ti Do – instead of Do re me fa.)

One innovation that came about in jazz music was to substitute an #4 for a 4 over chords with a major quality.  This put the 1/2 step motion between the 4th and the 5th.  Since the 5th is a chord tone in a major triad, it has less of an effect of moving outside of the key.

Here’s how this is applied:

  • Any Major scale with a #4 is a Lydian mode.
  • The A Lydian mode is taken from the parent Major scale of E Major.
  • The Relative Minor chord of A Major is F# minor.
  • In the key of E Major, F# is the second scale degree and uses the Dorian mode.
  • Dorian is a popular mode for soloing over minor chords.

Here’s the shortcut:

You can change the chord scale with the chord if you want here – but if you’re playing a chord progression that goes between a major and the relative minor chord (and you’re using Lydian for the major chord) – you can keep using the same scale to create a Dorian sound over the minor chord

(and vice-versa).

A Quick Review

Here’s the Major chord shape I’ve been modifying over the first 2 lessons:


.

A Major

.

If the root and the 5th are strategically sharped or flatted, other chord tones (7, #11, 9 and 13 can be created).

.

A major with  additional chord tones on the B and E string

Since the b (9th) on the high E string is available, the 9th on the g string is something that can be incorporated as well.

.

A Lydian/F# Dorian Chord tones based on an A major chord shape

.

If I’m soloing over A major (or F# Minor)  – all of these notes are fair game. 

Try all the licks below over an A major type chord or F# minor type chord.

.

Lick 1 (Double Click any notation to see full size)

Lick 1


I try to stay with consistent note-per-string fingerings on strings when playing melodically, so here I’m going to take the same idea and just move the last note to the g string to create a 3 note per string pattern.

.

Lick 1: Three note-per-string shape

.

Here’s how it sounds at 1/2 speed.

Here’s how it sounds at tempo.

.

Lick 2:

Here, I’m taking the same notes and breaking them up intervallically into 4ths (except for the 5th in the last 2 notes which adds some variety in the cycle).  Licks like these are easy to visualize (and therefore easy to manipulate when improvising).

.

Here’s how it sounds at tempo. 

Note:

When I improvised this- I played it as transcribed – but when I recorded it – I played the last 2 notes as 1/8th notes instead – please take any of the ideas here and manipulate them as you see fit.

.

Here’s a similar (but shorter) idea with a scalar pattern at the end.

.

4ths lick 2

.

Here’s how it sounds at 1/2 speed.

Here’s how it sounds at tempo.

Lick 3:

Here’s an arpeggio idea that incorporates chromaticism.

.

arpeggio lick w. chromatics

.

Here’s how it sounds at 1/2 speed and then at tempo.

.

A couple of notes:

  • In the beginning I’m visualizing a C# min7 arpeggio (C#, E, G#, B) starting on the B.
  • The chromatic motion isn’t random – instead it specifically emphasizes the A and the C# in the A Major chord.
  • In the 3rds pattern that ends the lick – I’m skipping the middle note of the 3 note per string pattern in Lick 1.  I like using 3rds in patterns because it breaks up the monotony of just running scales up and down.


Going Further – Dominant Superimposition:

Now that some initial options have been explored – I’ll take a look at the upper notes of the voicing.  If I take the previous fretboard diagram and extend a note on the g string I’ll have something that looks like the diagram below:

Here’s a chord voicing I discussed in part 2 of this series (B7/A)

And here’s how it sounds.

Short cut 1:

Playing a dominant 7th chord on the second scale degree of a major chord will get you all of the upper extensions and the root)

(i.e. B7 over A major)

Short cut 2:

When soloing over a major chord – you can play a dominant arpeggio on the second scale degree (i.e. B7 over A major).

In the example below, I’m combining a B9 arpeggio and an A major arpeggio to create a melodic idea.  The A and C# on the D string are the linking material between the 2 arpeggios (they act as the 7 and 9 in the B9 chord, or as the root and 3rd of the A Major).

The important thing with any superimposition like this is to resolve it to a chord tone in the chord you’re soloing over (in this case A).

.

.

Here’s how it sounds at 1/2 speed.

Here’s how it sounds at tempo.

.


Going Further – Minor Superimposition:

Here’s another chord voicing I discussed in part 2 of this series (G# min7/A)

Short cut 1:

Playing a minor chord on the seventh scale degree of a major chord will get you upper extensions (7, 9, #11 and 13)  of the chord.

(i.e. G# min7 played over A major)

Short cut 2:

When soloing over a major chord – you can play a minor arpeggio on the second scale degree (i.e. G# min7/A).

In the example below, I’m combining a sextuplet idea from the earlier licks and a  G#min arpeggio to create a melodic idea. Again, an important thing with any superimposition like this is to resolve it to a chord tone in the chord you’re soloing over (in this case A).

I’m not a fan of the shift from E to D# in this fingering as it requires quickly barring to get the rest of the arpeggio.  As an alternate fingering, I  recommend this:

.

The “picking” is just a suggestion.  (For example: you could also pull off the D# to the B on the g string and then just continue the sweep picking motion.)

.

Here’s how it sounds at 1/2 speed.

Here’s how it sounds at tempo.

.

Wrapping it up:

This is really only the beginning of where these approaches can go.  Hopefully this will give you some ideas to explore both in comping and soloing.  If there’s enough interest, I’ll expand this approach to minor and dominant chords in future posts.

Final Tech Note:

For those of you who are interested, these are the approximate settings I’m using in Pod farm for the distorted tone here:

Thanks for reading!

-SC

Getting Hipness From A Major Triad Or More Chord Recycling Part 2

In part one of this post, I looked at generating different major chord variations based on flatting the root and the 5th.  In this post, I’m looking at sharping those pitches and combining the two for additional textures (if you came here directly – you may want to review the A major variations in  part one before continuing).

.

Start with a map:

Adapting chord forms requires the ability to visualize chord tones around the shape you’re using.  As a starting point, here’s a fretboard diagram of an A major chord (with the A being on the 7th fret of the D string).  I’ve added some additional chordal extensions on the E and B strings (but this process could be applied to any string-set).

In the last lesson, I looked at creating sounds with the 6th (or 13 – see post 1 for the difference between the 2) on the E string.  This time, I’ll add the 6th (6th or 13th) on the B string by raising the E  up to F#.

.

A Major 6th no 5th

Here is the sound of the A Major 6th (no 5th) chord.

.

Comparing this to the A major 6th voicing in part 1:

.

A Major 6 - Watch the 1st finger stretch - if it hurts - stop Immediately!!

Here’s an mp3 of this chord.

.

The new voicing is certainly easier.  If I was really stuck on the close voicing of the E and the F# in the A major 6th, I could simply move the F# to the B string and move the E to the open string like this:

A maj 6 with open E string

.

Several Notes:

  • This voicing wasn’t included in the first lesson as I wanted to show the process of how to derive these chords.
  • The upside to this approach is it makes this specific voicing easier to play – but the downside is it’s not movable – which may or may not be problematic for you.
  • If a chord is really difficult to finger – there is always an easier way.  You may not get the specific notes or voicings you’re looking for – but there’s always an easier way.

Now I’ll extend the initial Major 6th sound by flatting the 7th.  This is done by lowering the A to G#.

.

A Maj 7 add 13 no 5th

Here’s how it sounds.

Again,  I’m a sucker for chords with seconds in the voicing (in this case the F# and G#).  It adds a little but of tension and elevates the chord a bit.

.

Adding in the 9th:

First let’s create an A major add 9 chord.

.

A add 9

Here’s how it sounds.

.

Note:

The reason this is an add 9 chord and not a major 9 chord is the lack of a 7th.

Since the chord is a major chord with a 9th added, it’s called an add 9.

.

Now I’ll add a sharp #11.  This is done by lowering the E to D#.

.

A maj 9 sharp 11 no 7th no 5th

Here’s how it sounds.

.

Another Note:


The further you extend the harmony and remove initial chord tones, the more vague the sound of the chord is as related to the tonic.

For example:  The chord above could be analyzed as an A major 9 # 11 with no 7th and no 5th. But the notes are A,  C#, D# and B.  If those tones are centered around B – you have a B, D#, A and C# or a B dominant 9 (no 5th)/A.

If you have to analyze a chord with more than 1 elimination (i.e. “no 7th no 5th”) there’s probably a simpler analysis of the chord.


Going Further:

Now that some initial options have been explored – I’ll take a look at the upper notes of the voicing.  If I take the previous fretboard diagram and extend a note on the G string I’ll have something that looks like the diagram below (again the A listed below is on the 7th fret of the D string):

If I’m willing to be a little adventurous and replace the 3rd of the chord (C#) with the #11 (D#) , I’ll get a voicing with a root and then all upper tensions (9, #11 and 13).  Here it is notated:

.

B7/A

And here’s how it sounds.

.

While you could analyse this related to the key of A Major (A major 13, #11, no 3rd, no 5th, no 7th) you may have noticed that shape is the upper chord voicing for a VII position B 7 barre chord.

.

Short cut 1:

Playing a dominant 7th chord on the second scale degree of a major chord will get you all of the upper extensions and the root).

(i.e. B7 over A major)

But isn’t a stable sound on its own.  If you play this chord and then the standard A major, it will probably feel resolved to you when you play the A.  If you have a song with a number of bars of A major – switching between these two chords is a nice way to generate a little harmonic motion.

Now, I’ll take this idea a little further by lowering the A to a G#:

G# min 7/A

.

Here’s how it sounds.

.

This gives the chord a 7 (G#), 9 (B), #11 (D#) and 13 (F#) – or all of the upper chord tones.

Short cut 2:

Playing a minor 7th chord on the seventh scale degree of a major chord will get you all of the upper extensions of the chord.

(i.e. G# minor 7 over A major)

Like the B7/A, this isn’t a stable sound on its own.  If you play this chord and then the standard A major, it will probably feel resolved to you when you play the A.

.

Quartal for your thoughts?

Here’s one last transformation for now.  Here I’m going to lower the D# to C# to create a quartal chord.

.

Quartal Chord

And here’s how it sounds:

.

A quartal chord is a chord that is built on 4ths (G#, C#, F#, B) as opposed to being built on 3rds like A Major (A, C#, E).  To me, quartal voicings have a nice “airy” or “floating” quality .  This is just one of many  possible quartal voicings built from A major.  Quartal voicings will be discussed more in-depth in a future post.

.

How to double the number of chords that have been covered.

So far, I’ve looked at a series of chords that either work as substitutions and/or extensions for major chords  I’m going to go into more depth about why this works in the next post but for right now – here’s a quick tip that gives a whole other dimension to using these chords.

.

Every chord presented here also works over the relative minor (i.e. F# minor chord).

.

Try taking this chord:

.

and after you play it add an F# by tapping a fret hand finger on the 2nd fret F# on the low E string for a very hip F# min 9 extension.

.

F# min 9 add 13 no 11

.

Hopefully this has given you some new chordal ideas!!  You may want to go back to the first post and apply this idea by playing through all of the voicings covered there and adding the F# as a root.

In addition to explaining this approach more in-depth, in part 3 of these posts I’m going to explore a number of ways to use these ideas in your soloing.

Thanks for reading!!  Please feel free to post any questions you might have.

-SC

Getting Hipness From A Major Triad Or More Chord Recycling Part 1

When I was at Berklee, one thing that took a while for me to really get my ear around was upper chord tones (7ths, 9ths, 11ths and 13ths).  Growing  up listening to a great deal of rock music – basic triads sounded “right” to me.   I learned a lot of esoteric chord voicings to try to expand on those forms – but my ear wasn’t ready for it and so I had no real motivation to develop it at the time.

As I mentioned in the getting through the gig and the recycling chords posts, simple triadic forms can be manipulated in a way that allows players to get more complex harmonic textures in real-time.  Additionally, these approaches can be adapted to lead playing as well.  This short series of posts are going to go deeper into adapting one specific chord voicing.  As a starting point I’ll use the major triad.

The following examples are based around a 5th position A major chord played on the D, G, B, and E strings.


The reason I’m using this specific voicing is to allow the open A string to ring while playing the chord to help reinforce the root.  Here’s the basic rhythm of the chordal examples:

While notated this way for simplicity, all the examples are played with a slight arpeggiation to help accent the different notes.

.

Here’s an mp3 of an A Major Triad.

 .

Rooting around for extra tones:

The first way to generate some additional substitutions for a simple major chord  is to lower the root chromatically.

While there is a root on both the D and the high E string, for now these examples will focus on manipulating the root on the high E string.

Lowering the root of a major triad a 1/2 step (1 fret) produces a Major 7th chord:

(This can be used in place of any A major triad)

A Major 7 Chord

 .

Here’s an mp3 of this A Major 7 chord.

.

Lowering the root of a major triad a step (2 frets) produces a Dominant 7th chord:

(This can sometimes be used in place of an A major triad

Example: When the A acts as a V chord in a chord progression (A -> D becomes A7–>D))

A7 Chord

.

Here’s an mp3 of this A 7 chord.

.

Note:

While dominant 7th chords contain a major triad in them – they are their own unique animal.  A future post will go into generating dominant chords – in depth – but this voicing is presented here as part of the process of generating chords by altering the root.

.

Lowering the root of a major triad a step  and a 1/2 (3 frets) produces a Major 6th chord:

(Typically this can be used in place of any A major triad)

A Major 6 - Watch the 1st finger stretch - if it hurts - stop Immediately!!

.

Here’s an mp3 of this A Major 6th chord.

.

Another Note:

There are certainly easier ways to generate this chord – but any chord form with  a 1/2 or whole step between notes on the B and E strings will require some limber hands.  Again, this voicing is not the only possible voicing of this chord but instead is just one possibility.

.

6th chord/13th chord Tip:

Frequently, I’m asked about the difference between a 6th chord and a 13th chord.  Since the note is the same for both the 6th and the 13th, the terms are sometimes used interchangably – but the difference is based around whether the chord has a 7th in it.  In the example above, the F# acts as a 6th, because no 7th is present in the chord.  If a seventh was in the chord, the F# would be viewed as a 13th.

.

The #4/#11:

One hip tone to use in a Major based chord is the #4 (or #11).  This is generated by flatting the 5th a 1/2 step (1 fret).

A Major add #4

.

Here’s an mp3 of this A Major add #4 chord.

I like voicings like this where the top voices (C#, D# and E in this case) are all close voiced (i.e. in the same octave). The technique of combining these close voiced ideas with open strings is a favorite approach of mine.

This idea can be expanded on by flatting the root as well.

This produces an A major 7 add #11 (no 5th) chord (A favorite substitution of mine for a major chord).

A Maj 7 # 11 no 5th

.

Here’s an mp3 of this chord.

.

Shortcut:

If you flat the top two notes of a major barre chord with the fifth and root on the B and high E string – you get a pretty hip major chord substitution.  This works in any key.

In part 2 of this series, I’ll look at sharping the 5th and the root to generate more chord voicings, combining both approaches and extrapolating lead ideas from these approaches as well.

Thanks for reading!!

-SC

Getting Through The Gig – Negotiating A Chord Chart Part 3

I took the wrong weekend to sleep in!  Guitar Squid distributed a link to part one of the post and by the time I got to check my stats for the weekend I had already missed my record keeping days.

However, you got here – welcome.

In the previous posts (part 1 and part 2), I talked about deciphering chord symbols and developing shortcuts for playing them.  In this post I’m going to talk about my approach and  how I ended up reading the chart.

.

One final time – here’s the 232 chart with upper extension triads written in:

.

Full Triadic Substitutions / Shortcuts

Here’s an mp3 of the track.  This was recorded with an FnH Ultrasonic recorded directly into AU Lab with PodFarm 2.0 @ 44.1.  The goal was an ambient wash of sound but in retrospect, I should have gone with a longer delay time/wetter reverb to hold the sustain.

Here’s the PodFarm Patch:

Here’s Bar 1 of the chart:

232 Measure 1

Notes:

  • Simple is better.  I usually start with 3-4 note voicings and then add from there on subsequent passes.
  • I chose the F minor chord in the first position to make the C in the chart the top note of the voicing (and thus accent the melody) – this kept my initial focus on voicings primarily on the D, G and B strings.
  • I added the bass note on the E and A strings so I could get a little more of the chord texture.
  • On the B minor 11 chord, I made some alterations on the fly.  To get the melody note on top of the voicing I doubled the 11 (E on the 5th fret).  Technically this isn’t a minor 11 chord as there’s no 3rd – but in this case Chris was playing the full voicing anyway, so I’m just adding texture.  Depending on what the bass was doing on the second pass I would probably add the 3rd of the chord (D) on the 5th fret of the A string.
  • The 3rd and 4th chords follow a similar pattern so I used the same voicing.
  • I decided to drop down to 1st position for the last chord to get some low-end emphasis.  I’d probably add some harp harmonics as well.
  • The same voicings and approach are used in Bar 2.

.

Bar 2

232 Measure 2

Bars 3-4


232 Measures 3-4

Notes:

  • A 9 (sus4) – This went to g,b and e strings to facilitate the melody note.  With the kind of ambient swell sounds that I used – muting the strings with the pick hand between chord changes becomes important to maintain smooth delay.
  • Bb Maj 9 – Here I was actually thinking Dm 7/Bb.  So I’m just using the top notes of the voicing.
  • E min 9 – This is a stock A string minor 9 voicing I use.  I have a couple of these for E and A strings I throw in when I need to.
  • F#9 (sus 4) – E maj/F# voicing based off of a VII position E barre chord.
  • G maj 9  – I was thinking B min but then added the A on the 10th fret for the melody and the G on the A string for the root.
  • C#min 9 – I moved the melody up an octave on the last 3 chords to amp up the arrangement.  Stock E string rooted voicing.  Sometimes I’d play the B on the D string and sometimes not.
  • D Maj 9 – Variation on the C#min9 shape – 2 useful voicings to have at your disposal.
  • E9 sus 4 – Just kept the D Maj 9 voicing, added the F# on the top string and played the low octave E.  I addition to filling out the chord the voicing puts me in a good spot space wise if we decide to repeat bars 1-4.

.

This has been a long series of instruction for a pretty simple chord chart, but the purpose of it was to detail the process behind those short cuts.  It might seem long and involved – but it gets easier over time.  In reality – the voicings took about a minute to suss out.

.

I hope this helps!  Please feel free to reply here or send an email to guitar.blueprint@gmail.com with any other questions you might have about this.

-SC