
Welcome to the fifth installment of the GuitArcitecture Mode Visualization lesson series.
If you see anything unfamiliar here, you may want to check out:
.
- part 3b or
- part 4 of the series.
.
About The Modal Exchange Example
Since describing how interchanging modes work doesn’t really get you any closer to hearing how they work – I’m going to present a simple exercise first and then explain the process of what’s going on theoretically in the post following this one.
.
Using one pattern to get all the sounds of the major scale modes:
.
As I’ve discussed before the modes of the C major scale are all related. Each individual mode has a different root but all belong to the same parent scale.
.

.
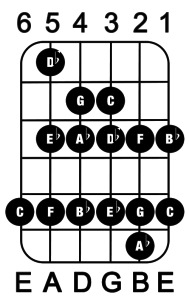
That being said, if I use any C major pattern (like this one with C played with the first finger on the 8th fret of the low E string):
.

C Ionian
.
and move the note C to different scale degrees – I’ll have all of the parallel modes (or modes have the same root notes – but belong to different parent scales) based on the pitch C.
.
So if, for example, I take the same pattern and move C to the 2nd scale degree (with C played with the second finger on the 8th fret of the low E string) I’ll have C Dorian.
.

C Dorian
.
Moving it to the 3rd scale degree (with C played with the 4th finger on the 8th fret of the low E string) produces C Phrygian.
.
 .
.
On the 4th scale degree (with C played with the first finger on the 3rd fret of the A string) – I’ll have C Lydian.
.

C Lydian
.
The 5th scale degree (with C played with the second finger on the 3rd fret of the A string) – produces C Mixolydian.
.

C Mixolydian
.
On the 6th scale degree (with C played with the fourth finger on the 15th fret of the A string) – I’ll have C Aeolian.
.

C Aeolian
.
And finally, if I move it to the 7th scale degree (with C played with the first finger on the 10th fret of the D string) – I’ll have C Locrian.
.

C Locrian
.
Taking stock of the exchange:
.
Now I’ll show a musical example that uses this one shape to play all of the parent major scale/natural minor scale modes.
.
Note:
This is not the most efficient way to get around the fingerboard but it can help with 3 things.
- Hearing the difference in how modes sound
- Seeing the modes as they relate to parent scale and
- Gaining fluidity in getting around the fretboard.
.
What you’ll need
.
- You’ll need a time keeping device (like a metronome, or a drum loop) and
- A drone of the note C (You can create this by looping the pitch C in your DAW or just recording a note C)
.
The drone is very important because the drone and the combination of notes will be what helps you hear the change in modes (and tonality).
.
Playing the Example
.
I’ve created a simple one bar phrase for each mode.
All you have to do is play them over the C drone, in the order I’ve listed below and in time.
.
That being said, here are some additional things to keep in mind:
.
- The primary goal of this is not physical technique – but developing your ear. Playing through it at slower tempos will probably be more beneficial to you in really being able to hear the transitions.
.
Note:
If you really want to get something more out of it – try singing along with the pitches as you’re playing them. This sounds goofy to most people but singing really is the way to get the sounds into your ear.
.
Take this as a piece of advice learned by many people who take four terms of ear training at the collegiate level. If you look at those 4 terms as 3 units each that’s 12 units or a full term load (at most for-profit colleges at $18-19,000 a term).
.
In other words, people spend a lot of money to sing things to train their ear, doing it for free on your own is a good idea.
.
- Focus on the 3 T’s in performance (Tone, Timing and hand Tension). From a technical standpoint, the goal is to play though the whole cycle without stopping.
- Get the patterns and the timing under your fingers first – and then worry about making music out of it. The important thing here is connecting the sound with the pattern visualization. (I’ve tabbed all the examples as well – but try to be aware of the change in key signatures in each bar).
.
First, here are the individual measures.
..

C Lydian

C Ionian
.

C Mixolydian
.

C Dorian
.

C Aeolian
.

C Phrygian
.

C Locrian Option 1
.
If you want to keep a low register pattern – you can try starting the Db Major pattern from the 7th putting 4 notes on the low E string).
.

C Locrian Option 2
.
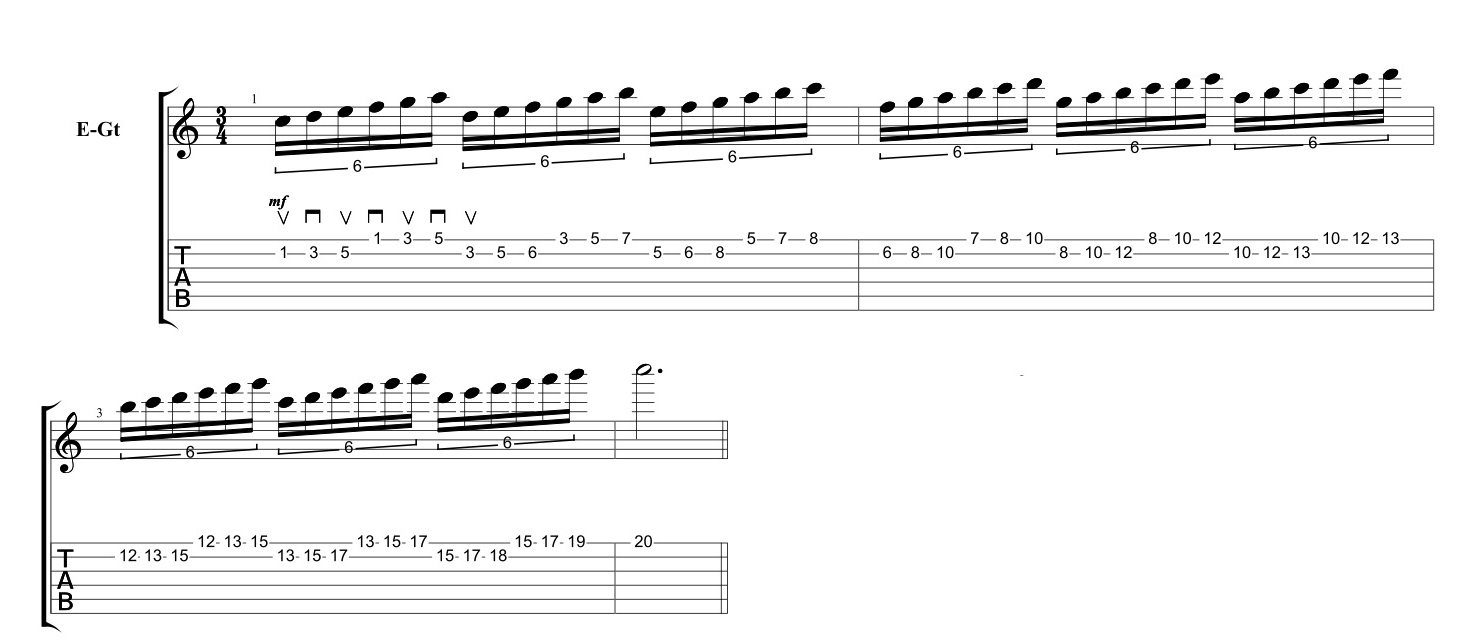
and here’s the whole thing:
(Just click to see full size)
.

 .
.
Going Further
.
- Once you can get through the example at various tempos cleanly and really hear the transitions, take a short phrase and try moving it through the different modes. It will be easier initially if you think about scale degrees. Here – I’m thinking 5-4-5-6-7-2-1.
- Also: try playing it swung in double time (ala Jazz 001)
.

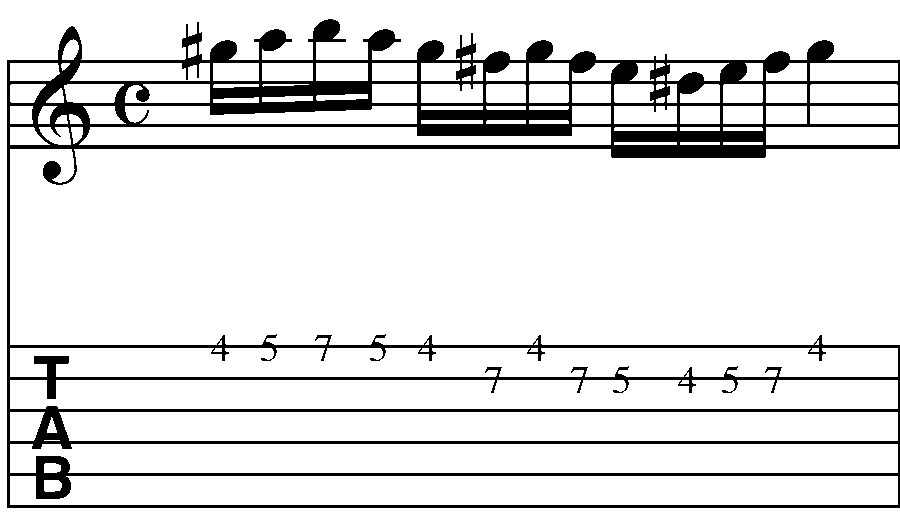
C Lydian Lick
.
.
Note: The scale degrees stay the same when I move to C Ionian but the F# becomes F natural.
.

C Ionian Lick
.
The same phrase changes the B to Bb when moved to C Mixolydian:
.

C Mixolydian
.
The lack of an Eb in the phrase means that the notes are the same between Mixolydian and Dorian in this case – just played in different position.
.

.
Moving it to Aeolian, the A natural becomes Ab.
.

C Aeolian Lick
.
The D becomes Db in C Phrygian.
.

C Phrygian Lick
.
And finally, changes the G to Gb for C Locrian:
.

C Locrian Lick
.
From the light to the Dark.:
I’ll be talking about how I derived the order I’m using for the mode progression in the next lesson post on the circle of 5ths, the tonal circle of 5ths and talk about how these relate to modal interchange. For now here’s a shortcut to consider until next time.
.
In general the more flats a mode has in its scale formula – the darker its sound.
.
 .
.
Note:
This is a tricky area for intermediate students. While I use a parent scale approach to visualize how I solo over chords, I am aware of the chord tones (and tensions) and tend to focus on those melodically.
When soloing, Just running up and down a scale isn’t going to help you really nail changes – it’s just going to fill space that often doesn’t need filling sonically.
.
For beginning or intermediate players new to this – like I said before, for now just worry about associating the modes, fingerings and sounds.
.
I’ll be talking about each of the modes in-depth in future posts, but for now understand that each mode of Major, Melodic Minor or Harmonic Minor has its own unique characteristics that are worth exploring.
.
As before, just go through the lesson at your own pace and return to it as you need to and please feel free to post any questions you might have (or pm me at guitar.blueprint@gmail.com).
.
I hope this helps and as always, thanks for reading!
.
-SC
.
P.S. If you like this post – you may also like:


