Thanks for coming to this page but it’s moved!
You can find it now on Guitagrip.com.
Thanks for dropping by. I hope to see you at guit-a-grip!

Thanks for coming to this page but it’s moved!
You can find it now on Guitagrip.com.
Thanks for dropping by. I hope to see you at guit-a-grip!
I’ve been fortunate in that I’ve had the opportunity to play a lot of different styles of music in a number of bands. In terms of gig referrals, this has pluses and minuses. In the plus category, when someone needs Frisell-ish textural guitar on one tune, post-tonal shred on another and fretless on a third – I’m on a short list of players that people call. On the minus side, for generic guitar needs (“We need a (rock, jazz, blues, etc) guy for this track”, other people who specialize in that type of vibe will often get the call.
If you have a stylized sound you’ll get calls for some gigs, but to keep working, you’ll also need a generic enough skill set that you can cover other things if you have to.
Each band I’ve played in has had different challenges to approaching material, but there are two general points of emphasis I’ve come across. The situations all call for quality, but depending on the quantity, quality may be a very relative term.
How To Learn 110 Songs In 6 Days
Years ago, I had a gig opportunity open up for me when I was living in Boston. A friend of mine on faculty at Berklee gave me a call to see if I wanted to take over what we in Boston called a GB (General Business) gig.
GB gigs are typically weddings, corporate gigs or something similar. The emphasis on these gigs isn’t to make a big spectacle. Your job is to provide some background entertainment and stay out of the way of the function as much as possible.
The gig pay wasn’t great but there was a challenge that I couldn’t pass up. I’d have to learn five one-hour sets of music (110 songs) in a week. The songs were mostly covers (60’s to top 40 in scope), and while I had heard most of them, I didn’t know any of them. There were also at least six originals that I needed to learn as well.
I’ve always liked challenges so I said, “Sure! Let’s see how it goes.” I got through the gig and ended up making money playing with the band for the better part of a year. So here’s what I learned.
I started with a plan of getting down 20-30 songs a day (depending on how long it took to learn them.) The gig itself was only 4 hours, but I wanted to at least have gone through all the tunes in case people called them out.
(i.e “song x” –
G (This indicated the key)
unison intro (just a reminder)
3rd chorus solo.
The point was to just have enough notes to jog my memory about the tune. Unfamiliar tunes had some more detailed notes like chord progressions written in (like a verse or a chorus).
As general advice, what this really speaks to is the depth of which you know (or need to know) something. I saw the movie Rock Band again recently and there’s a funny scene early on in the film where Mark Wahlburg’s character stops a band rehearsal over a small discrepancy in a performance and I laughed because I’ve been in situations where rehearsals stopped because I threw a fret hand slide in somewhere or where days were lost because I was required to match tones exactly. I’ll save that story for another time…
In the meantime – thanks for reading.
-SC
Before I drag this article kicking and screaming down the bloody cobblestones of memory lane, I’ll mention that the kick off for this post was a recent effort to stabilize my laptop rig.
.
A couple of months ago I found out that the 4 gig chip that my laptop would support had come down in price. This would allow me to max out my elder laptop at 6 gigs instead of the current 4. I surmised that had to improve performance overall.
After saving up some cash – I ordered the chip from OWC. It came very quickly and installation was a snap. I turned on the laptop and seeing the memory say 6GB – was thrilled for about a ½ hour.
.
At that point, the laptop screen did a big wipe down and I got an error message of death – you need to shut off your laptop, which I did. It powered back up and 10 minutes later did the same thing. I took out the memory and added the old memory back and everything worked fine. I contacted OWC – they had me try a few things, and then sent me an RMA so I could send it back for free. The promptly sent me another chip.
.
I got that chip in the mail on Monday. I installed it in my laptop and everything was fine. I ran it all day and there were no issues. I got it home and was streaming a video while I was working out and sure enough about an hour in the laptop screen did a big wipe down and I got an error message of death – you need to shut off your laptop, which I did. This time however, when I turned off the laptop, I felt underneath it – I had the laptop elevated to get it some air to help cool it down, but even so – it was still hot enough that you could fry an egg on it. I set the laptop on its side to cool it down and once the back was cool to the touch – maybe a couple of minutes later – started it up and it’s been working fine ever since. I think it was the combination of the poor airflow and table lamps I have to increase the lighting. I’ll have to go to staples now and get one of those self cooling USB fan jobs and hope it doesn’t mess with the audio signal. But it was an important reminder about the precarious nature of laptops as signal processors. The reason I was trying this in advance was because at the next gig I have, I don’t want the laptop to shut down mid song and leave me stranded.
All of this got me rethinking the laptop vs hardware debate that I partially discussed here but is worth a broader examination.
.
The obligatory history lesson to stave off initial pointed questions of, “Do you even know what that stuff is supposed to sound like?”
As with many of the things I do, my entry into laptop guitar was completely unplanned, but in retrospect not that surprising.
When I first started playing guitar, the amp I had was a no frills, no name combo amp with a 12” speaker. Given my influences at the time (Hendrix, Sabbath, Ozzy, etc.), it’s no surprise that almost immediately I started looking for distortion. Then every dollar I could put together was going for other effects: wahs…chorus….delays… anything I could get my hand on to try to replicate those sounds.
When I was playing in the Committee of Public Safety (my avant-garde core French Revolution fixated band with voice, guitar, bass, cello and drums) – my signal chain was really small. I had a Marshall JCM800 50 watt combo amp with a single 12 (this was run through a 4×12 Marshall 1960A cab). I had a channel switcher for the amp, a volume pedal and a TC Distortion/Boost pedal. The committee lead tone was the TC preamp before the Marshall distortion channel – and it was a creamy tone. I want to say there was some kind of cheap delay in there as well (maybe an Arion), and from what I remember that was it.
The Marshall got stolen from a rehearsal space in Allston while I was trying to resurrect mach 2 of the Committee. The stolen amp was my cue from the universe that it was time to move onto another project. In the meantime, something interesting started happening. The more I got into pedals, the more I started getting into sounds that didn’t sound like the tones I was initially trying to emulate. Soon the more a pedal disguised the fact that I was playing a guitar, the more I wanted that pedal.
At the time, I was working at a music store and an Ampeg guitar amp came in, and I got it for a super low price. I started picking up some EH pedals at the time as well (including a really sweet 1st generation Russian Big Muff Pi), and I found an old tube echoplex. I remember playing a gig and the sound man took a look at my pedals and said, “Wow – this would be a state of the art rig in like ’72.” It was meant as a dig, but I took it as a compliment. The rig had character, the tones were right there and it sounded as guitaristic (or non guitaristic) as I wanted it to. That amp eventually gave way to amps by Seymour Duncan and Gibson before settling on a 4×10 Hot Rod DeVille (really a pretty great sounding amp with some mods by Tom at AzTech Electronics).
In between a lot of other pedals and effects crossed my path. This included a 1st generation Jam Man (with additional memory slotted in which really turned my head around) and eventually sold, a Rhythm and Sound (also sold), various distortions wahs and other filters. By the time I was playing in Visible Inc (and later in The Bentmen/Tubtime/One Of Us) – my full rig was a tuner, Ernie Ball Volume Pedal, Digitech Space Station, T.C. Electronics Chorus, Memory Man Delay (original), Guyatone MD-2 delay, Akai Headrush looper, Vox Wah and another Ernie Ball volume pedal that went into the front end of a Fender Hot Rod Deville (4×10 amp). The full rig sat in an 88 key keyboard flight case that would not fit width wise across my car seats.
During all of this, I was constantly investigating different digital options. I had the original zoom effect that I used for quite a while, and when the line 6 came out – I remember getting a used 2.0 bean and just being blown away at the flexibility of it. Even later – my B-rig (and the one I used primarily with Annette Farrington) was the pod bean with a line 6 pedal board, the looper, wah and volume pedal. (Later in a cover band – it was only the Pod 2.0 in front of the amp). And that rig sounded pretty damn good in front of my amp. Even the band’s sound guy went from dismissive to begrudging concession. It really didn’t sound AS good as the full board – it sounded different – but it worked and it was a hell of a lot less stuff to bring than a huge pedal board.
This is all mentioned because about a month before I left Boston to go to CalArts, my rig was stolen out of an uninsured rehearsal space. The only thing I had taken home with me was the space station and the Akai Headrush – the amp and all the rest of the pedals were gone. The band hadn’t been rehearsing for a while so I had no idea anything was missing until a month later. By then there wasn’t much of anything to do – but leave Boston and start what would now be my acoustic studies at CalArts.
My first year at CalArts, my wife got me a Pod XT for a Christmas gift – and that was my ticket back on the crazy train of gear. But back when I was rocking a G3 ibook – I remember thinking that someday I’d be able to get guitar tones from a laptop. The day would come that I’d be able to bring a guitar and a laptop and leave all those pedals behind. And now I can say – that day is partially here.
Computer guitar tones are the best they’ve ever been, but there are a number of issues big and small that I think need to be acknowledged.
1. Laptops do not sound like tube amps. They just don’t. Even running a laptop with a Marshall patch through a tube amp – doesn’t sound like a Marshall. Having said that, it doesn’t sound bad. In fact, it sounds pretty damn good. What laptops have all over traditional amps and pedals is flexibility and portability. Knowing that I can bring a laptop and a guitar and (if the venue has a PA) get through a live show makes touring a LOT easier for me.
2. Pedals don’t often break – but when they do – they can be bypassed and the amp still used. The downside is that when the laptop goes down – you’re done. I’ve never ever had a hardware POD breakdown at a show (other than one time when the venue lost stage power and ALL the amps (and PA) lost power. I have had laptop programs crash mid set and it’s very nerve-wracking in a live context in the best situations. In the worst situation – the show’s over.
Laptops are fragile and pedals are built for durability. I don’t have to worry a well-built pedal getting ruined at a show (unless someone pours their beer on it) – but any one of a number of things could be the end of my laptop.
3. The technological barrier to true emulation will be cracked. The news of the new Thunderbolt protocol in mac books is stunning to me. 12x faster than firewire 800? At a certain point the algorithms will be improved enough, the data transfer rate and processing power will be so high – that you will no longer be able to tell if something was recorded on tape or not. You will no longer be able to tell if that’s a real tube amp you’re playing through. It isn’t a question of if it will happen – only when – and honestly I think we’re only about 5-10 years away at the most.
4. Emulation allows for sounds not feasible in the real world. Do I want to get an idea of what running a guitar through 6 tube echoplexes sounds like? Digitally? No Problem. In the real world – you’d have to first find 6 working tube echoplex units – and the hiss would be unusable, trust me on that one.
If you’re planning on using a laptop live – here are some suggestions I have for you
1. Optimize it.
2. Back it up.
The first time you lose all your data – you will know how important this is. I’m especially bad at this as well and only back up once a week or so. A hard drive is a very delicate thing. If you knew you easily it lost information, you would lose sleep at night.
3. Make Multiple patches and back them up as well.
Patches take up almost no drive space. I probably have 40-50 different AU Lab settings. The reason for this is that AU LAB remembers all of the patch parameters as you save them. So if, for example, you finally optimize your work flow and settings and accidentally close the mixer window and save it when you close out – that window is gone when you reopen it – and there isn’t a way to recall it. What that leaves is no way to change parameters, levels etc. In other words – you start from scratch. I do this with POD FARM patches as well (multiple variants of tones so if I can call up parameters at will), SooperLooper, Apogee Maestro and FBV preferences as well. Hugely helpful in sessions – believe me.
3. Related to #2 and 3 – organize your folders and label them logically.
In working on my book, you would be amazed at the amount of time lost digging through folders with vague titles looking for old graphics. All my patches are in one place and backed up to a flash drive.
4. To the extent you can – run real world tests before going live.
If the stage has hot lights on it, it’s going to be doubly warm for your laptop – will it operate correctly in a live context. In a related note, record yourself when you’re playing and check levels etc. As I’ve said before, there’s a substantial difference in sounds that work when your practicing with headphones, sounds that work at low volumes and concert level sounds. The more prepared you are, the easier it will be to keep it all together.
5. Keep it compact
Typically in live performance you won’t have an hour to set stuff up. 5-10 minutes is optimal. To the extent that you can, try to pre-cable all of your connections. Don’t assume that the venue will have clean, continual power. I have a surge protector built into my strip – it’s not ideal but it’s better than nothing.
6. Go with the highest resolution your system will handle.
SooperLooper freaks out when I run anything higher than 44.1k – so if I’m looping – everything runs 44.1. If I’m not looping everything runs 88.2, or 96k. The clean sounds have more definition and the dirty sounds are a whole different ball game at 88.2 vs 44.1. Again, this is where having multiple AU patches comes in handy.
7. Be flexible.
Have a backup plan when things go wrong. In a worse case scenario where the laptop completely fails – I can go directly into the amp and get a signal. There won’t be any effects, but at least I don’t have to stop playing while it gets sussed out.
8. Be calm.
This took a while for me to get my head around. The problem with getting freaked out – is that it just exacerbates the situation as typically it leads to bad decisions which leads to more freaking out. The more you can calmly assess what’s going wrong, the more quickly you’ll be able to solve the problem.
9. Bring Extras.
I bring a trouble shooting pack to every gig it consists of:
10. Bring your A game.
Stage presence is a difficult thing to bring to a laptop performance, but to the extent that you can – show that you’re engaged (or at least don’t look bored/frightened) and come out from your laptop once in a while. If it’s engaging for the audience, it’s going to make the performance go easier for you as well.
Thanks for reading!
-SC
For those of you who use SooperLooper – it looks like Jesse snuck a new release under the radar back in January that I’m just catching now.
The only release note is that the AU unit is now more stable under various hosts, for those of you with AU validation issues – this might help out a lot.
For those of you who have a Mac and aren’t using SooperLooper – now’s the time to get on board. SooperLooper is a shareware application that uses a lot of the functionality of the Oberheim/Gibson echoplex looping unit. It’s leagues above the looper that you get with Mainstage and could be all you need to do a 1 person show.
(If you do start using it – you should definitely send a couple of bucks Jesse’s way for all the hard work he’s done on it.)
-SC
6 for the price of 5
While pentatonics are a great melodic and harmonic device, slipping some extra notes into the scale can add some additional spice to the approach. The most common way to do this is through the method used in the blues scale – which is a pentatonic minor scale with an added note (in the case of the blues scale – a tritone).
The impetus for posting on this was a post my friend Moby Pomerance put up regarding some elements of this very topic. Originally I had devised an alternate (i.e. approximate) fingering for his idea – but ultimately I put a few twists and turns in it and came up with one lick that’s really three mini licks rolled into one.
First – The Scale
Here’s a “box” position D pentatonic minor scale as a starting point:

What I’m going to do is add in a 9th (e) for an additional flavor

If I put this in a 2 note per string pattern using the D on the D string 12th fret as a starting point, I get this fingering ascending and descending. (Use alternate picking with this lick.)

While there’s nothing wrong with fingering it this way, I like dividing it into 3 string groupings. The 2-note-per-string approach with alternate picking is more aggressive – but the dividing the notes per string into grouping of 3-1-3 on the g-high e strings is a little more legato makes it easier for me to sequence sections. So here is the same idea but moved to the 7th/8th position.

Pay careful attention to the picking pattern and the 4th finger. The slide is indicated here to accent the pinky movement. While it’s picked in this example, it could also be played with only the first pick attack.
The lick
This idea is presented below in a larger lick that works over a d minor/d min7/d min9 chord. Here’s an mp3 I recorded with the FNH Guitar in AU Lab- first played slow (1/2 time) then faster (full speed – tempo is around 200).
** Note – the mp3 player on the site seems to be working better in Safari – but if you have trouble playing it – just refresh the page.


Notes:

Lastly, examining the notes in this scale: D,E, F, G, A, C as unique triads reveals the following:
D, F, A (d minor) + C, E, G (c major)
in other words – to get away from the full-scale approach – you could alternate D minor and C major arpeggios and get a very similar effect. I’ll look at this more in a future lesson.
In the meantime, if this idea is interesting to you – you may also want to look at this GuitArchitecture lesson post, or look at the pdfs of the pentatonic posts in the online lesson (PDFs) tab on the top of the page.
I’m always looking for feedback. If there’s anything in this lesson that helps, or that raises other questions – feel free to drop me a line at guitar.blueprint@gmail.com.
Thanks for reading!
-SC
.
While inertia is a term that refers to Newton’s 1st law of motion, I’ve always thought about inertia outside of the realm of physics and applied it psychologically. I’ve taken some liberties with Newton’s definition, “Every body remains in a state of rest or uniform motion (constant velocity) unless it is acted upon by an external unbalanced force” and tried to view it as a factor in personal development/motivation.
I saw the new A&E show, Heavy last week and it was a blunt reminder of just how powerful inertia is in our lives.
.
Bodies at rest tend to stay at rest.
In watching the subjects of Heavy try to transform their bodies, I was immediately struck with how difficult it can be to get something moving. As one person was exhausted and covered in sweat just walking to the gym, the personal trainer commented that, “He’s at 600 lbs. That’s like a normal person trying to walk to the gym with a refrigerator strapped to their back.”
When I thought about that for a moment, I realized that if I had a fridge strapped to my back, it would only take a couple of steps before every synapse in my body said, “Forget this. This is dumb. Just sit down.” The fact that these people worked through that to get to their short-term goal, speaks both to how difficult it can be to work through inertia, and also to how we have the ability to break out of cycles in our heads.
.
The flip side of inertia is that bodies in motion tend to stay in motion
So while putting something in action can be hard, maintaining it is a lot easier than stopping it and trying to start it up again. If you build positive habits it becomes easier to maintain them over time. I’m not saying that it goes on auto pilot. If you don’t like practicing scales and have built up a new practice regimen involving playing scales – you might have days you skip. The important things are
1. that when you’re doing it – you’re really doing it
2. if you fall of the wagon make sure to get back on
.
Falling off the wagon is easy, but getting back on isn’t a big deal if you’ve done it before.
I remember taking with an alcoholic who fell off the wagon in the middle of a multi-day binge and he talked about falling off the wagon like it was a high-speed train. It’s an issue of perception – if you view a habit or an action as something you have to amp yourself up to do – it’s going to make it more difficult to instill.
If you view the wagon as something that you’re either on or off –it’s going to put a lot of additional pressure (and difficulty) for you to get back on.
.
Going with the flow
If you’ve ever tried to walk up a really powerful stream, you know that it’s a lot easier to follow the current than it is to fight it. In terms of productivity – it’s important to know your flow. If you know what works for you and what you’re likely to do it’s easier to work things in around that.
I’ve often found that the biggest learning curve that I’ve had in maximizing productivity has been in learning what works for me. For example, by nature I’m not a very disciplined person and I find that if I leave myself to my unorganized devices I don’t often get much done.
.
Coordinates or knowing where you are
Having said that – I do tend to be an organized person. So in being organized, I find that keeping a calendar (and a practice log) help keep me focused and in focusing helps keep me disciplined.
While I keep and maintain my calendar, every time I put it aside and say – “I don’t need that – I know what I’m doing” – a week goes by and I find that I may have only gotten a fraction of the things done that I wanted to.
In keeping a weekly calendar I see not only where I’ve been but also what I’ve been doing. If I don’t get to my short-term goals, it simply means I’ve fallen off the wagon and have to get back on. The more time’s I get back on – the less likely I am to fall off.
Because I know my behavioral tendencies, I can go with the flow of those tendencies rather than fighting against them. If you’re not a morning person, getting up at 5 am to the gym is going to be an uphill battle. If you tend to be focused mid day – working out on your lunch break might work better for you. In being organized I find that keeping a calendar (and a practice log) helps keep me focused, disciplined and getting things done.
.
Sometimes the last one standing is the winner
All of this works off of the concept of short and long-term goals. There are times in life that you’ll have to hustle a breakneck 50-yard dash, but life itself is a marathon.
I don’t know how many of you have ever seen Another State Of Mind (a really great get in the van with the band style documentary featuring a then largely unknown Social Distortion).
Social Distortion was on Conan last night, and while I was watching it I thought about all of the critical accolades they’ve received since Another State of Mind and wondered if Mike Ness ever imagined that he would go from spray painting the band logo on a T-shirt to still being around 26 years later.
As a guitar culture, we’ve always put emphasis on the hot-shot guitar player. You can go on You Tube and see any one of ten thousand people playing their fast licks, and most of them will be posting videos of their snowboarding jumps 2 years from now while their guitar sits unplayed and gains dust.
Social Distortion has achieved the success they have largely by being the last one standing. Largely by being around and playing so long, they simply couldn’t be ignored anymore. I also suspect that over time they started amassing a better team (management, lawyers, agents, etc) that helped amplify that process. But they never would have attracted that team if they broke up for good in the 80’s or 90’s.
I’d known about my fret hand fly-away pinky issues for years, but it wasn’t until I studied with Miroslav Tadic and Jack Sanders , that I realized how much it was holding me back. Unlearning my habits and fixing that has been a really arduous 4-year process but I can say that my playing is already in a different place than it was 2 years ago – much less before I studied with Miro. If I just stuck with the old habits I had, I never would have been able to move forward – but in taking a huge step back in my playing – I’m able to move forward now.
.
Thinking isn’t Knowing
The difference is I thought I knew what I was doing was right, but it wasn’t until I experienced how wrong it was, that I knew it would have to be fixed. While I tend to conceptualize (or think) things very quickly, but it takes a long time for me to know something. That’s my flow, and while it would have been great to fix my playing at the get-go, that wasn’t going to happen until I really knew what was wrong and what to do. To know something is to experience it – and experience takes time.
If you have a plan of where you ultimately want to go (and have some flexibility in getting there) you are well on your way. In the meantime, it’s important to know what works for you and establish practices that work with your nature instead of against it.
I hope this helps! Thanks for reading.
-SC
..
Improv lessons from a cooking contest show
If you’ve ever watched a cooking competition show – you’ve probably seen some real world improvisation.
.
The Challenge
How is this not improvisation? You have a skill set that you need to employ to navigate a series of changes that may or may not be unfamiliar to you.
So how do they get through it?
.
The Approach
.
What the unsuccessful chefs have taught me, is that an approach that works for one thing may not work for everything. “Oh I want to wow the judges, I’d better use Truffle oil.” which may or may not work in an ice cream. I heard an mp3 of Eddie Van Halen jamming w. Holdsworth once and it was grim – because he was just doing the Eddie thing over Holdsworth’s comping and it didn’t work at all. It sounded like the bleed through of two guys in adjoining practice rooms working on something different at the same time.
When you’re in some kind of timed artificial event (i.e. they’re forced to improvise) – this approach makes sense. When dealing with something unfamiliar you go with what you know. You pull out the well-worn licks that have worked their way into your vocabulary. That’s also when you find out just how well you know something.
It’s not just about learning licks to play over ii-v->I’s – improvisation is a mindset as well – if you look for it in sources outside of music – you will find things to adapt and bring into your musical improvisations. It brings something different to the table than someone who’s learned every Coltrane and Bird lick and nothing else.
.
And now as an example of what not to do: A drinking game
I don’t drink – but if you do and you’re looking for a drinking game here it goes.
.
You’ll probably be drunk in an hour. It is basically impossible to watch the Food network and not have someone talk about the merits of “Big Flavors” or on some dish’s flavor profile.
And what do these terms mean? Is there anyone out there trying to cook with small flavors? And “Flavor profile”? Really? How about just calling it “taste” instead?
The thing is, this jargon has been hijacked by foodies and now it’s difficult to watch anything regarding cooking and not hear those terms. My beef with jargon is that it should serve the function of simplifying a process through language and instead typically acts in an exclusionary manner.
.
Music and jargon
When I did my undergraduate degree I had to take several classes that dealt with post tonal theory. As a starting point, what does “post tonal theory” mean to anyone other than a composer or an improviser? Can you imagine seeing a CD cover with a label on it that says, “Now with Post tonal Theory!”? In terms of accessibility to the layman, it goes radically downhill from there. Where some of the music created with this mindset is vibrant and exciting, the language and jargon around it explains what’s going on only to those in the know. It makes no attempt to make inroads to the causal listener, and statistically there are way more music listeners than post tonal theorists.
Music is a language and like any language if you break away the accessibility of it, you doom it to oblivion. In the 1950’s people still actively studied Latin – it was even taught in high school until it was pushed further and further into the realms of academia (I know Chronicle of Higher Education – Academe is the new preferred jargon – but academe is a poor shell of a word), and now is only taught in a increasingly fewer places. It transitioned from a vibrant language to a patchwork of quoted phrases thrown out as part tricks.
The same thing happened to post tonal music. Inside the hallowed halls of academia, there is a compositional indoctrination that occurs; a self-congratulatory high-five for music that is performed in student recitals to crowds of 10. The theoretical language that is posted to describe these works often reads like a combination of a repair manual for a 1950s radio delivered with the melodramatic sincerity of an adolescent journal. Taken on its own merits, it reads as intellectually aloof and emotionally underdeveloped and seems to be defensive before anything has even been sounded.
If the first thing people are exposed to is inaccessible, why would they take the effort to go on? True, academia tends to support projects and approaches that reinforce the need for academia (i.e. peer reviewed journal entries that are so topic and jargon specific that only other academics will bother to read and understand (read: scrutinize) them); but this doesn’t help make the music more accessible. It brings up the question of,
.
Is it music if no one hears it?
Sure it can sit in a drawer or live on a cd. But if no one is listening to it being played is it music?
.
Music requires a performer and an audience.
Like any conversation it requires a speaker and a listener, and the magic is neither in the speaking or the listening – but in the communication itself. If there’s no listener, there’s no communication, and no music. This doesn’t mean that quantity equates with quality (it’s not a contest about how many listeners you have) iit’s about being inclusive rather than exclusive.
Just a thought…
Thanks for reading.
-SC
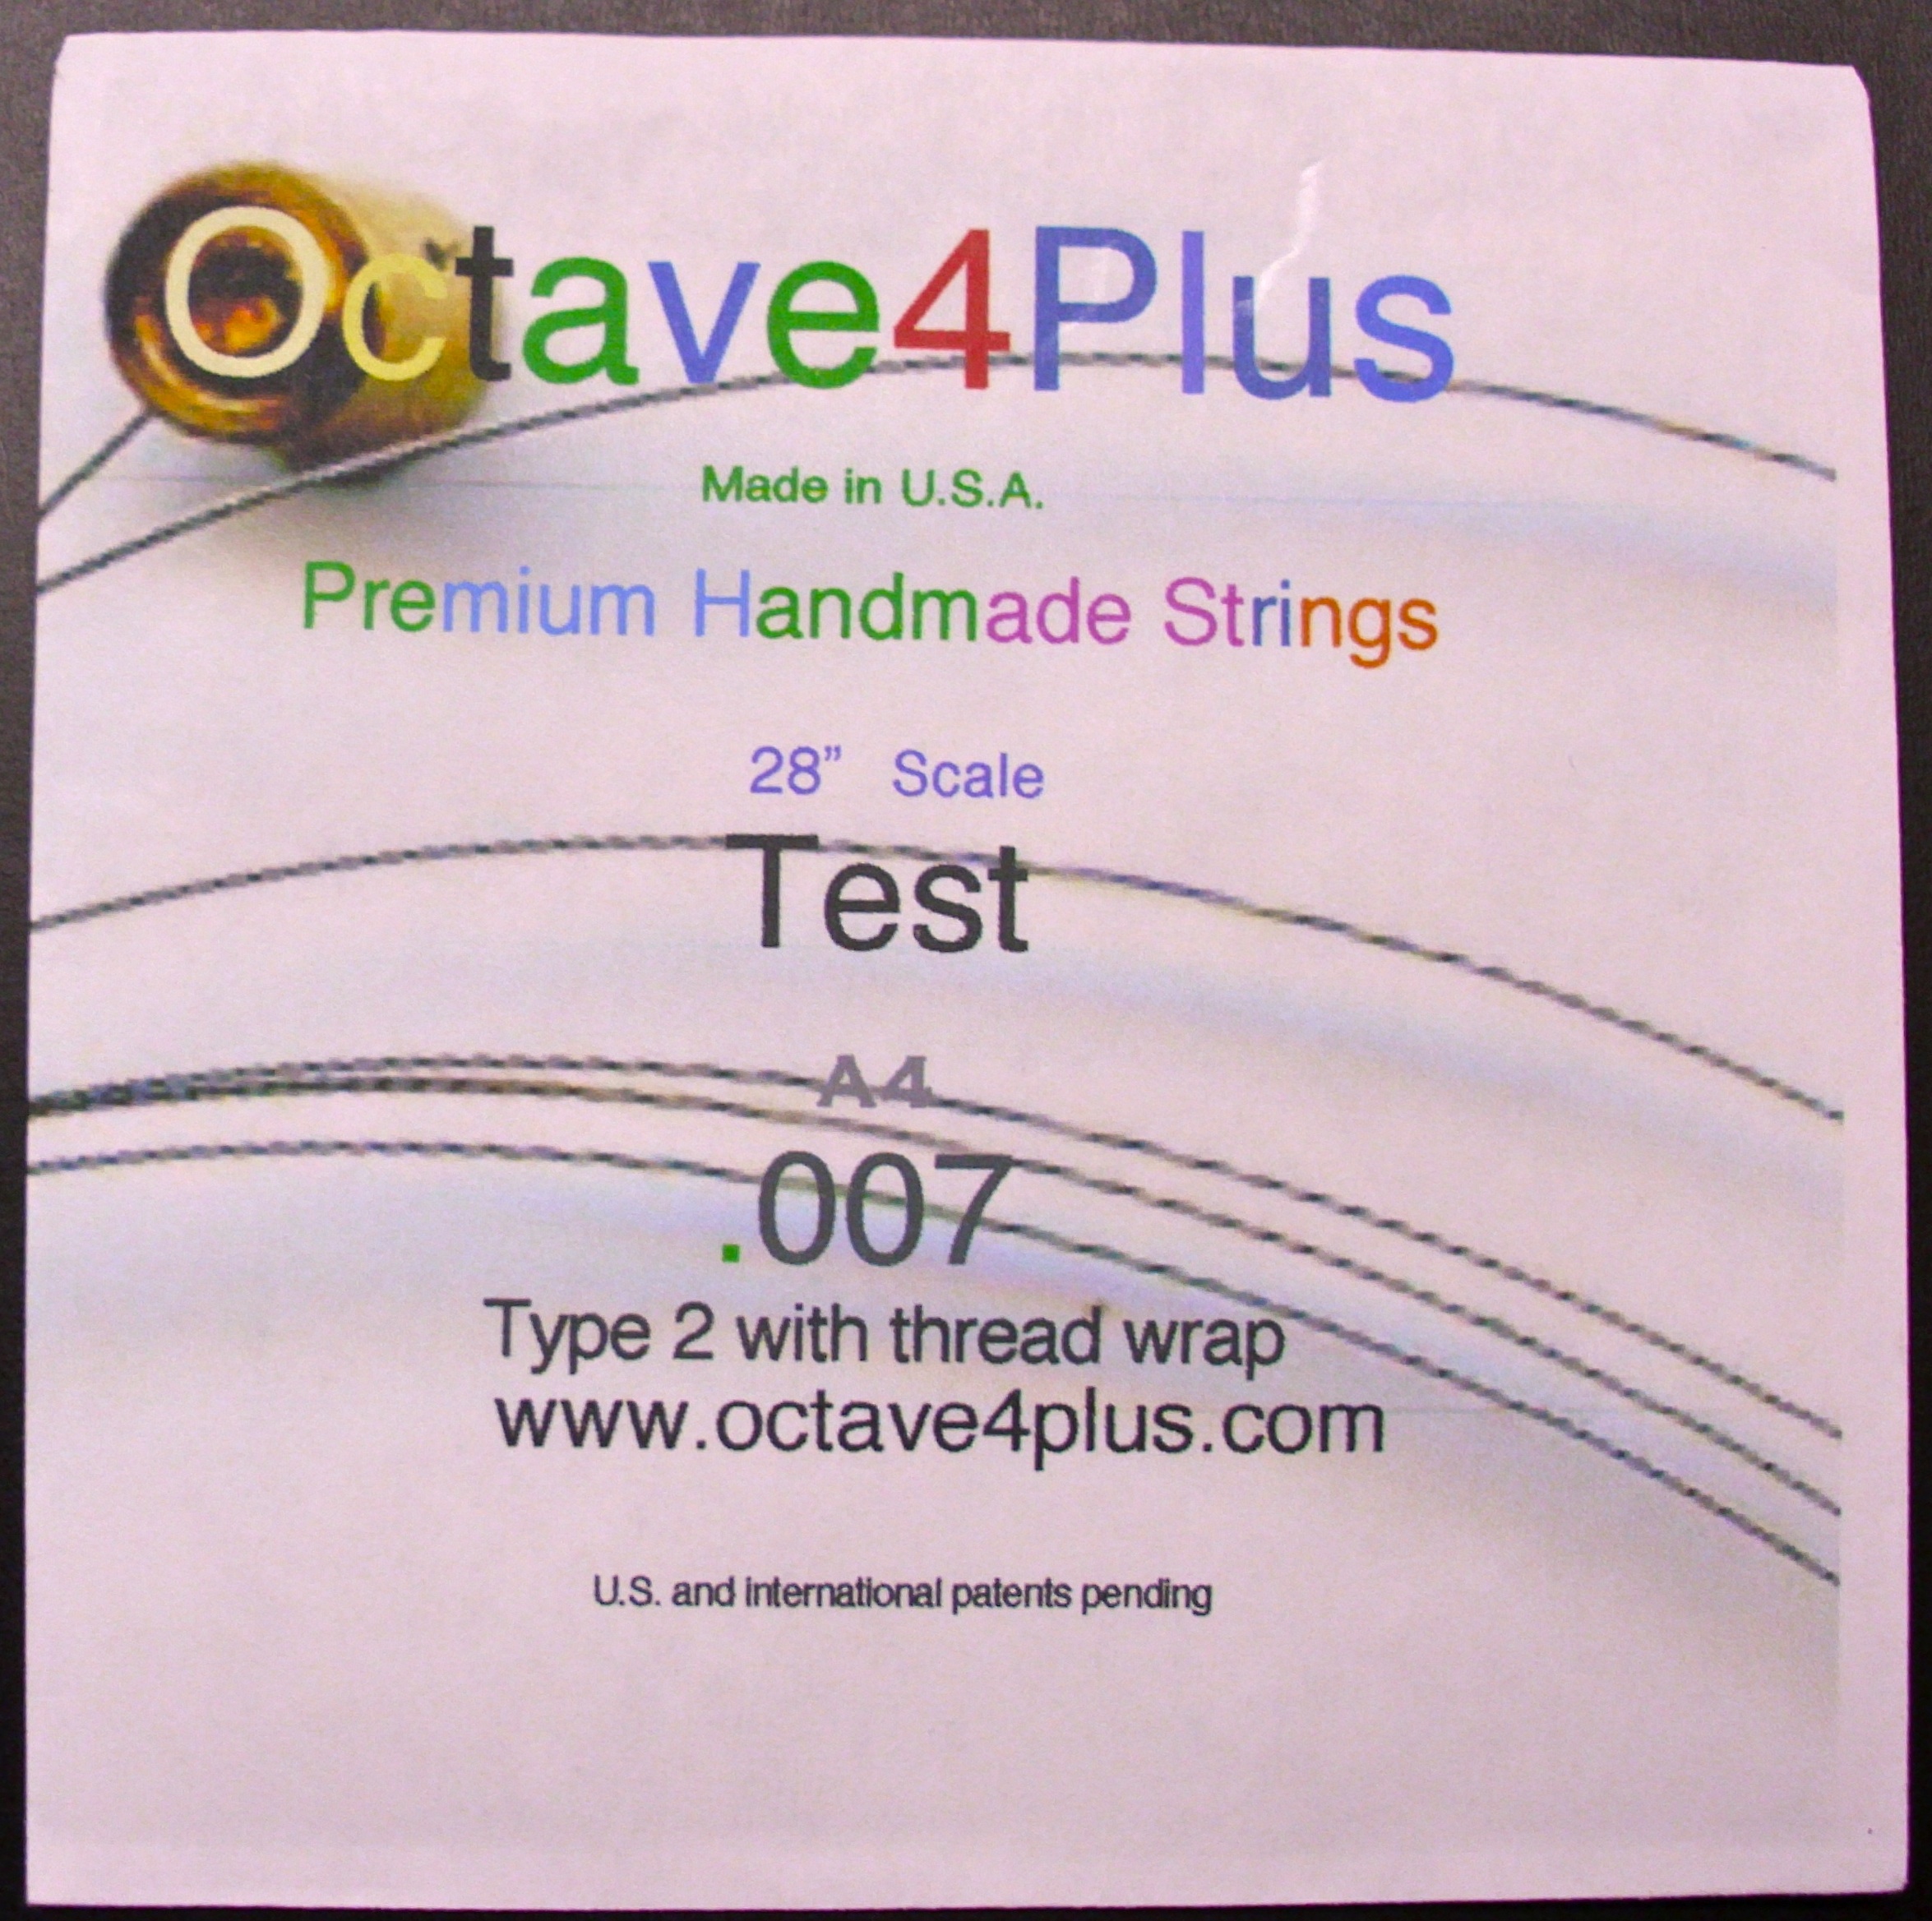
When I started playing 8 string (all 6 weeks ago or so) – I knew from the get go – that I was looking to have a full range instrument that went from a low B (below the 6th string E) and a high A (above the 1st string E). When I checked out the Marshall Harrison video, he mentioned that he was using a .005 for the A – which was a little too high for me – but I decided to investigate the Octave 4 Plus string brand he was using.
Octave4Plus – are handmade strings for extended range instruments (up to 40 inches!). Since there’s really no way to try before you buy – I figured I’d take the plunge and put an order in.
.
Ordering
When ordering individual strings, the minimum purchase number is 5 strings. Additionally, there is an online form you will need to complete which goes over some specifics of information needed to make your string (scale length of the instrument, whether the string is front or top loading in the bridge, etc.). There is a several day time limit that you need to complete the form in – or your money gets refunded. This might seem a little draconian, but given the small batches that the strings are made in – I imagine that hunting down people for information is a case of diminishing returns financially, so I understand it at least.
When I made my order, I got the strings with a “Type 2” thread wrap. While this is recommended for guitars with a string tree, I found that it’s also recommended if your guitar “… loads the string through the back, has a steep break angle, a sharp edge on the nut or tuner, or a string tree.”
The website does a good job of explaining a number of specific for string ordering – but as an FYI – if your scale length is 26.5” – you’ll need to order the 28” scale strings.
Payment is made on the website via PayPal and is a relatively painless process.
.
Pricing
Here is the pricing for the order I made:
“Guitar .007 plain steel ( 28” ) $4.75 each A440
5 strings @ $23.75
Type 2 strings – $10
Shipping and Handling – $10
Sales Tax $3.17
$46.92 (or about $8.20 a string including the test string [see below])
.
Shipping And Delivery
My order was put in on Thanksgiving day and came on Christmas eve. The time frame for delivery is somewhat vague on the website – but 4-8 weeks seem to be a reasonable time frame.
The package was shipped priority mail. The contents were well packaged and included a copy of the order form, photocopied directions for installation, and 6 individually sealed strings (5 strings and a test string which was a nice touch).
.
The Ball End
I’ve never used a handmade string before. I was particularly intrigued with the allen wrench nut that serves as a proprietary ball end.
Ball end close up

There are specific instructions for installation, but it’s a very clever design that works well.
.
String Installation
The installation instructions are clear and well written, but reading and doing are two very different things. Right off the bat – you will probably notice that getting the string through the bridge can be tricky as it’s sooo thin. (I can’t imagine trying this with a .005!)
While the Schecter Omen I installed this on didn’t have a string tree – I used the thread winding as an entry point for the string to go into the tuner, with the idea that it may help with any potential burrs.
In installing the string, the directions state that bringing the string up to pitch too quickly will result in the string breaking at the ball end.
Given the general instability inherent in attempting to get a string to stay at a pitch of high A over a 26.5” scale – this seems reasonable.
You should expect to spend 2-3 hours getting the string to pitch if you follow the directions verbatim.
Needless to say – this path isn’t for everyone. If you break one of these on stage mid set – you’re not going to be replacing it between songs. But this is a generality that applies to the circumstance – and is not specific to the Octave4plus string.
Since I started with a test string – I used the directions I outlined in my Omen review for bringing the string up to pitch – which worked fine – and took about 45 mins to an hour.
As a bonus tip: I also let it stay a ½ step below pitch overnight before playing it – and that seemed to help a lot with stability.
.
In Use
I didn’t have a lot of time to get into it as almost immediately I got a call from Mike Reagan to see if I could add some high adrenaline lead playing to an X-box track he was working on. I decided to bring the Omen and my FNH and see what happened.
While I don’t know about the material of the string, it definitely seemed more stable than the D’Addario .007s I was using. In bending I easily got ½ step bends with no issue. From the 12th fret on – I got whole step bends – which made me pretty nervous – but he was so excited by the pitches on the high A string that he wanted me to play a lot of bent melodies on that string. The string finally broke after about the hour mark and (having broken one of them in getting it to pitch) – I finished the session with the D’Addario.
.
Final thoughts
From an economic standpoint, it’s easy to balk as you could get 60 D’addario .007 strings from just strings for $42 with shipping. And if you don’t follow the instructions – those 6 strings are going to break pretty quickly.
If you’re playing something like an Agile – with an even longer scale length – this is pretty much the only game in town. But even on the 26.5” scale, I liked this string a lot. The construction quality is certainly there, and I really admire what they’re doing.
I’ve been pretty delicate with the D’Addario – so it hasn’t broken since the session – but when it does – I’ll give the Octave plus4 more of a chance than the few days it had before.
Thanks for reading!
In the previous recycling chords lesson, I looked at ways to reinterpret chords. Another way to create different sounds is to take something as basic (and familiar) as a triad and alter tones to create more complex chords.
Note: this process isn’t designed to replace the need to learn multiple chord voicings but instead to supplement it.
.
Starting with the Flats
For example, take a C major triad (C, E, G) and flat the 3rd, and it becomes a C minor triad.

This idea also can be applied to the root of the chord.
If the note C is flatted a ½ step (1 fret), the new note is B. This creates a C major 7th chord with no root.

Likewise, if the note C is flatted a 1 step (2 frets), the new note is Bb. This creates a C7 chord with no root.
 .
.
Moving to sharps
To add a 9th to the chord quality, raise the root a ½ step for a flat 9 (b9) (or a step for a natural 9).

.
This is a good place to make a couple of notes:
.
First: the voicings presented here are used to demonstrate the process, but I like some of them better in other registers. For example, here is the C add 9 voicing on the top 3 strings.

Second: one reason to explore voicings without roots is that, in an ensemble setting, the bassist often holds down the root of the chord. If you need the root – it’s easy enough to just add it in. Here is the same chord with a root:

The chord tone transformation chart
The following is a map of alterations to show how chord tones can be modified to create other sounds.
.
![]()
Taking the approach above, some general rules can be applied to a major triad.
.
The root of the chord can be lowered to the 7 or raised to the 9.
 .
.

.
The fifth of the chord can be lowered to the 11 or raised to the 13.

.
In this manner, a triad can be altered into almost any other functional chord.
Here’s an exercise that utilizes a D major triad to illustrate this idea:
.
| Note: D major is used instead of C major because each note of a 1st position D major chord can be lowered to another note on the fingerboard, without using open strings. In other words, each chord is a moveable voicing on the fingerboard. |
.
The first step of this exercise is to make sure you can visualize triads both horizontally and vertically across the fingerboard.
.
Horizontal (i.e. positional) visualization
Here’s a series of D major chord inversions in the 2nd position.

Here are the D major inversions in the 5th position

and in the 10th position.

If these voicings are unknown to you, start by familiarizing yourself with them before continuing to the rest of the lesson.
.
Vertical visualization
Note: the important thing with both the horizontal and vertical voicings is knowing where each chord tone is located in the voicing.
One way to practice this is to play through the chords and stop at random points and ask, “where is the root?” “where is the 3rd?” “where is the 5th ?” This has to be full internalized to be able to intelligently transform the chords, with the goal being instant chord tone identification.


As with the horizontal voicings, if these voicings are unknown to you, start by familiarizing yourself with them before continuing to the rest of the lesson.
.
Triad Transformation Exercise
Now that the preliminary steps have been taken, let’s begin the process.
First, here are a few chord formulas we’ll need:
Major: Root, 3rd, 5th – D, F#, A
Major 7th: Root, 3rd, 5th and 7th – D, F#, A, C#
Dominant 7th: Root, 3rd, 5th and flat 7th – D, F#, A, C
Minor: Root, flat 3rd, 5th – D, F, A, C
Major 7 flat 5: Root, flat 3rd, flat 5th and flat 7th- D, F, Ab, C
Now, let’s go through the exercise as individual steps to explain the process.
.
Step 1: Take a Major chord (in this case D)

Step 2: Make it a D Major 7 chord
[by flatting the root a 1/2 step (1 fret)]

Step 3: Make the chord a D dominant 7 (D7) chord
[by flatting the root 1 step (2 frets)]

Step 4: Make the chord a d minor 7 chord
[by flatting the 3rd of the D7 a 1/2 step (1 fret)]

Step 5: Make the chord a d minor 7b5 chord
[by flatting the 5th of the Dminor7 a 1/2 step (1 fret)]

You get the idea. Transform the chord into every possible voicing and repeat with every other inversion.
.
When less is more – A case for smaller voicings
When I started out playing, if a song called for a C major chord, I’d play something like this:

While there’s nothing wrong with six note voicings, context is everything. It took a while to realize that when playing in larger groups, smaller voicings sometimes helped propel the song and allowed for better voice leading.
For example: here’s the same C Major chord but with just 3 notes.

And here is the voicing in a I-iv-V7 (C-F-G7) progression with smooth voice leading.

If you’re playing solo guitar – this isn’t going to fill a lot of space sonically but it works well in an ensemble, and it’s easy to play. A win-win.
I hope this helps! In a future lesson I’ll go further into this concept and use it to create 9th, 11th and 13th chords. In the meantime, you’re free to download and distribute any of the lessons here but I maintain the copyright on the material.
I’m always looking for feedback on what people find useful and what they don’t, so if you have any questions or comments, feel free to e-mail me at guitar.blueprint@gmail.com .
Recently, I got a call to play on a forthcoming X-box title and the composer asked me to bring a couple of guitars for some uptempo rock solos. (Unfortunately, I can’t post any audio from the session – but when the game releases I’ll post a link to any trailers for it.)
The session seemed like the perfect time to bring out my Schecter Omen 8 – particularly since I recently got Seth Mayer to install a Bareknuckle Cold Sweat Pickup and a kill switch on it.
.

Bare Knuckle Pickups
For those of you who aren’t familiar with Bare Knuckle Pickups, they are one of the few companies that are making hand-wound (!!) passive 8 string pickups (in addition to their 6 and 7 string line).
When I was first looking into this – I sent an email to Tim Mills, to see what he recommended for someone needing a lot of tonal flexibility with a basswood body 8 string and he recommended the painkiller. After reading the forums and listening to a lot of samples – I found that Axe Palace had an 8 string cold sweat neck pickup in stock for $160 and I bit the bullet.
(BTW – I had a really good experience with the Axe Palace guys, so if you’re looking for a U.S. Dealer to purchase from – I’d recommend them.)
.
Cold Sweat Neck Close Up

The new Bare Knuckle website is excellent and absolutely full of useful information. For example here are some specs taken from the bare Knuckle Website. Each pick up now has this information posted so it’s really easy to compare and contrast different pickups and get a good idea about how they’re going to sound.

There are some mp3s on the Bare Knuckle Cold Sweat page – but having done some quick mp3s of the original schecter pickups, I thought I would post a couple of mp3s for comparison.
First, here is the Line 6 POD Farm patch I’m using for both clan and dirty sounds:

Here is a 4 octave B minor scale played with a clean tone ascending and descending using the neck (cold sweat), middle (Cold sweat and stock bridge) and Bridge (Schecter).
Here is a 4 octave B minor scale played with a dirty tone ascending and descending using the same pickup order as the clean tone.
Here are some clean chords played on the upper strings. While the pickup allows for a coil tap – I didn’t have have the push pull pot to have it wired for that – but I’m sure that allowing for a coil tap – would give clean sounds like this even more tonal variety.
Here is chunk style low end riff. The amp setting here is a little muddy to begin with – so you’ll notice that the Schecter actually cuts through pretty well.
And here is the same idea but with the tube screamer turned on. With the added gain – the Cold Sweat takes on more definition.
.
A quick sum up
This is a short review, because rather than regurgitate a lot of information that’s on their website – I’d recommend that you go straight to the source and get the full description.
For the xbox title – I ended up playing the FNH Ultrasonic and the Schecter in front of a Marshall 4×12 and for leads – the Cold Sweat made the Schecter just scream.
The fact that they’re hand wound – is insane to me – in the best way possible. It speaks volumes about the commitment to excellence that BNK has towards its products and tone. This isn’t the cheapest pickup that you’ll ever buy – but it blows an EMG out of the water and comes with a lifetime warranty. Buying a Omen and installing one of these in it – is still cheaper than a Damien Elite – and I think it’s a better sounding guitar. You owe it to yourself to check out what they’re doing.
