New Lesson PT II – Improv(e) and Applied Theory

Case Study

In Part I of this lesson,  I laid some ground work for the idea that improvisation can be utilized as a tool for practicing and composition.  You might want to read that post here.

In this lesson I’ll use a real world example to demonstrate how improvisation and applied theory led me to develop a lick.

Ganamurti Melankarta

I’ve written before about how theory can not only help you understand what you’re playing but can also expose you to new sounds you never considered before.

I was fortunate enough to have some studies with Aashish Khan at CalArts in Hindustani (Northern Indian) Music – the Carnatic (South Indian) has been of interest to me as well.  In South   I have a photocopy of L Shankar’s 1974 AWESOME Wesleyan dissertation, The Art of Violin Accompaniment in South Indian Classical Music (typically available through interlibrary loan – Reminder – SUPPORT YOUR LOCAL LIBRARY) but as that text is not accessible to some people I’d recommend fellow Berklee alumni Charlie Mariano’s An Introduction to South Indian Music as a really good source for making South Indian melodic material accessible to people who wish to adapt the music.

One Melakarta (this is an oversimplified definition but for discussion purposes here – a 7-note scale) I got exposed to was called Ganamurti

(scale formula: Root, b2, bb3, 4, 5, b6, 7)

or with A as a root:

A Bb Cb D E F G# A  (aka A Bb B D E F G# A).

I feel the best way to internalize new scale ideas is to write a new tune with them.  Here’s an excerpt of a new tune based on this idea I’m playing with KoriSoron.  You’ll be able to find it on our next EP.

What’s notated below is what I wrote for Farzad’s part on the A section of the tune.  I’m playing a counterpoint line and doubling some parts of the tune.

Ganamurti A section

So this gives you a basic idea of the melody and vibe of the tune.

Han(d) Solo

There are a few other sections of the piece and then some sections to solo over.  One of those sections has a repeating pattern like this.

Ganamurti Ost

Now this is the basic form.  There’s a lot of melodic variation and fills thrown in on the last beat so it’s not played robotically but you get the general gist of one of the ostinatos being soloed over.

So what I’m going to do now is walk you through the process of how I approach improvising over something like this and how I generated a new lick to add to my vocabulary.

To review the process from Part I of this lesson:

  • Improvise. (Create)
  • Record everything.
  • Listen back and find the new things that you improvised that you like. (Assess)
  • Learn (and when possible improve upon) the best ideas you came up with when improvising.

Here’s the ostinato.

Ganamurti Ost

Thought Process #1. 

I start negotiating the scale looking for melodic fragments to utilize.

I see D F G#

D F G#

aka D, F, Ab

D F Ab
which I recognize as a Diminished triad.

The scale also has a Cb (B) (This is going to be referred to as B from here on out for simplicity.)

D F Ab Cbb

Which makes it a Diminished 7th.

Thought Process #2:

This means I can play dimishished arpeggios over the ostinato.

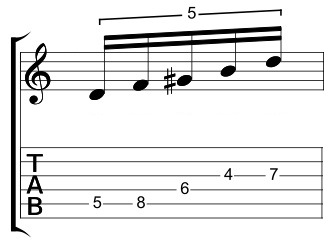
As diminished arpeggios are made up of all minor 3rd intervals, the notes repeat over the same string groups every three frets.  This is useful information because whatever I come up with melodically here:

D F Ab Cbb

Can be played at the 8th fret:

8th fret 4 note

And the 11th fret:

11th Fret 4 note revised

And so on to create a melodic sequence.

What’s your Position on That?

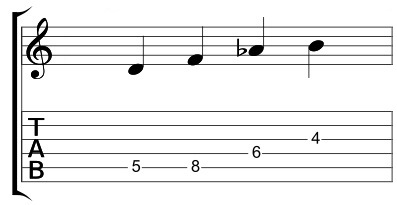
Before I look at developing a multi-positional lick I’m going to look at it in position.  Since the intervals are made up of all minor thirds – this arpeggio:

D F Ab Cbb

will have a D on the G string as well:

D Dim 7 to octave

Thought Process #3.

THIS is useful information because if I have an arpeggio that’s contained on three strings (in this case using 2 notes-per-string, 1 note per string and 2 notes-per-string which I think of as a 2-1-2 form) then I can take whatever I’m using as picking and fingering for that shape and (with slight modifications to the fingering) apply the same basic idea (more or less) positionally.
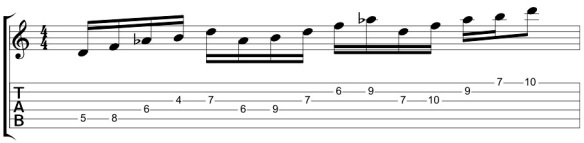
So this:

D Dim 7 to octave

Becomes this:

Positional Ab

And this:

Positional D

**Note on playing with patterns:  I find pattern playing to be extremely useful when improvising because it makes modifying those patterns (i.e. making music from them) in real time feasible.   Having said that playing this as quintuplets (i.e. 5 notes to the beat)

Diminished 7th quint

will give you a very robotic feel.  (This IS a really good way to practice getting quintuplets under your fingers but that’s another discussion).  With arpeggios like this I typically play them as 1/16th notes to alter up the feel a bit.

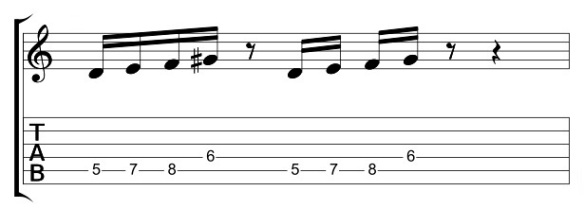
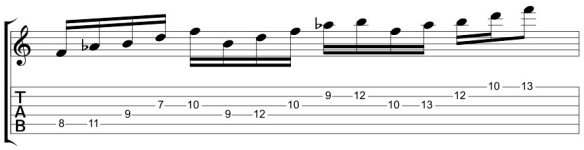
With all this in mind – here is the lick I improvised initially:

four four sixteenth first

It basically involved:

  • Seeing a diminished shape
  • Seeing it on three strings
  • Manipulating it in position

While I’ve detailed a lot of the thoughts out BEHIND the scenes here,  Once I saw the initial shape I arrived at this intuitively.

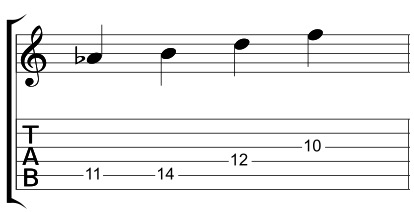
Then I just moved it up 3 frets:

four four positional sixteenth two

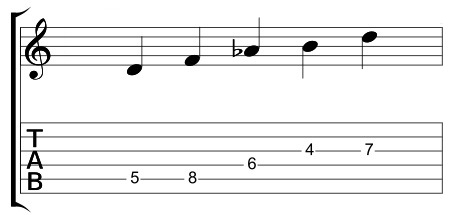
And three frets more:

11th Fret four four revised

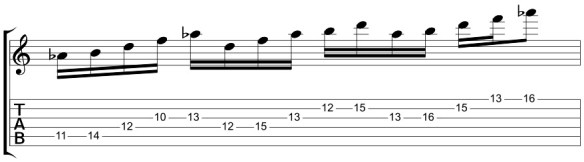
Once I saw the whole thing – I tied it together into this monstrosity:

Ganamurti Diminished lick full

News Flash!

We play this tune around 100-110 BPM on acoustic guitars.  What looks like a pristine metronomic moment of perfection in the example above was a train wreck when I first tried to pull it off.

In order to have it under my fingers (and at my disposal) when we play live I’m going to have to practice it and in Part III of this series, I’m going to show how I’ve been practicing this to get it up to tempo.  If you’ve ever felt like practice lessons are not fruitful for you or wondered if you’re doing it the right way – Next week’s lesson will be an awesome one for you!

A call to action:

As always – thanks for reading.  I hope that this helps!

I’d like to continue to keep the lesson content I put up here for free but, in addition to the amount of time it takes to generate lesson content this in depth, there are also expenses associated with putting any content online.

If you like this lesson, or the other material on the site, there are a number of ways you can contribute (and enrich your own quality of life) and help keep the information here free.

  • You can schedule a private lesson.  You can email me at guitar (dot) blueprint at gmail for information on skype or in-person lessons.

Any and all support is appreciated.  As always, thanks for reading!

-SC


An Update and Part 1 of a new lesson

One small step for man

I’ve been doing a LOT of research on pedagogy and rapid skill acquisition versus mastery in preparation for the new teaching project I’ve been developing.  It’s reinforced a lot of what I’ve learned through trial and (a great deal of) error, and it’s given me some new tools and insights for how to get people to learn new skills quickly and how to get people who want to go past competence to go past their current limits towards mastery.  The new project I’m working on is audacious and big and, to be candid, intimidating to try to develop, encapsulate and ship out to people, but it’s getting closer to being done!

In the meantime, it’s been a while since I wrote a lesson post.  Mostly, it’s because what takes 5-10 minutes to explain in person takes hours of work to explain to people in a way that you can learn from reading online.  With that in mind, I’m going to take a lesson regarding how to come up with your own licks and how to learn them efficiently and break it up into a multi-part lesson.  In this lesson, I’m going to give you an approach to generating new ideas and then in the next lesson, I’m going to take you through a practical application and show how I develop a new idea and get it under my fingers (and into my ear so I can have it at my disposal when I play).

Where do licks come from?

In my experience there are two primary ways to develop your lick vocabulary.

  • Learn licks from other people and make them your own.
  • Discover licks on your own.

Improvisation

There are several ways to discover your own licks but a the one I invest the most time in myself is improvisation.  When I’m really improvising (and not just sticking licks I already know into things I’m playing over), I always find some new angle or approach that I never expected.  But if you’re really in the moment, it’s impossible to keep of all those ideas afterwards using only memory.

Let’s talk about improvisation for a moment.  As even Derek Bailey couldn’t really encapsulate it over a hundred or so pages it’s not something that I’m going to be able to do here in a few sentences, but I’ll do my best to give you some thoughts on improvisation.  I’m going to use language as an example as we improvise when we speak every single day and generally do so quite naturally without a great deal of stress or worry.

Let’s say you’re going to give a speech.  You want the speech to be professionally delivered and polished so you write it in advance, edit and revise it endlessly and practice giving it over and over again so that when you go in front of a room full of people you can execute it in a perfect manner.  This is kind of  a classical music approach to having every performance be perfect.  It’s like working out a solo and playing the same solo every night over a song.  There’s nothing wrong with that, you may need to be that comfortable with the material to get up in front of an audience and speak.  But over time, you’ll probably find that it will be difficult to maintain the passion in performing the same material exactly the same way every time.

As an intermediate step, you might find yourself interjecting some new observations into the speech on the fly.  Perhaps someone asks for a clarifier about something you said and you need to come up with a more detailed explanation or an analogy.  Maybe a Q&A is added at the end of the speech.  It becomes a “thinking on your feet” moment.  Now you’re improvising a little.  Maybe you add little flourishes in a pre-written solo, or throw some licks in between a vocal melody if you’re playing guitar on something.

Now you know the speech (and the subject matter) thoroughly.  You don’t want it to be stale, so you have a series of talking points on an index card.  You know how you’re going to start the speech and how it’s going to end, but you just have a few bullet points on an index card to use as a launching point for talking about them in more depth.  This is how many people approach jazz/rock improvisation.  They know the material enough to be comfortable, they’re going to start with a lick or two – develop a few ideas and then target specific things to happen at certain points in the solo with an end in mind.

Then you have the next level.  You walk into an unannounced meeting and have to make an impromptu presentation on something. Now you’re REALLY improvising.

In my mind, improvising in any capacity involves some level of working without a net and limiting yourself to specific approaches.

For example: If I’m improvising on a tune I’m practicing –   I’ll pre determine things like:

  • I’m not going to play any licks I already know.
  • Perhaps I limit myself to a scale or hand full of tetra chords
  • I’m only going to solo on certain strings or solo in certain areas of the fret board.

Save it for the ages

One thing I recommend doing is dedicating at least one part of your practice session to developing new ideas and recording it in some way, shape or form.

In Korisoron, we have an inexpensive Tascam recorder that doubles as a live mixing desk that we use to record shows just so we can do pre-production for tracks we’re working on – but you don’t need anything fancy.  I picked up a ZOOM mini recorder used for well under $100 that just sits on my desk top for this exact thing (or when inspiration strikes) but an iPhone of android device would also work just fine.  Whatever you use – just make it something that is easy to access and works for you! 

Assess and Analyze

Now here’s the part a lot of people don’t want to do.  You gotta go back and listen to what you recorded and find the things you like.  Since you’re improvising a lot of these things won’t be pristine ideas, they might have mistakes or only be partially formed ideas.  The process here is two fold:

1.  Really assess where you’re at with your playing to determine what you need to work on.  If you find that your time is all over the place – that’s something to work on.  If you find yourself going back to the same rhythmic approaches for every phrase – that’s something to work on.  You want to be detached in this process.  This isn’t about beating yourself up over what you didn’t do well or giving yourself a pat on the back for something you did.  This is about coming up with an accurate assessment of where you are really at.  One way to detach yourself is to go into third-person mode and listen to the recordings as if someone else made them.   You don’t listen to it directly as a measure of what you did but as what happened musically.   One way to do this is to listen to the recordings a few days (or weeks) after you record them.  I’ve come back to recordings I did months ago and have no memory of any of the ideas that happened there.

2.  Find the diamonds in the rough and clean them up.  This is where the vocabulary part comes in.  For me, when I improvise my ideas and approaches are not often pristine.  So when listening back, I’ll take a little fragment of something I like and practice it and try to add it to my repertoire.  By practicing it – I mean:

  • Getting the lick under my fingers and being consistent in picking.
  • Working the lick in a variety of harmonic and rhythmic contexts.
  • Expanding the lick.  So if it’s an intervallic lick from a scale moving that interval up and down the scale to see what else it yields.

Get Swoll

Doing this consistently can not only add new ideas to your playing and writing (I can’t tell you how many of the things I improvised and recorded became songs at some point), but it can radically improve technical aspects of your playing.

To Review:

Here’s part one of the plan:

  • Improvise. (Create)
  • Record everything.
  • Listen back and find the new things that you improvised that you like. (Assess)
  • Learn (and when possible improve upon) the best ideas you came up with when improvising.

In Part II of this series, I’m going to use a specific example from my own practicing to show how I generate ideas by:

  • Creating.
  • Deconstructing.
  • Refining.
  • Executing.
  • Observing.
  • Correcting (and)
  • Executing Again.

You might want to write that down somewhere you can post it.  That’s an important key to getting things done.

As always, I hope this helps!  Thanks for reading.

-SC